How to Add an App to the Dock on a Mac
If you need to use a particular app on your Mac frequently, it’s easy to add it to your Dock. Once there, your favorite app is only one click away at any time.
[mai mult...]Soluții pentru problemele tale IT

If you need to use a particular app on your Mac frequently, it’s easy to add it to your Dock. Once there, your favorite app is only one click away at any time.
[mai mult...]Cum putem asculta un fisier mp3 cu HTA si VBScript
Pasul 1
Copiem urmatorul cod intr-un editor de text:
<html>
<head>
<title>Start and Stop music</title>
<SCRIPT Language=”VBScript”>
Sub PlayMusic(LOC)
Call DisableButton1()
Dim STRHTML
STRHTML = “<br>”
STRHTML = STRHTML & “<bgsound src=”& loc &” loop=””infinite””>”
MyMusic.InnerHTML = STRHTML
End Sub
‘******************************************
Sub DisableButton1()
button1.disabled = True
button2.disabled = False
End Sub
‘******************************************
Sub DisableButton2()
button2.disabled = True
button1.disabled = False
End Sub
‘******************************************
Sub StopMusic()
Call DisableButton2()
MyMusic.InnerHTML = “”
End Sub
‘******************************************
</SCRIPT>
</head>
<body>
<input type=”button” name=”button1″ value=”Start the Music” onclick=’PlayMusic(“E:\Users\Desktop\a.mp3″)’>
<input type=”button” name=”button2″ value=”Stop the Music” onclick=”StopMusic()”>
<span id =”MyMusic”></span>
</body>
</html>
Pasul 2
Modificam calea catre mp3 (E:\Users\Desktop\a.mp3)
Pasul 3
Salvam fisierul cu numele dorit si extensia .hta

Sa presupunem ca avem reteaua din topologia de mai jos:

Scopul este de a configura OSPF pe fiecare dintre Routerele din topologia de mai sus, astfel incat acestea sa faca schimb de informatii de rutare (retele) pentru a ne permite conectivitate end-to-end. Toate aceste Routere se vor afla in Aria 0.
[mai mult...]Actually many people apply group policies in Windows to enable/disable features and functionality. In future, they might want to remove those policies but resetting those policies will require lots of time as the user will need to find all active policies using Group Policy Editor and then reset them to “Not Configured” one by one. It’ll waste lots of time.
When a group policy is applied in Windows 10, users also get “Some settings are managed by your organization” warning message or banner showing at the top of pages in Settings app.
If you reset or remove all applied group policies using this tutorial, it’ll also help you in getting rid of that message.

Let’s start the tutorial.
When you apply group policies using Group Policy Editor (gpedit.msc), all policies are stored in following folders:
If you try to open these folders, you’ll get following files and folders:
To reset or remove all applied group policies, you just need to delete these 2 folders: GroupPolicy and GroupPolicyUsers.
PS: In some computers, you’ll get only GroupPolicy folder. That’s completely ok. If only one folder exists, then you need to delete only one folder.
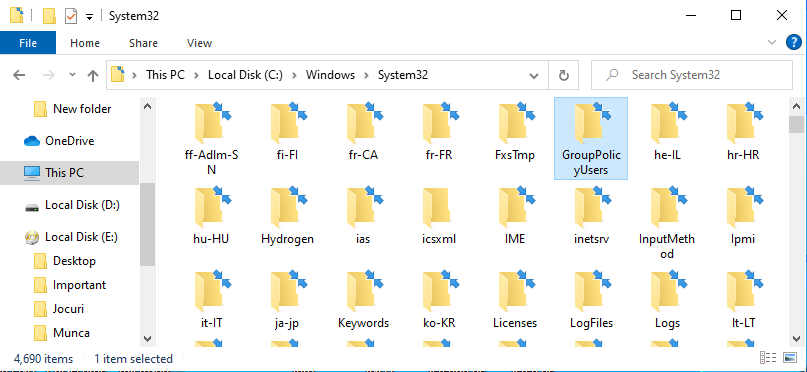
1. To delete the folders, open This PC (or My Computer, File Explorer) and go to C:\Windows\System32 folder.
Now look for GroupPolicy and GroupPolicyUsers folders present under System32 folder.
Once you find the folders, select them and press Delete key. Windows will ask for confirmation, click on Yes and Continue buttons.
That’s it. After deleting folders, you’ll need to forcefully apply group policy changes to Windows.
2. Open Command Prompt as Administrator.
Now run following command:
gpupdate /force

It’ll take a few seconds in processing and you’ll get “Computer Policy / User Policy update has completed successfully” message. That’s it. You have successfully removed all currently active group policies in your Windows device. You can also restart your computer system if required.
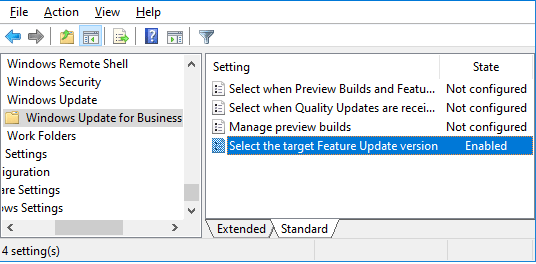
Now if you try to open Group Policy Editor (gpedit.msc), you’ll find that all group policies are set to Not Configured which means all applied policies have been removed successfully.
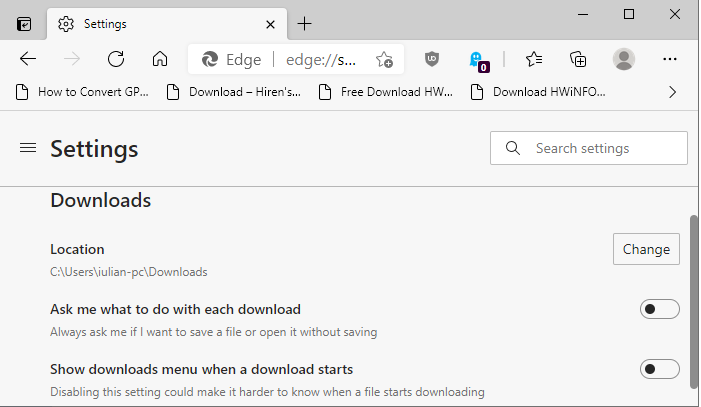
[mai mult...]The security and feature update for the organization’s Firefox web browser introduced a major change in the native PDF viewer of the browser. Up until now, JavaScript was ignored by Firefox when PDF documents were viewed in the browser. The execution displayed the JavaScript document in the browser but ignored any JavaScript code that it contained.
Mozilla enabled the execution of JavaScript in PDF documents in Firefox 88; this means that JavaScript code will be executed if it is present in a PDF file that is viewed in Firefox. There are legitimate reasons for supporting JavaScript in PDF documents, for instance to verify the input in form fields or to make changes to a document based on data when it is opened or when certain events happen.
Unfortunately, JavaScript in PDFs may also be used to execute malicious code. In other words: JavaScript is a security risk when it is executed in PDF documents. Most Firefox users may not need the feature, and it is a good idea to disable the execution of JavaScript in PDF documents in the browser to protect the system against JavaScript-based attacks.
Disable JavaScript execution in PDF documents
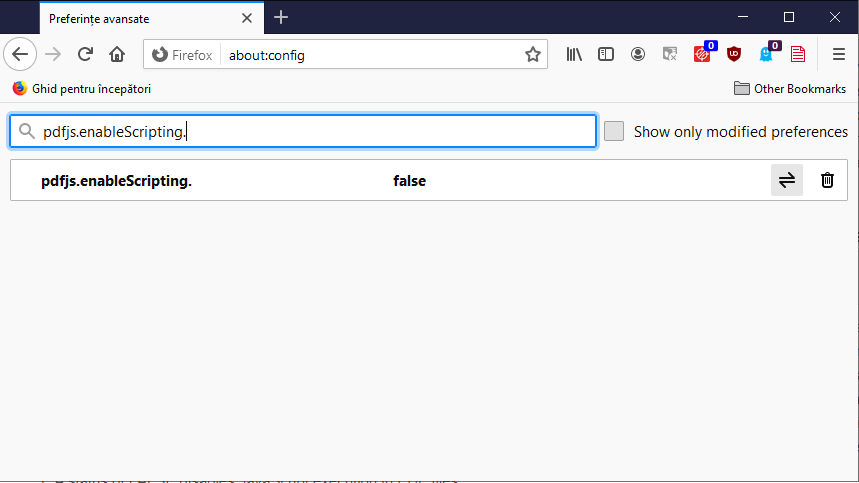
Firefox users may disable the execution of JavaScript by the browser’s native PDF viewer in the following way. Note that there is no option to turn it off in the main settings of the browser.
Firefox will ignore JavaScript in PDF documents if the preference is set to FALSE.
Testing
You can test the effect by loading PDF documents that include scripting from a site like PDF Scripting. Just download the sample PDF documents and check them in the native PDF viewer of Firefox to see if the execution is blocked.
[mai mult...]