
Soluții
How to avoid buying the wrong Mac
How to use Apple invites to Manage your Events
To create an event, you’ll need to download and install the Apple Invites app from the App Store. You also need an iCloud+ subscription to create a new event, although you don’t need one to respond to invitations.
- Open the app and click “Create Event
- Tap “Add Background” to create a background image for the invitation. You can select one of the available backgrounds, tap “Photos” to use one of your photos as the background, or tap “Camera” to take a photo to use as the background.
- If you have Apple Intelligence, you can also tap “Playground” to create an original image using Image Playground.
Once you’ve selected your background, tap “Event Title” and give your event a name. Select “Date and Time” to choose the date and starting time of the event. You can make events all-day and include an end time if you wish. Tap “Location” to add the location for the event; you can search for a location from Apple Maps. Invites will automatically add the weather for that location to the event.
You have the option to add a shared photo album to your event. This lets you and other invitees upload photos that are visible to everyone who receives the invite.
- Tap “Create Album” and grant the app access to your photos.
- Change the name of the shared album if you want and tap “Done
- Tap “Add Photos” and select the photos you want to add to the album.
- Tap “Post” to add the photos to the shared album. When invitees receive the invite, they’ll be able to add their own photos to the shared album if they want.
You can also set up a shared Apple Music playlist for your event. However, for invitees to be able to listen to the playlist in full, they’ll need to have their own Apple Music account, otherwise they can only listen to a preview of the playlist.
- In your invite, click “Add Playlist.” You’ll need to grant access to your Apple Music account.
- You can then select a pre-existing playlist or tap “New Playlist” and give your playlist a name to create a new one from scratch.
- You’ll need to set up an Apple Music profile if you choose “Add and Collaborate” or you create a new playlist.
If you don’t want to do this, you can add a pre-existing playlist, and select “Add Playlist Only” which will mean that other people can’t edit or reorder the songs.
Adding your Event to your Calendar
Bizarrely, considering how integrated the Invites app is with the Apple ecosystem, your event isn’t added to your calendar app by default. You can manually create a calendar event, however.
Once you’ve completed your invite, it’s time to send it out. There are two main options here; you can send out a link that anyone can use to view and respond to your invite, so invitees can share the link with others if they want. Alternatively, you can send a unique invite link to specific people, meaning that only those people you invite can respond.
If you’ve reached the point where you’ve previewed your invite, tap “Next.” If you’ve left it and come back to it, tap “Invite Guests.” To send out a public link that lets anyone with the link view your invite, you can share the link via Messages, Mail, using your iPhone’s sharing options, or by copying the link and sending it out however you want. Toggle “Approve Guests” on if you want to be able to choose who can attend from the people that respond.
Repeat for any other contacts you want to invite. If you want to send a one-off link to someone who isn’t in your contacts, tap “New Guest.” Enter their name and tap “Send Invitation.” You can then choose how to share the unique link.
Responding to an Invitation
You can send invitations to anyone, regardless of whether they have an Apple device or not. Having an iPhone with the Invites app installed does make the process a little quicker, however.
- On iPhone, when you open the invite link, you’ll be taken straight to the Invites app
- Click “Open Invitation” to see the details
- You can then select “Going,” “Not Going” or “Maybe” and add a note to your response if you want.
- Tap “Send Reply” and the creator of the event will be notified. The creator can see a full list of the RSVPs at any time by tapping the Guest List section of the event.
Limitations of using Apple Invites
If you’re an Apple user who already has an iCloud+ subscription for other reasons, then the Apple Invites app is a really easy way to create or respond to event invitations. If you don’t have iCloud+, you won’t be able to create events, which seems a little mean-spirited.
For Android users, the process isn’t quite as simple. You’ll need to verify your email to be able to see the event details and RSVP, and you’ll have to sign up for an Apple Account to view the shared photo album. If you don’t have an Apple Music subscription, you’ll only be able to hear a preview of the shared playlist, too.
[mai mult...]How to install Chrome browser
- Visit https://www.google.com/chrome/
- Click the Download Chrome button

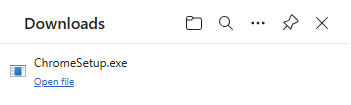
- If prompted, click Run or Save


4.If you choose Save, double-click the download to start installing
5.Start Chrome: Windows 7, 10, and 11: A Chrome window opens once everything is done. Windows 8 and 8.1: A welcome dialog appears. Click Next to select your default browser.
[mai mult...]