Soluții

Cum convertiți Hard Disk-ul sau o partiție în format NTFS în Windows 11/10

Computerul dumneavoastră cu Windows 11/10 a întâmpinat vreodată o problemă în timp ce încerca să selecteze o destinație pentru a salva copia de rezervă? Dacă da, este posibil ca problema să fi persistat din cauza unuia dintre următoarele motive:

  • Destinația este chiar unitatea de disc pe care încercați să faceți o copie de rezervă. Nu puteți efectua o copie de rezervă a unui disc pe el însuși. De exemplu, nu puteți face o copie de rezervă a conținutului unității D: pe unitatea D:.
  • Destinația nu este formatată ca New Technology File System (NTFS), File Allocation Table (FAT) sau Universal Disk Format (UDF). Copiile de rezervă pot fi salvate numai pe discuri care sunt formatate folosind unul dintre sistemele de mai sus.
  • Ultimul motiv este subiectul nostru de discuție, așa că, în cadrul postării, vom învăța cum să formatați sau să convertiți un hard disk sau o partiție în format NTFS.

Acum, cineva se poate întreba de ce ar trebui să convertească un hard disk sau o partiție în format NTFS. Ei bine, dacă nu știți, sistemul de fișiere NTFS oferă o performanță și o securitate mai bună pentru datele de pe hard disk-uri și partiții sau volume decât sistemul de fișiere FAT utilizat în vechea versiune de Windows.

Observatie!

Rețineți că, odată ce ați convertit o partiție în format NTFS, nu mai puteți să o schimbați cu ușurință în alt format. Vi se va cere să reformatați partiția, ceea ce șterge toate datele stocate pe acel disc.

O partiție formatată ca NTFS se referă la o secțiune a unui hard disk care a fost configurată folosind New Technology File System, un sistem de fișiere avansat care oferă performanțe ridicate și caracteristici suplimentare care nu sunt disponibile în alte sisteme de fișiere. NTFS este utilizat în mod obișnuit în sistemele de operare Windows pentru securitate sporită, compresie de fișiere și suport pentru medii de stocare de mari dimensiuni.

Dacă aveți o partiție care utilizează sistemul de fișiere anterior FAT16 sau FAT32, o puteți converti în NTFS utilizând comanda de conversie. Acest lucru nu va afecta în niciun fel datele de pe partiție.

Conversia hard disk-ului sau a partiției în format NTFS

În primul rând, dacă rulați vreun program care se află pe unitatea care urmează să fie convertită în format NTFS, este recomandat să închideți acel program pentru a putea continua.

Următorul pas este să deschideți Command Prompt ca administrator. Dacă vi se cere o parolă de administrator sau o confirmare, introduceți parola sau furnizați confirmarea, astfel încât procesul de conversie să nu fie întrerupt în niciun moment.

Odată deschisă fereastra promptului de comandă, tastați următoarea comandă și apăsați Enter:

convert drive (unitate la alegere)/fs:ntfs

De exemplu, pentru a converti unitatea E în format NTFS, tastați:

 convert E: /fs:ntfs. Acest lucru va converti unitatea E în format NTFS.

Dacă partiția pe care o convertiți conține fișiere de sistem, adică fișierele prezente în unitatea pe care este instalat sistemul de operare, cum ar fi unitatea C:, va trebui să reporniți calculatorul pentru ca conversia să se finalizeze cu succes.

În plus, dacă discul este plin, este posibil să primiți o eroare; prin urmare, cel mai bine este să ștergeți sau să eliminați fișierele nedorite sau cel puțin să faceți o copie de rezervă a acestora într-o locație adecvată, astfel încât să puteți elibera spațiu pe disc.

[mai mult...]

What is UEFI and how is it different from BIOS?

Way back in 2017, Intel announced plans to completely replace BIOS with UEFI on all their chipsets, and the industry quickly followed suit. The classic BIOS is now firmly a relic of the past. But what is UEFI, and how is it different from the BIOS we’re all familiar with?

What Do the BIOS and UEFI Do?

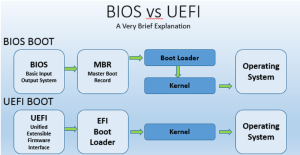
Both the Unified Extensible Firmware Interface (UEFI) and BIOS are low-level software that starts when you boot your PC before booting your operating system, but UEFI is a more modern solution, supporting larger hard drives, faster boot times, more security features, and—conveniently—graphics and mouse cursors.

We’ve seen newer PCs that ship with UEFI still refer to it as the “BIOS” to avoid confusing people who are used to a traditional PC BIOS. Even if your PC uses the term “BIOS”, modern PCs you buy today almost certainly ship with UEFI firmware instead of a BIOS. 4

What Is a BIOS?

BIOS is short for Basic Input-Output system. It’s low-level software that resides in a chip on your computer’s motherboard. The BIOS loads when your computer starts up, and the BIOS is responsible for waking up your computer’s hardware components, ensures they’re functioning properly, and then runs the bootloader that boots Windows or whatever other operating system you have installed.

You can configure various settings in the BIOS setup screen. Settings like your computer’s hardware configuration, system time, and boot order are located here. You can access this screen by pressing a specific key—different on different computers, but often Esc, F2, F10, or Delete—while the computer boots. When you save a setting, it’s saved to the memory on your motherboard itself. When you boot your computer, the BIOS will configure your PC with the saved settings.

The BIOS goes through a POST, or Power-On Self Test, before booting your operating system. It checks to ensure your hardware configuration is valid and working properly. If something is wrong, you’ll see an error message or hear a cryptic series of beep codes. You’ll have to look up what different sequences of beeps mean in the computer’s manual.

When your computer boots—and after the POST finishes—the BIOS looks for a Master Boot Record, or MBR, stored on the boot device and uses it to launch the bootloader.

You may also see the acronym CMOS, which stands for Complementary Metal-Oxide-Semiconductor. This refers to the battery-backed memory where the BIOS stores various settings on the motherboard. It’s actually not accurate anymore, since this method has been replaced with flash memory (also referred to as EEPROM) in contemporary systems.

Why the BIOS Is Outdated

The BIOS has been around for a long time, and hasn’t evolved much. Even MS-DOS PCs released in the 1980s had a BIOS!

Of course, the BIOS has evolved and improved over time. Some extensions were developed, including ACPI, the Advanced Configuration and Power Interface. This allows the BIOS to more easily configure devices and perform advanced power management functions, like sleep. But the BIOS hasn’t advanced and improved nearly as much as other PC technology has since the days of MS-DOS.

The traditional BIOS still has serious limitations. It can only boot from drives of 2.1 TB or less. 8 TB drives are now common, and a computer with a BIOS can’t boot from them. That limitation is due to the way the BIOS’s Master Boot Record system works.

The BIOS must run in 16-bit processor mode, and only has 1 MB of space to execute in. It has trouble initializing multiple hardware devices at once, which leads to a slower boot process when initializing all the hardware interfaces and devices on a modern PC. The BIOS has needed replacement for a long time. Intel started work on the Extensible Firmware Interface (EFI) specification back in 1998. Apple chose EFI when it switched to the Intel architecture on its Macs in 2006, but other PC manufacturers didn’t follow.

In 2007, Intel, AMD, Microsoft, and PC manufacturers agreed on a new Unified Extensible Firmware Interface (UEFI) specification. This is an industry-wide standard managed by the Unified Extended Firmware Interface Forum, and isn’t solely driven by Intel. UEFI support was introduced to Windows with Windows Vista Service Pack 1 and Windows 7. The vast majority of computers you can buy today now use UEFI rather than a traditional BIOS.

How UEFI Replaces and Improves on the BIOS

UEFI replaces the traditional BIOS on PCs. There’s no way to switch from BIOS to UEFI on an existing PC. You need to buy new hardware that supports and includes UEFI, as new computers do. Most UEFI implementations provide BIOS emulation so you can choose to install and boot old operating systems that expect a BIOS instead of UEFI, so they’re backwards compatible.

This new standard avoids the limitations of the BIOS. The UEFI firmware can boot from drives of 2.2TB or larger—in fact, the theoretical limit is 9.4 zettabytes. That is an appreciable percentage of all of the information on the Internet! That’s because UEFI uses the GPT partitioning scheme instead of MBR. It also boots in a more standardized way, launching EFI executables rather than running code from a drive’s master boot record.

UEFI can run in 32-bit or 64-bit mode and has more addressable address space than BIOS, which means your boot process is faster. It also means that UEFI setup screens can be slicker than BIOS settings screens, including graphics and mouse cursor support. However, this isn’t mandatory. Many PCs still ship with text-mode UEFI settings interfaces that look and work like an old BIOS setup screen.

UEFI is packed with other features. It supports Secure Boot, which means the operating system can be checked for validity to ensure no malware has tampered with the boot process. It can support networking features right in the UEFI firmware itself, which can aid in remote troubleshooting and configuration. With a traditional BIOS, you have to be sitting in front of a physical computer to configure it.

It’s not just a BIOS replacement, either. UEFI is essentially a tiny operating system that runs on top of the PC’s firmware, and it can do a lot more than a BIOS. It may be stored in flash memory on the motherboard, or it may be loaded from a hard drive or network share at boot.

Different PCs with UEFI will have different interfaces and features. It’s all up to your PC manufacturer, but the basics will be the same on each PC.

How to Access UEFI Settings on Modern PCs

If you’re a normal PC user, switching to a computer with UEFI won’t be a noticeable change. Your new computer will boot up and shut down faster than it would have with a BIOS, and you can use drives of 2.2 TB or more in size.

If you need to access low-level settings, there may be a slight difference. You may need to access the UEFI settings screen through the Windows boot options menu rather than pressing a key while your computer starts. With PCs now booting so quickly, PC manufacturers don’t want to slow down the boot process by waiting to see if you press a key. However, we’ve also seen PCs with UEFI that allow you to access the BIOS in the same way, by pressing a key during the boot-up process.

[mai mult...]

Logitech G Pro – review

Key Features:

1. Ambidextrous Design:

  • The G Pro features an ambidextrous design, making it suitable for both right and left-handed gamers. This versatility caters to a wide range of users, ensuring comfort and control for various grip styles.

2. HERO Sensor Technology:

  • Equipped with Logitech’s HERO (High-Efficiency Rated Optical) sensor, the G Pro offers exceptional accuracy and responsiveness with zero smoothing, acceleration, or filtering. The sensor supports sensitivity settings up to 16,000 DPI for precise control.

3. Lightweight Construction:

  • Weighing in at just 80 grams, the G Pro is designed with a lightweight build that enhances agility and reduces fatigue during extended gaming sessions. This feature is particularly appreciated by gamers who prioritize swift and precise movements.

4. Mechanical Button Tensioning System:

  • Logitech’s mechanical button tensioning system uses metal springs to provide a crisp and consistent click feel with reduced pre-travel and post-travel. This enhances the responsiveness of the primary buttons, critical for competitive gaming.

5. Customizable RGB Lighting:

  • The G Pro features customizable RGB lighting with Logitech’s LIGHTSYNC technology, allowing users to personalize the mouse’s aesthetics and sync lighting effects with other Logitech G devices for a cohesive gaming setup.

6. Onboard Memory:

  • With onboard memory, the G Pro allows users to save their customized settings directly to the mouse. This ensures that preferred configurations remain accessible across different devices without the need for software installation.

Pros:

  1. Highly Accurate HERO Sensor:
    • The HERO sensor technology delivers exceptional accuracy, making the G Pro a precise tool for competitive gaming. It eliminates common issues like acceleration and provides consistent performance.
  2. Versatile Ambidextrous Design:
    • The ambidextrous design caters to both right and left-handed users, offering a comfortable and ergonomic shape suitable for various grip styles.
  3. Lightweight for Swift Movements:
    • Weighing only 80 grams, the G Pro is well-suited for gamers who prioritize quick and precise movements. The lightweight construction contributes to reduced fatigue during extended gaming sessions.
  4. Durable Mechanical Button Tensioning:
    • The mechanical button tensioning system enhances the durability and responsiveness of the primary buttons, ensuring a satisfying click feel with reduced wear over time.
  5. Customizable RGB Lighting:
    • The RGB lighting adds a touch of personalization to the G Pro, allowing users to match their gaming setup’s aesthetics. LIGHTSYNC technology ensures synchronized lighting effects with other Logitech G devices.

Cons:

  1. Limited Thumb Rests or Side Grips:
    • Some users may find the lack of distinct thumb rests or side grips a drawback, as these features can contribute to a more secure grip during intense gaming sessions.
  2. Slightly Higher Price Point:
    • Compared to some other gaming mice in its category, the G Pro is positioned at a slightly higher price point. While justifiable given its features, it may be a consideration for budget-conscious consumers.
[mai mult...]

AMD Radeon RX 6900 XT

1. RDNA 2 Architecture:

  • The RX 6900 XT is built on the RDNA 2 architecture, bringing advancements in performance, power efficiency, and feature set. This architecture introduces hardware-accelerated ray tracing and variable rate shading for enhanced graphics.

2. 16 GB GDDR6 VRAM:

  • With 16 GB of GDDR6 VRAM, the RX 6900 XT provides ample memory capacity for high-resolution gaming, content creation, and multitasking. The large VRAM buffer contributes to smooth performance in demanding scenarios.

3. Real-Time Ray Tracing:

  • The RX 6900 XT supports real-time ray tracing, introducing lifelike lighting, shadows, and reflections to supported games. This enhances the visual fidelity, delivering a more immersive gaming experience.

4. Infinity Cache Technology:

  • AMD’s Infinity Cache technology acts as a high-bandwidth cache that improves memory performance, allowing the RX 6900 XT to maximize the utilization of its memory resources.

5. Impressive 1440p and 4K Performance:

  • Excelling in both 1440p and 4K gaming, the RX 6900 XT delivers high frame rates and smooth gameplay experiences. It competes favorably with other high-end GPUs in its class.

6. Smart Access Memory (SAM):

  • SAM, when paired with compatible AMD Ryzen processors, enables the GPU to access the entire system memory, potentially providing a performance boost in supported applications.

Pros:

  1. Exceptional 4K Gaming Performance:
    • The RX 6900 XT shines in 4K gaming, delivering high frame rates and excellent visuals. It competes closely with its NVIDIA counterparts in many popular gaming titles.
  2. Competitive Pricing:
    • The RX 6900 XT offers competitive pricing compared to similar-performing GPUs in its category, providing users with a compelling value proposition.
  3. Ray Tracing Capabilities:
    • Real-time ray tracing enhances the visual quality of supported games, bringing realistic lighting, reflections, and shadows for a more immersive gaming experience.
  4. Smart Access Memory (SAM) Support:
    • SAM, when paired with compatible AMD Ryzen processors, provides an additional avenue for potential performance gains in supported applications, contributing to a more responsive gaming experience.

Cons:

  1. Power Consumption:
    • The RX 6900 XT has a relatively high power draw, which may require a robust power supply unit (PSU). Users need to ensure their systems can accommodate the power demands of this GPU.
  2. Availability Challenges:
    • Similar to other high-end GPUs, the RX 6900 XT faced availability challenges upon its release, making it challenging for consumers to purchase at its suggested retail price.
[mai mult...]

NVIDIA GeForce RTX 3090 -Review

Key Features:

1. Ampere Architecture:

  • Built on the Ampere architecture, the RTX 3090 boasts improvements in CUDA cores, Tensor Cores, and RT Cores. This architecture brings unparalleled performance and efficiency to gaming and content creation workloads.

2. Massive 24 GB GDDR6X VRAM:

  • The most distinctive feature of the RTX 3090 is its colossal 24 GB GDDR6X VRAM, providing an unprecedented amount of video memory for handling massive datasets, 8K gaming, and complex content creation tasks.

3. Real-Time Ray Tracing:

  • The RTX 3090 supports real-time ray tracing, introducing a new level of realism to gaming visuals. Shadows, reflections, and lighting effects are rendered with incredible precision, enhancing immersion and visual fidelity.

4. AI-Powered DLSS Technology:

  • Deep Learning Super Sampling (DLSS) leverages AI to upscale lower-resolution images in real time, providing improved image quality and performance in supported games.

5. PCIe 4.0 Support:

  • The RTX 3090 takes advantage of PCIe 4.0 technology for faster data transfer rates between the GPU and the rest of the system, ensuring optimal performance and responsiveness.

6. 8K Gaming Capability:

  • With its massive VRAM and processing power, the RTX 3090 is tailored for 8K gaming experiences, delivering smooth frame rates and breathtaking visuals at the highest resolutions.

7. NVIDIA Reflex and Broadcast:

  • Features like NVIDIA Reflex reduce system latency for a more responsive gaming experience, while NVIDIA Broadcast leverages AI for enhanced audio and video quality during streaming and video calls.

Pros:

  1. Unparalleled 4K and 8K Gaming Performance:
    • The RTX 3090 excels in 4K gaming, providing high frame rates and exceptional visuals. Its substantial VRAM also makes it a powerhouse for 8K gaming, an area where few GPUs can compete.
  2. Massive VRAM for Content Creation:
    • The 24 GB VRAM capacity is a boon for content creators working with large datasets, high-resolution textures, and complex 3D models. It’s particularly beneficial for tasks like 3D rendering, video editing, and graphic design.
  3. Ray Tracing Realism:
    • Real-time ray tracing elevates the visual quality of supported games, delivering realistic lighting, reflections, and shadows for a truly immersive gaming experience.
  4. DLSS Technology:
    • DLSS technology enhances performance in supported games while maintaining image quality, allowing users to enjoy higher resolutions and improved graphics without sacrificing frame rates.

Cons:

  1. High Power Consumption:
    • The RTX 3090 has a considerable power draw, requiring a robust and high-wattage power supply unit (PSU) for stable operation. Users need to ensure their systems can handle its power demands.
  2. Premium Price:
    • The RTX 3090 comes with a premium price tag, making it a significant investment. While it offers unparalleled performance, its high cost may be a limiting factor for budget-conscious users.
[mai mult...]