
Soluții

What is netstat command used for?

Netstat stands for “network statistics”.  If you’re having difficulties accessing the internet, the netstat command can help you identify where the problem lies. Netstat will display all of your computer’s active network connections and the status of those connections. If a connection is not working, netstat can often provide more information about why it is not working.

Netstat can also be used to monitor your computer for security threats. By default, netstat does not show listening ports, so you will need to use the -l option to see them. If you discover any unusual or unfamiliar listening ports, it’s possible that someone is attempting to gain access to your system without permission.

USING CMD

Type netstat at the prompt and press Enter. The netstat command will now display a list of all active network connections.

If you want to view all active network connections, just type netstat -a. Many other netstat options allow you to customize its output; type “netstat /?” for a full list at the command prompt.

To stop netstat output, just press the Control + C keys to exit.
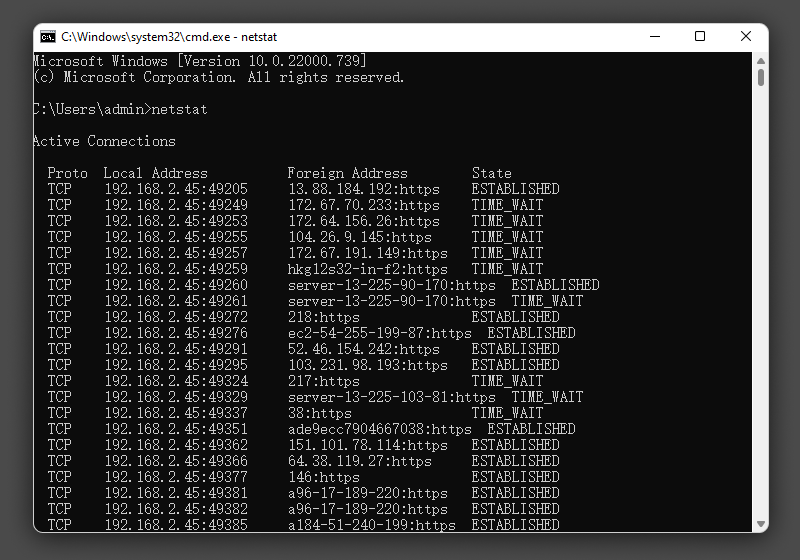
  • Proto -The networking protocol and it could be protocols like TCP, UDP etc.
  • Local Address – The local computer’s IP address and the port number being utilized. Unless the -n switch is used, the hostname and port corresponding to the IP address will be displayed. An asterisk (*) indicates that the port has not yet been assigned if one has not yet been set up.
  • Foreign Address – The remote computer’s IP address and port number to which the socket is linked. The names that relate to the IP address and port are displayed unless the -n switch is used. If no port has yet been assigned, an asterisk (*) appears in place of the port number.
  • State – Indicates an active TCP connection’s status,  including:
    • CLOSE_WAIT
    • CLOSED
    • ESTABLISHED
    • FIN_WAIT_1
    • FIN_WAIT_2
    • LAST_ACK
    • LISTEN
    • SYN_RECEIVED
    • SYN_SEND
    • TIMED_WAIT
[mai mult...]

How to Solve Windows Update Error

  1. Check Internet Connection:
    • Ensure that your computer is connected to the internet. You can do this by opening a web browser and attempting to navigate to a website.
  2. Restart Your Computer:
    • Sometimes, simply restarting your computer can resolve temporary issues. Restart your computer and attempt to update Windows again.
  3. Run Windows Update Troubleshooter:
    • Windows includes a built-in troubleshooter specifically for Windows Update issues.
      • Press the Windows key on your keyboard to open the Start menu.
      • Type “Troubleshoot” and select “Troubleshoot settings” from the search results.
      • Scroll down and select “Windows Update” under “Get up and running.”
      • Click on “Run the troubleshooter” and follow the on-screen instructions. The troubleshooter will attempt to detect and fix any issues with Windows Update.
  4. Check Disk Space:
    • Make sure your computer has enough free disk space to download and install updates.
      • Open File Explorer and navigate to “This PC” or “My Computer.”
      • Check the available space on your system drive (usually the C: drive). If it’s running low, consider freeing up space by deleting unnecessary files or uninstalling unused programs.
  5. Disable Third-Party Antivirus:
    • Sometimes, third-party antivirus software can interfere with Windows Update. Temporarily disable your antivirus software and try updating Windows again.
  6. Manually Download and Install Updates:
    • If Windows Update continues to fail, you can manually download and install updates from the Microsoft Update Catalog.
      • Go to the Microsoft Update Catalog website (https://www.catalog.update.microsoft.com/).
      • Search for the update KB number (you can find this in the error message or by checking the Windows Update history).
      • Download the appropriate update for your system architecture (32-bit or 64-bit).
      • Double-click the downloaded update file to install it manually.
[mai mult...]

How to Solve Windows 10 Startup Repair Loop

  1. Boot into Safe Mode:
    • Start by attempting to boot your computer into Safe Mode, which loads only essential system files and drivers.
      • Power on your computer and repeatedly press the F8 key (or Shift + F8) before the Windows logo appears during startup. This may bring up the Advanced Boot Options menu.
      • From the Advanced Boot Options menu, select “Safe Mode” and press Enter.
      • If your computer boots into Safe Mode successfully, proceed to the next steps. If not, continue to the next step.
  2. Use Automatic Repair:
    • Windows 10 includes an Automatic Repair feature that can help fix startup issues automatically.
      • Restart your computer and repeatedly press the F8 key (or Shift + F8) before the Windows logo appears during startup to access the Advanced Boot Options menu.
      • Select “Repair your computer” from the menu and press Enter.
      • Choose “Troubleshoot” > “Advanced options” > “Startup Repair.”
      • Follow the on-screen instructions and allow Windows to attempt to repair the startup issue automatically.
  3. Check Disk for Errors:
    • If Automatic Repair doesn’t resolve the issue, you can check your disk for errors using the Command Prompt.
      • From the Advanced Boot Options menu, select “Command Prompt.”
      • In the Command Prompt window, type the following command and press Enter:
        bash
        chkdsk C: /f /r
      • Replace “C:” with the letter of your system drive if it’s different.
      • This command will check the disk for errors and attempt to fix them. It may take some time to complete.
  4. Use System Restore:
    • If you have previously created a System Restore point, you can use it to revert your computer to a previous working state.
      • From the Advanced Boot Options menu, select “System Restore” and follow the on-screen instructions to restore your system to a previous restore point.
  5. Reset or Refresh Windows:
    • If none of the above steps resolve the issue, you can try resetting or refreshing Windows.
      • From the Advanced Boot Options menu, select “Troubleshoot” > “Reset this PC” or “Refresh your PC.”
      • Follow the on-screen instructions to reset or refresh Windows. Note that this will remove all installed applications and settings, so be sure to back up your important files beforehand.
  6. Reinstall Windows:
    • As a last resort, you can perform a clean reinstall of Windows.
      • Create a Windows 10 installation media using a USB flash drive or DVD.
      • Boot your computer from the installation media and follow the on-screen instructions to reinstall Windows.
[mai mult...]