Deblocheaza analiza rapida cu functia Flash Fill in Excel
Cand ai de-a face cu date inconsistente, Flash Fill te poate ajuta. Iata cum sa automatizezi completarea coloanelor pe baza unui model.
[mai mult...]Soluții pentru problemele tale IT

Cand ai de-a face cu date inconsistente, Flash Fill te poate ajuta. Iata cum sa automatizezi completarea coloanelor pe baza unui model.
[mai mult...]Eroarea 502 – Bad Gateway indică faptul că un server (de obicei un server proxy sau un server de echilibrare a încărcării) nu poate obține o comunicație validă de la un server ascuns în spate (upstream server). Această problemă poate apărea din mai multe motive. Iată câteva sugestii pentru a remedia această eroare pe un server Linux:
systemctl status [serviciu] sau service [serviciu] status.proxy_pass.location / {
proxy_pass http://127.0.0.1:8080; # Asigură-te că acest port este corect
}
/var/log/nginx/error.log și pentru Apache în /var/log/apache2/error.log sau /var/log/httpd/error_log./var/log/php-fpm.log.proxy_read_timeout în Nginx).iptables, ufw) pentru a vedea dacă nu blochează comunicațiile.curl pentru a testa conexiunea la serverul backend:
curl -I http://127.0.0.1:8080 # Verifică unde `8080` este portul serverului backend
systemctl restart nginx   # Pentru Nginx
systemctl restart httpd   # Pentru Apache
Eroarea 403 – Forbidden indică faptul că serverul a înțeles cererea, dar refuză să o îndeplinească. Aceasta poate fi cauzată de mai multe motive. Iată câteva sugestii pentru a remedia această problemă pe un server Linux:
755 și pentru fișiere 644.chmod 755 /cale/catre/director
chmod 644 /cale/catre/director/*
.htaccess. Asigură-te că nu există directive care interzic accesul. De exemplu:
Order Deny,Allow
Deny from all
apache2.conf sau httpd.conf.SELinux (disponibil pe distribuții precum CentOS sau Fedora), este posibil ca politicile SELinux să blocheze accesul. Poți verifica statusul cu:
sestatus
/var/log/apache2/error.log sau /var/log/httpd/error_log (în funcție de distribuție)./var/log/nginx/error.log.index.html sau index.php), serverul poate returna un 403. Asigură-te că ai un fișier index valid sau activează listarea directoarelor în configurația serverului, deși nu este recomandat din motive de securitate.www-data pentru Apache sau nginx pentru Nginx) are acces la fișiere și directoare.This is useful if you want to access your internal network applications from outside by creating a secure tunnel linked to your domain
1. Create a tunnel
enterprise-VPC-01)cloudflared and run it. To do so, check that the environment under Choose an environment reflects the operating system on your machine, then copy the command in the box below and paste it into a terminal window. Run the command.
The next steps depend on whether you want to connect an application or connect a network.
2a. Connect an application
Before you connect an application through your tunnel, you must:
Follow these steps to connect an application through your tunnel. If you are looking to connect a network, skip to the Connect a network section.
https://localhost:8000The application is now publicly available on the Internet. To allow or block specific users, create an Access application.
2b. Connect a network
Follow these steps to connect a private network through your tunnel.
To configure Zero Trust policies and connect as a user, refer to Connect private networks.
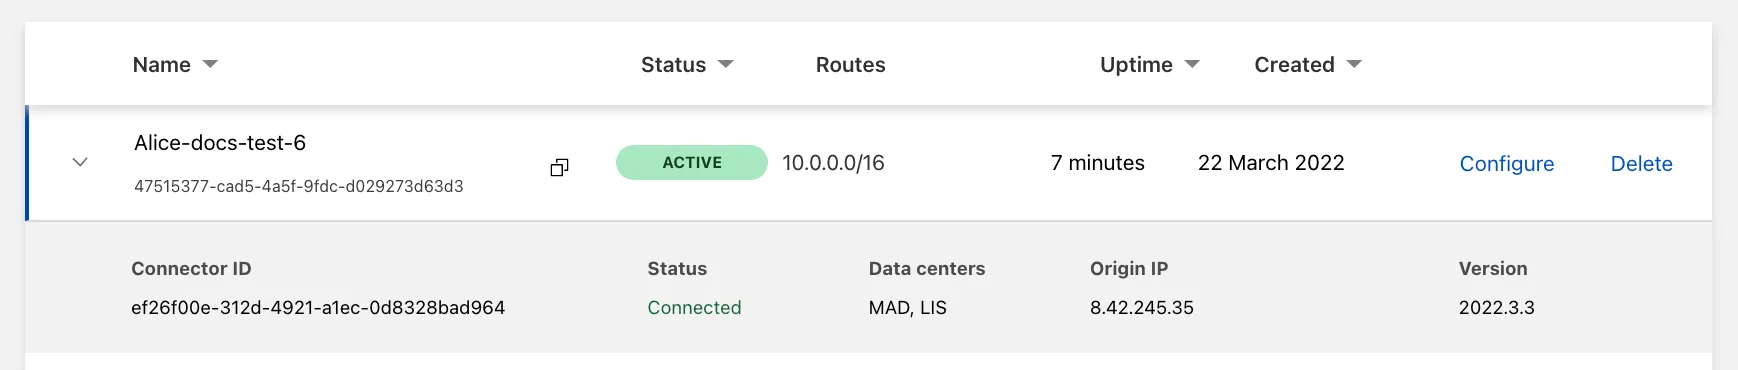
3. View your tunnel
After saving the tunnel, you will be redirected to the Tunnels page. Look for your new tunnel to be listed along with its active connector.
We can use ZFS as a local or external storage option for the VMs and containers with Proxmox VE. In order to do so, we must run the following steps:
Steps to add ZFS storage to Proxmox
1. Set Proxmox VE on the servers we intend to use for managing VMs and containers.
2. Create a ZFS pool on the disks we need to assign to VMs and containers using local storage on the VE server. Make that the pool is already established and reachable from the Proxmox VE host if we install external ZFS storage from a different server.
3. Proxmox VE employs LVM as its storage backend by default. In order to use ZFS as a storage option, enable ZFS on the Proxmox VE host. It includes installing the ZFS package and turning on the ZFS service.
4. With ZFS enabled, a ZFS dataset will be created and used by VE as a pool. Typically, this dataset is connected to a particular ZFS pool path.
5. We’ll add this dataset as storage using the VE web interface (GUI). Choose “ZFS” as the storage type by going to “Datacenter” >> “Storage” >> “Add”. After that, give the pertinent information, such as the dataset path and storage choices.
6. In order to give VE the access rights necessary to read and write data to the storage, we need to modify the permissions of the ZFS dataset.
7. After installing the ZFS storage, it’s crucial to make that Proxmox VE can access and use the ZFS dataset as needed.
8. Finally, create Virtual Machines and Containers that Use ZFS Storage. Now that the ZFS storage has been configured, we may produce virtual machines and containerized software that utilizes the ZFS storage. We can pick the ZFS storage pool we previously installed while creating a virtual machine (VM) or container by selecting the storage location option.
[mai mult...]Emby este o platformă open-source (cu funcții premium disponibile) care îți permite să îți organizezi, transcodezi și accesezi biblioteca media de pe orice dispozitiv: telefon, tabletă, browser sau TV. Seamănă cu Plex, dar oferă un control mai mare asupra serverului.
[mai mult...]