Situatie
1. Scan for Viruses
Many times, a file might be corrupted or inaccessible owing to a virus. Malware and viruses are designed to do something malicious to your computer, whether it be taking files hostage or erase them. Some viruses specifically target system files, so that they can steal your information and you can do nothing about it.
Try running an antivirus program or using the built-in Microsoft Defender. These programs will scan your computer for missing files, malicious software, and any other viruses or the like. Afterward, they’ll quarantine and remove the virus, which should clear any virus-related system errors.
2. Run SFC
If you’ve scanned for a virus and removed it or don’t have any malicious software on your computer, but the system error in Windows 11/10 still occurs, the next thing to do is to run “System File Checker”. This tool is built into the Windows operating system, meaning that you won’t have to download any app.
Running SFC is very easy, although if you know what to do. There are a few steps, although they’re not too difficult:
-
- Search CMD or Command Prompt in your Search bar (Windows key).
- Right-click and press Run as Administrator.
- A box may pop up and ask you if you want to grant administrative access; press Yes or Accept.
- Once the Command Prompt has opened, type SFC /scannow.
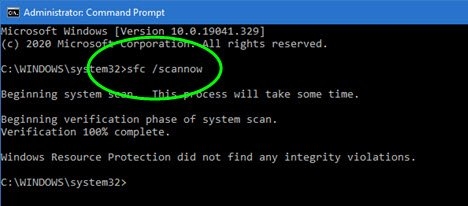
- Let the SFC run and after that, restart your computer.
3. Run chkdsk
Check Disk (or chkdsk) scans your hard drive for any errors or issues, which it’ll then try to fix. This fix uses the CHKDSK program, which comes with every computer running any version of Windows. CHKDSK checks every file on your hard drive, finding issues and fixes the files. This program works for any file system error that’s related to your actual hard drive, meaning it’ll work for most errors.
Similar to running SFC, to use Check Disk, you’ll need to follow these steps:
- Search CMD or Command Prompt in your Search bar (Windows key).
- Right-click and press Run as Administrator, or press the same words to your right.
- A box may pop up and ask you if you want to grant administrative access; press Yes or Accept.
- Once the Command Prompt has opened, type chkdsk:/f and press Enter key.
- Let Check Disk operate, which may take a few minutes.
4. Run DISM
Deployment Image Servicing and Management, known as DISM, is used to repair your Windows image (.ISO file or your Windows OS image). This option is used for issues relating to the Windows Store or your operating system as a whole.
When activated, DISM will run, scan, and repair items from the counterpart on Microsoft’s services. It’s recommended to use DISM alongside SFC, as SFC will scan and fix what it can, with DISM fixing whatever is left. As another Command Prompt service, to use DISM, you need to:
-
- Once the Command Prompt has opened, type dism /online /cleanup-image /restorehealth.
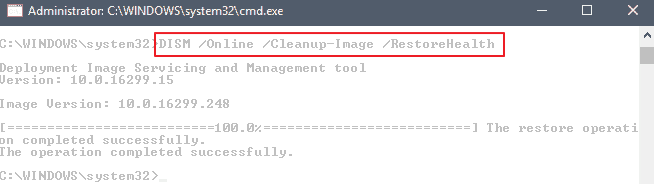
- Let DISM connect to the Microsoft servers, scan your computer, and initiate repairs.
5. Update Windows
Many issues relating to a file system error are in your Windows update files. The file system error -2147219196 is a notable example, as that error means that your Windows update was corrupted or messed with. Even with that example, many other errors pertain to updates, which can be fixed by repairing your OS files.
To run a Windows update, search your computer for update, press the Windows Update option, then click check for updates. Once it finishes loading, press download or continue, let the update finish, then hit restart when the option appears.
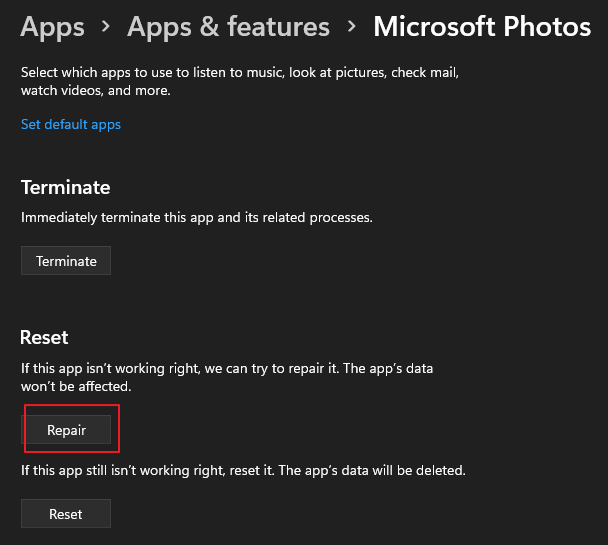
6. Repair/Reinstall the Photos App
Error code -2147219195 is the most common Photos app issue, which can be fixed by either repairing or reinstalling the Photos app. Photos app oftentimes attempts to open files that aren’t actual photos, which may result in your computer being quite confused.
To repair the Photos app:
- Open Settings through the shortcut Win + I.
- Choose Apps, then locate Photos app and select Advanced Options.
- When a menu appears, scroll down and press Repair.
To reinstall the Photos app:
- Search PowerShell to open it and click Run as administrator.
- Enter Get-AppxPackage Microsoft.Windows.Photos | Remove-AppxPackage and hit Enter key.
- Reinstall the app from Microsoft Store.
7. Run the Windows Store Apps Troubleshooter
For any problem relating to the Photos app or other apps that can’t be solved by repairing or reinstalling, the Windows Store Apps Troubleshooter is a good option to fix the system file errors. To use the troubleshooter:
-
- Search Troubleshoot then press the option.
- Find Other troubleshooters and click it.
- Scroll down and find Windows Store Apps.
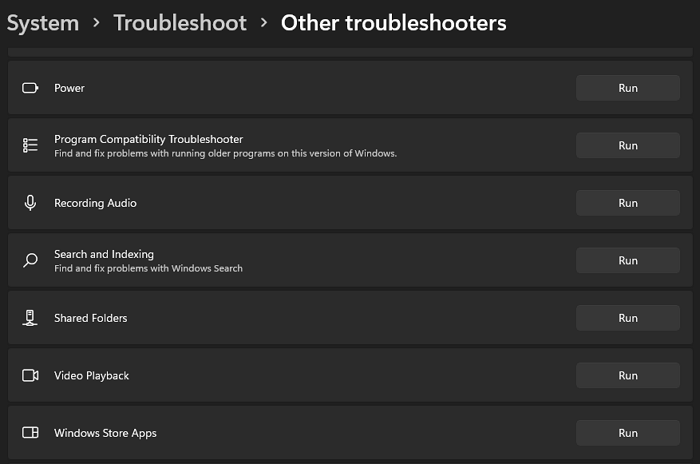
- Press the option and let the troubleshooter run.
8. Reset Windows Store Cache
If your issue involves the Windows Store, whether with an outdated app or issue update, clearing your cache might be the issue. Over time, cache stores itself on your computer, which can lead to issues accessing files. To clear your Windows Store cache, type wsreset.exe into your Run box, then press Enter. This will reset your Windows Store cache and should allow you to use it.
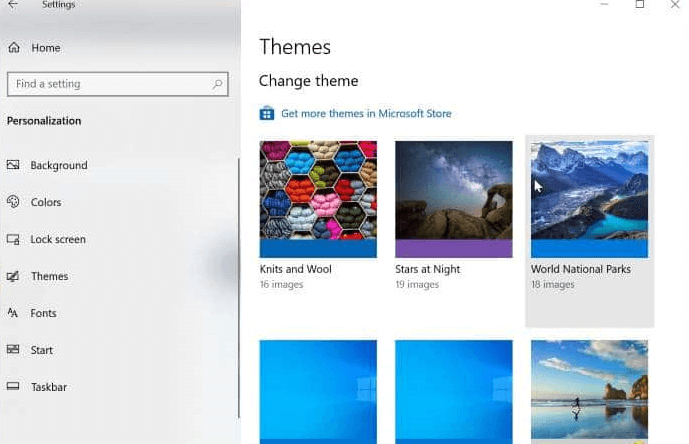
9. Set Windows Theme to Default
In some scenarios, your Windows theme may cause a file system error. Occasionally, your background theme may interfere with applications or your system, which may result in an error. If you accidentally shut down your computer or don’t save unfinished customization, it can cause a file system error. To set your theme to default:
- Go to Settings > Personalization.
- Choose Themes and you should have options to change your theme, so find and select the Windows theme from the list of Windows default themes.
10. Run System Restore
If you can’t find a solution to your file system error, it may be a major issue with files or your OS. The only reasonable solution would then be to run system restore. This option will undo recent changes, which might have caused your error, leaving documents and the like untouched.
-
- Open Control Panel and click Recovery.
- Press Open System Restore, the 2nd option in the middle
- When it appears, you may be asked to choose the restore point.
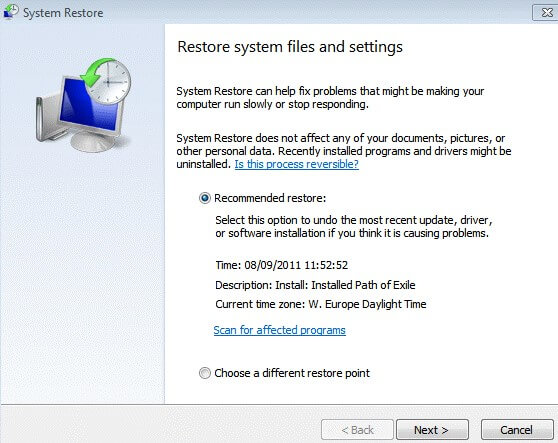
- Then follow the instructions to complete the process.
Leave A Comment?