Situatie
The Action Center—also known as the Notification Center—is located on the far right of the Windows 10 taskbar. This feature helps you easily access your system notifications and gives you quick access to settings. Sometimes, due to technical glitches, the Windows 10 Action Center will be grayed out and won’t open. This will hinder you from accessing the notifications and settings for various apps.
Solutie
Pasi de urmat
Enable the Action Center Via Settings
- Press Windows Key + I to open Settings, then head to Personalization > Taskbar.
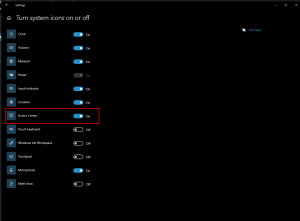
- In the Taskbar settings, scroll down and select Turn system icons on or off.
- To enable the Action Center icon in the taskbar, turn on the Action Center option.
Rename the UsrClass.dat System File
- Press Windows Key + R to open the Run command dialog box.
- Type %localappdata%\Microsoft\Windows and press Enter.
- Select the View tab in File Explorer and check the Hidden items box. This will show hidden files on your PC.
- Locate the UsrClass.dat file and rename it to something like “UsrClass.original.dat.” Although Windows will automatically restore this file, you shouldn’t completely delete it. In case something goes wrong, you may still need the file to restore your system settings. When you’re done renaming the file, reboot your PC to save these changes.
Re-Register the Action Center by Running a PowerShell Command
- Press the Windows Key + X and select Windows PowerShell (Admin) from the options.
- Type the following command and press Enter.
Get-AppxPackage | % { Add-AppxPackage -DisableDevelopmentMode -Register “$($_.InstallLocation)\AppxManifest.xml” -verbose }
- When you finish, restart your PC to save these changes.
Enable the Action Center Via the Registry Editor
- Press the Windows Key + R to open the Run command dialog box.
- Type Regedit and hit Enter to open the Registry Editor.
- In the Registry Editor, navigate to HKEY_CURRENT_USER > Software > Policies > Microsoft > Windows > Explorer.
- If the Explorer key is absent within the Windows key, you’ll have to create it. You’ll also have to create relevant files within the new Explorer key. In case the Explorer key is already present, you can skip to the next step.Otherwise, here are the steps you need to follow to create the Explorer key and its relevant files.
- Right-click the Windows key on the Registry Editor, select New > Key.
- When you’re prompted to name this new key, type Explorer and press Enter.
- Right-click on the new Explorer key, select New > DWORD (32-bit) Value. When prompted to name this value, type DisableNotificationCenter and press Enter.
- Double-click the DisableNotificationCenter file on the right-hand side pane. When a window pops up, change the Value data from one to zero to enable the Action Center. Select OK to finish.


Leave A Comment?