Situatie
When you start a new installation of Windows 10, you must go through the Windows Setup, which is the experience that helps you to configure various settings, including language preferences, product key, and partition layout. After the installation, you also have to go through the out-of-box experience (OOBE), which you need to complete to configure settings like keyboard layout, account, and privacy settings.
Although the process is relatively easy for most people, you still have to spend the time controlling the installation and answering questions, which can take up a lot of time, especially if you need to complete multiple installations in your workplace.
If you want to automate the installation process (and save time in the process), you can create an answer file with instructions to complete every on-screen prompt, which you can integrate onto a bootable media. Then the Windows Setup can read to install Windows 10 automatically.
In this Windows 10 guide, we walk you through the steps to create an autounattend.xml answer file containing all the necessary settings to perform a basic unattended installation of the OS.
Backup
How to create unattended Windows 10 installation media
On Windows 10, you can use many ways to create and set up an answer file to automate the installation process. This guide outlines the instructions to configure a “.xml” file to perform an unattended installation of Windows 10 Pro 64-bit on a computer with a single drive using Unified Extensible Firmware Interface (UEFI) or Basic Input-Output System (BIOS).
After setting up the answer file, the process will erase everything on the drive, create and configure the necessary partitions, and install a fresh copy of Windows 10 with the most basic settings.
Warning: This is a friendly reminder that the installation process will completely erase the hard drive of your computer. If you have anything important on this device, it’s recommended to make a full backup of your PC before proceeding
Solutie
Pasi de urmat
Requirements
This guide has quite a few steps, and you’ll need a few things to complete the project successfully:
- Windows Assessment and Development Kit (ADK)
- Windows 10 installation files
- Windows 10 account with administrator privileges
- USB flash drive with 8GB of space
- Spare computer to test the installation.
Anyone can write an answer file manually. Microsoft offers the Windows System Image Manager (SIM) console available through the Windows Assessment and Deployment Kit (ADK) to make it easier to create the file to install Windows 10 unattended.
To install the Windows System Image Manager, use these steps:
- Download the Windows ADK installer for Windows 10 version 2004
- Double-click the adksetup.exe file to begin the installation
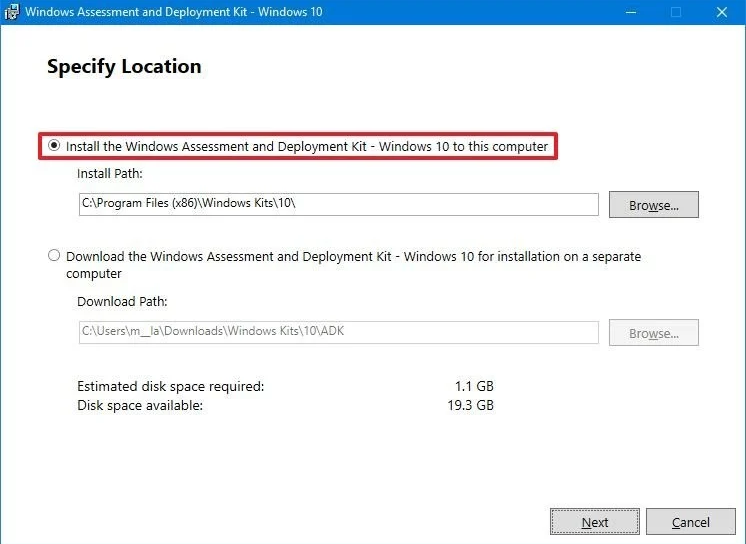
- Select the Install the Windows Assessment and Deployment Kit – Windows 10 to this computer option
- Click the Next button
- Select your privacy setting
- Click the Next button
- Click the Accept button to agree to the license agreement
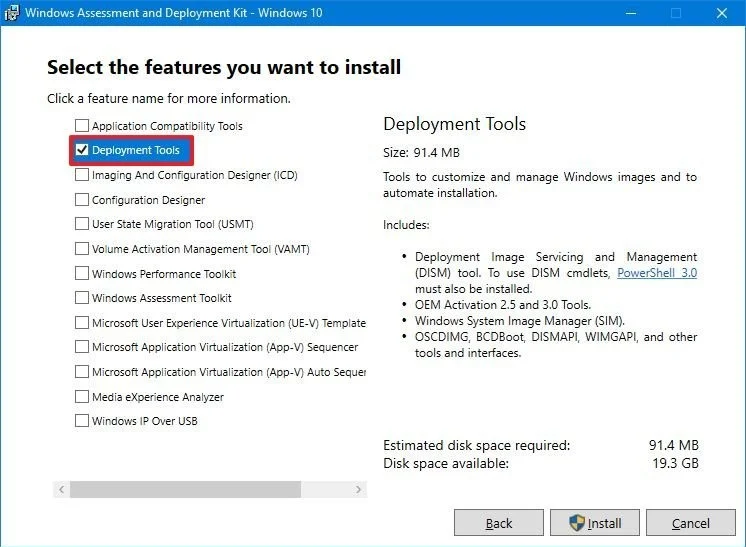
- Clear all preselected choices
- Check only the Deployment Tools package to install the Windows System Image Manager components
- Click the Install button
- Click the Close button.
Once you complete the steps, you can use the console to create a “.xml” file with the answer to all the questions to automatically install Windows 10. After the file is created, you can adjust the settings and reuse it for other installations, instead of having to use the Windows System Image Manager tool.
To create an answer file, you need to open a Windows 10 image and create a catalog of all the components to automate the installation. However, to perform this task, you must first import the installation files onto your device.
To import the Windows 10 installation files, use these steps:
- Open File Explorer
- Navigate to the Windows 10 ISO file location.Quick tip: Alternatively, you can also connect the USB flash drive with the installation files. If you don’t have the files below, you can find the steps to use Rufus to download the latest ISO for Windows 10
- Right-click the ISO file and select the Mount option
- Open the drive with the Windows 10 installation files
- Click the Select all button from the “Home” tab
- Click the Copy button from the “Home” tab
- Navigate to the folder you want to use to store the files for the project
- Click the New folder button from the “Home” tab
- Specify a name for the folder – for example, Windows2004
- Open the newly created folder
- Click the Paste button from the “Home” tab.
Once you complete the steps, the installation files will be available on your device. However, to continue, you need to confirm the install.wim file image is present in the “sources” folder. If the ISO was created using the Media Creation Tool, you’re likely to have an install.esd, which you won’t be able to open because it’s encrypted.
If you don’t have an .wim image file, you can get the uncrypted image by downloading the latest Windows 10 ISO file from the Windows Insider Program or MSDN with a subscription.
Convert install.esd to install.wim
In the case that you’re stuck with an “install.esd” image, you can use the DISM command tool to export the image files and create a “.wim” image from a “.esd” file.
To decrypt an install.esd image, use these steps:
- Open Start.
- Search for PowerShell, right-click the top result, and select the Run as administrator option.
- Type the following command to identify the index number of the edition you want to use and press Enter:
dism /Get-WimInfo /WimFile:C:\path\to\folder\sources\install.esdIn the command, make sure to change the path to the sources folder location with the “install.esd” file on your computer. - Confirm the index number for the edition you want to deploy. For example, in the case, select the index number of 6 to extract the files for Windows 10 Pro.
- Type the following command to create an install.wim file and press Enter:
dism /Export-Image /SourceImageFile:C:\path\to\folder\sources\install.esd /SourceIndex:6 /DestinationImageFile:C:\path\to\folder\sources\install.wim /Compress:Max /CheckIntegrityIn the command, make sure to change the path to the sources folder location with the “install.esd” file on your device. The destination path should be the same as the source.
Alternatively, you can also use the Rufus tool to download the Windows 10 ISO with an “install.wim” file.
To download a Windows 10 ISO file with Rufus, use these steps:
- Open Rufus download page
- Under the “Download” section, click the latest release of the tool to save the file on the computer
- Double-click the Rufus-x.x.exe file to launch the tool
- Under the “Device” section, select the USB flash drive with at least 8GB of space
- Under the “Boot selection” section, click the arrow button next to the “Select” option, and choose the Download option
- Click the now available Download button
- Use the “Version” drop-down menu and select Windows 10
- Click the Continue button
- Select the 20H1 (Build 19041.264 – 2020.05) option to download the Windows 10 May 2020 Update
- Click the Continue button
- Use the “Edition” drop-down menu and select the Windows 10 Home/Pro option
- Click the Continue button
- Use the “Language” drop-down menu and select your installation language.Quick note: If you’re in the United States, you should select “English” instead of “English International.”
- Click the Continue button
- Use the “Architecture” drop-down menu and select the 32-bit or 64-bit (recommended).Quick tip: You can find out the architecture of your device on Settings > System > About, under Device specifications.
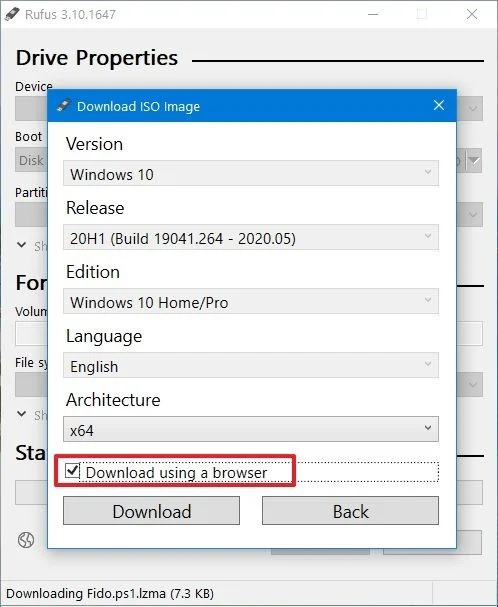
- Check the Download using a browser option.
- Click the Download button.
- Save the ISO file on your device.
Once you complete the steps, you’ll end up with an ISO file of Windows 10 that includes the install.wim file inside the “sources” folder.
Setting up an answer file environment
To prepare the environment to create a new answer file project, use these steps:
- Open Start
- Search for Windows System Image Manager and click the top result to open the console
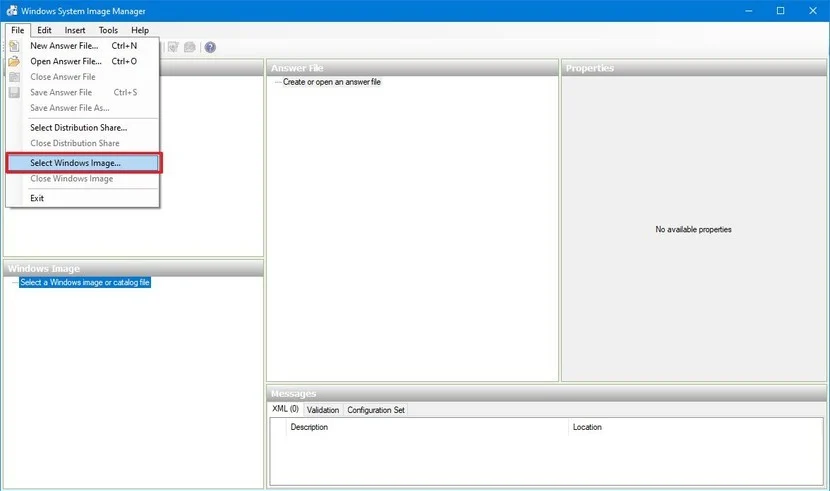
- Click the File menu
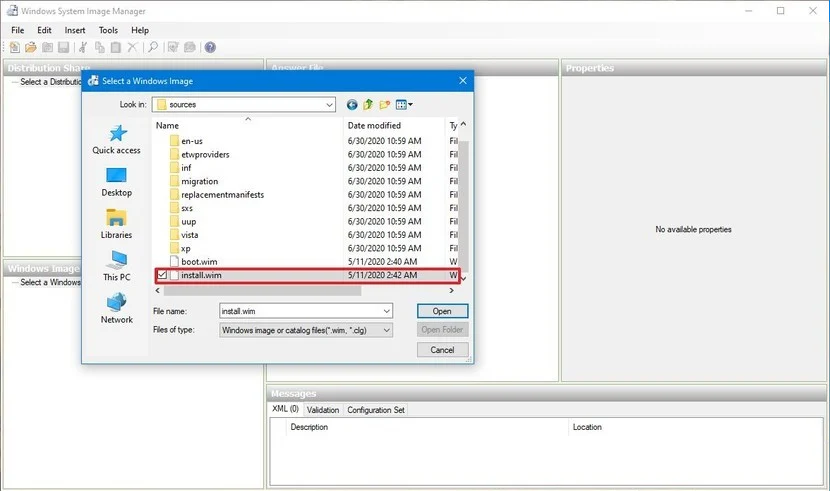
- Select the Select Windows Image option.
- Navigate to the folder with the Windows 10 installation files exported
- Access the source folder
- Select the install.wim image file.
- Click the Open button.Important: Make sure that image is an install.wim file. Otherwise, if you have an install.esd image, this will not work
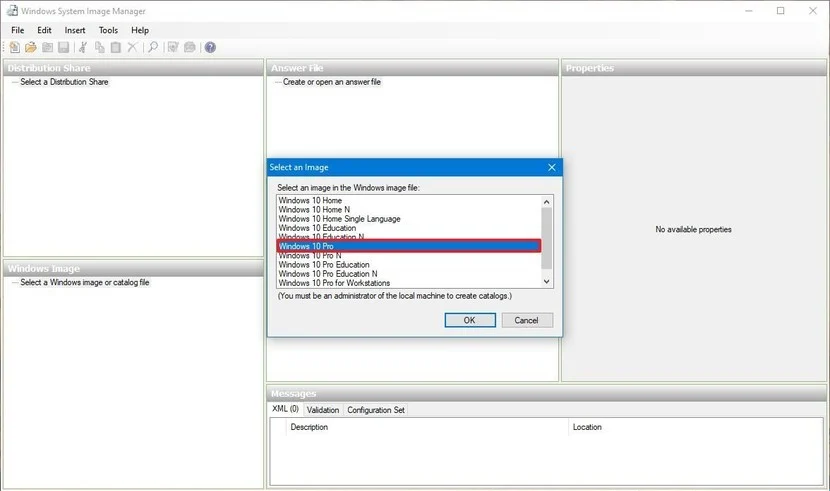
- Select the edition of Windows 10 you want to use. (Usually, you want to select the version that you’re planning to install)
- Click the OK button
- Click the Yes button to create a new catalog file (if applicable).Quick note: This process will take some time, but it’s a one-time process. The .clg file will be saved in the same location where the install.wim is stored, and you can reuse it later on other projects.
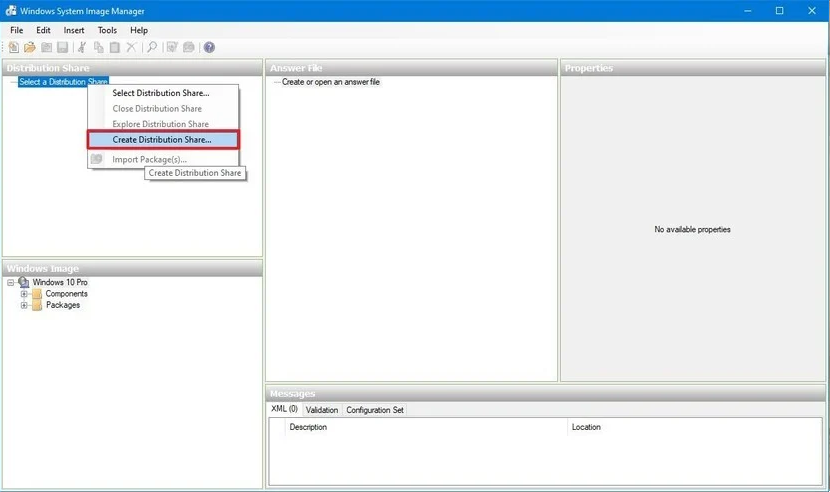
- Under the “Distribution Share” section, right-click on “Select a Distribution Share” and select the Create Distribution Share option.
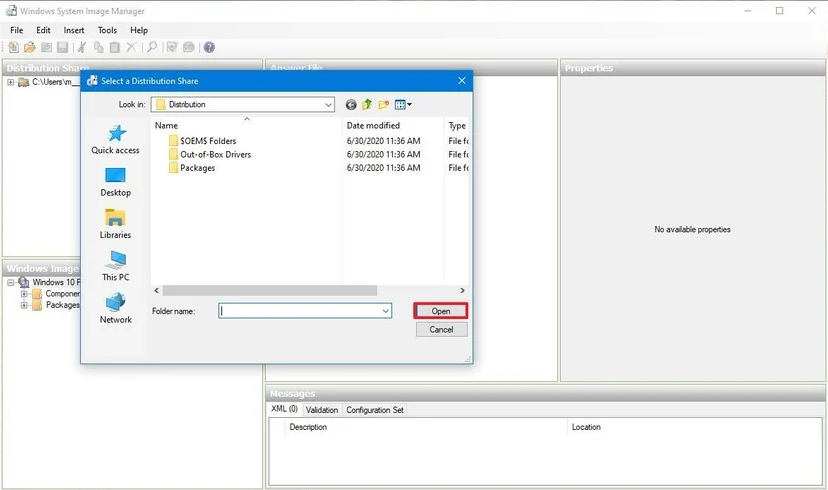
- Click the Create New Folder option in the dialog box
- Specify a name for the folder – for example, “Distribution” and select the folder. Click the Open button.
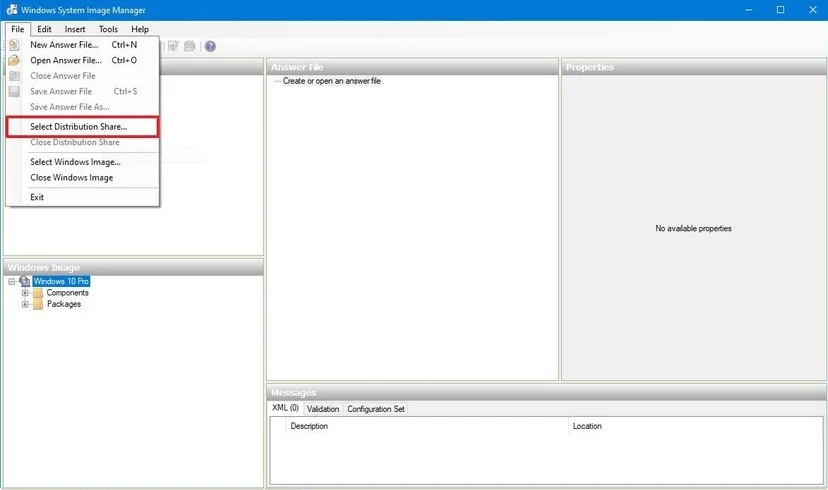
- Click the File menu
- Select the Select Distribution Share option
- Locate the folder you recently created for the distribution files.
- Click the Open button
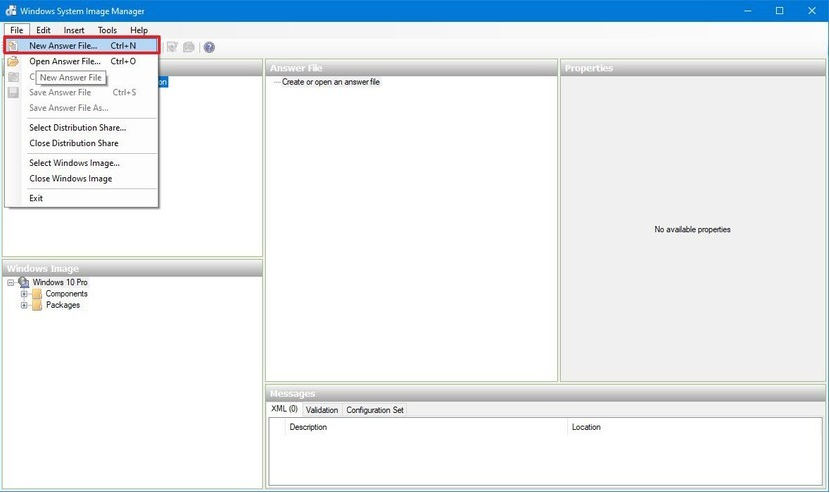
- Click the File menu
- Select the New Answer File option.
After you complete the steps, the environment will be created to configure an answer file.



Leave A Comment?