Situatie
Domain Name System (DNS) is a service that translate friendly domain names (Yahoo.com) into IP addresses (172.217.6.238) which aren’t easy to remember. Typically, you don’t have to worry about adjusting your DNS configuration, because your Internet Service Provider (ISP) always provides this service automatically. However, there are many other the DNS resolvers that are faster, reliable, private, and more secure, including those provided by Google, CloudFlare and Cisco.If the DNS servers offered by your ISP are slow and not reliable, or you simply don’t trust their resolvers, you can change the DNS addresses on Windows 10 in at least four different ways using Command Prompt, PowerShell, Settings, and Control Panel.
Solutie
Pasi de urmat
Fast and reliable free DNS services
Although there are many resolver services out there, CloudFlare, Google, and OpenDNS are among the companies that offer resolvers that are fast, reliable, and secure.
CloudFlare DNS addresses
- 1.1.1.1
- 1.0.0.1
Google Public DNS addresses
- 8.8.8.8
- 8.8.4.4
OpenDNS by Cisco DNS addresses
- 208.67.222.222
- 208.67.220.220
Change DNS address using Command Prompt
Although using command lines is not a suited method for most users, it’s one of the quickest way to change the DNS address on Windows 10.
To change the DNS address with Command Prompt, use these steps:
- Open Start on Windows 10.
- Search for Command Prompt, right-click the top result, and select the Run as administrator option.
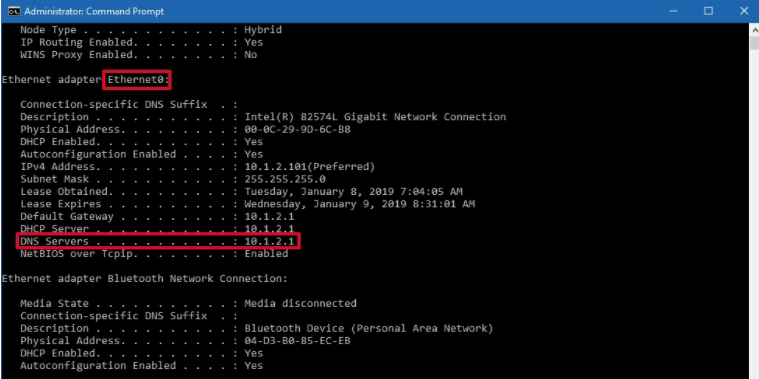
- Type the following command to see your current networking configuration and press Enter:
ipconfig /all
- Under the network adapter note the name of the network adapter as well as the following information in these fields:
- IPv4
- DNS Servers
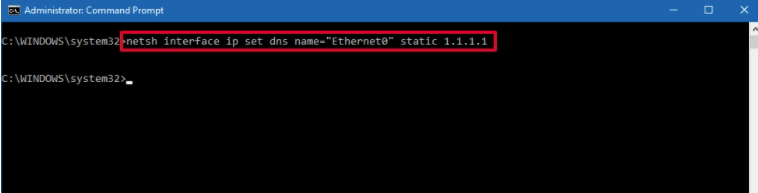
5. Type the following command to set the new DNS server address and press Enter:
netsh interface ip set dns name="Ethernet0" static 1.1.1.1


6.Type the following command to set an alternate DNS server address and press Enter:
netsh interface ip add dns name="Ethernet0" 1.0.0.1 index=2
In the above command make sure to change Ethernet0 with name of your adapter and 1.0.0.1 with the preferred alternate DNS server address. Once you complete the steps, you can confirm the new configuration using the ipconfig /all command and checking the DNS Servers addresses.
Microsoft is in the process of retiring netsh on Windows 10, as such you should start using the NetTCPIP networking module available in PowerShell instead.
Change DNS address using PowerShell
Windows 10 also includes PowerShell command line platform that allows you to use the NetTCPIP module to manage networking settings, including the ability to change the DNS address settings of your device.
To change the DNS address with PowerShell, use these steps:
-
- Open Start.
- Search for PowerShell, right-click the result, and select the Run as administrator option.
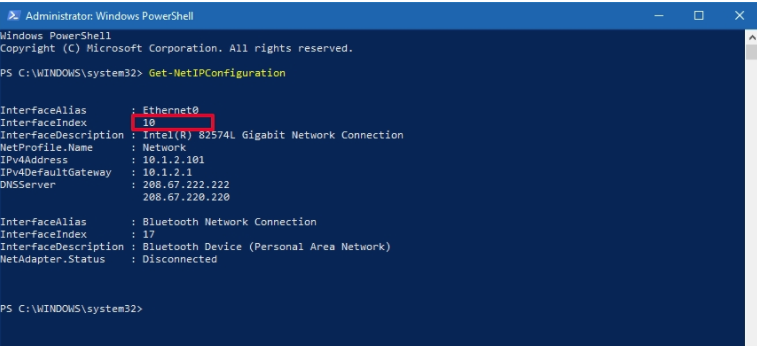
- Type the following command to view your current network configuration and press Enter:
Get-NetIPConfiguration
3.After running the command, note the following information:
- InterfaceIndex
- DNSServer
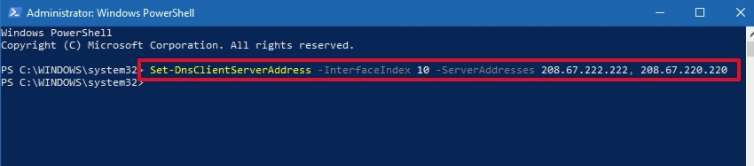
4.Type the following command to assign a primary DNS server address and press Enter:
Set-DnsClientServerAddress -InterfaceIndex 10 -ServerAddresses 208.67.222.222


(Optional) If you need to set a secondary DNS server address, you can use the same command, but adding a comma and appending the second address:
Set-DnsClientServerAddress -InterfaceIndex 10 -ServerAddresses 208.67.222.222, 208.67.220.220

Change DNS address using Settings
You can also specify new DNS addresses using the Settings app, but you need to configure all the TCP/IP settings to static to make it work. If you’re not comfortabl assigning a static TCP/IP configuration, you should not use this option.
To change the Windows 10 DNS address with Settings, use these steps:
- Open Settings.
- Click on Network & Internet.
- Click on Status.
- Under the “Network status” section, click the Properties button for the network you want modify.

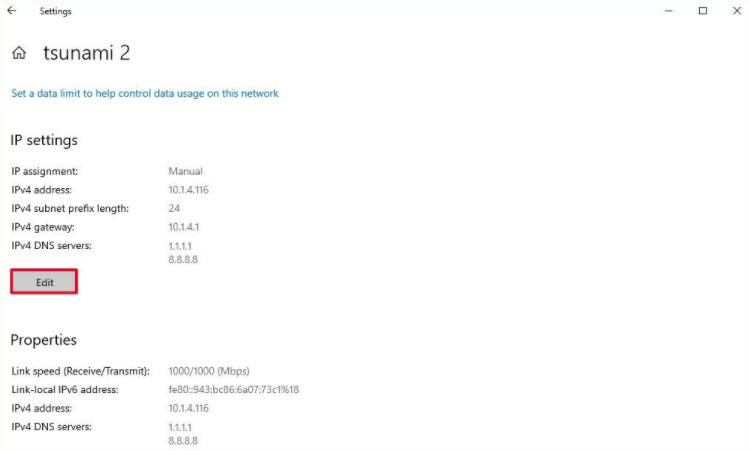
5. Under the “IP settings” section, click the Edit button.
6.Use the drop-down menu and select the Manual option.
7.Turn on the IPv4 toggle switch.
8.Under the “IP address” section, specify the TCP/IP address for the device.
9.Under the “Subnet prefix length” section, set the subnet length. Usually, home networks the length is 24 to represent the subnet address 255.255.255.0.
10.Under the “Gateway” section, set the default gateway address. Usually, this is the IP address of the router.
11.Under the “Preferred DNS” section, specify the IP address of the DNS server (for example, 1.1.1.1).
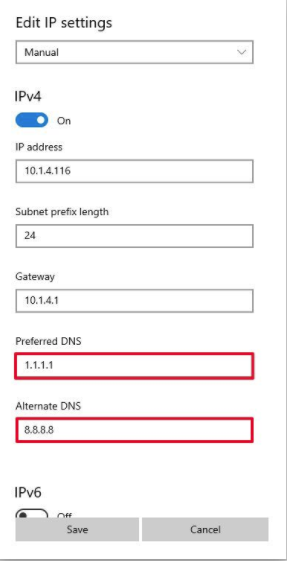
- Under the “Alternate DNS” section, specify the IP address of the secondary DNS address.
- Click the Save button.
Once you complete the steps, the device will continue to receive its TCP/IP address from the DHCP server, but it’ll use the DNS addresses that you specified. In future updates, Windows 10 will make the DNS settings more accessible from the “Properties” page, including the ability to enable DNS over HTTPS (DoH) to help make online connections a little more private.
Change DNS address using Control Panel
Alternatively, you can also use Control Panel to change the DNS settings on Windows 10. To change the DNS address of Windows 10 with Control Panel, use these steps:
- Open Control Panel.
- Click on Network and Internet.
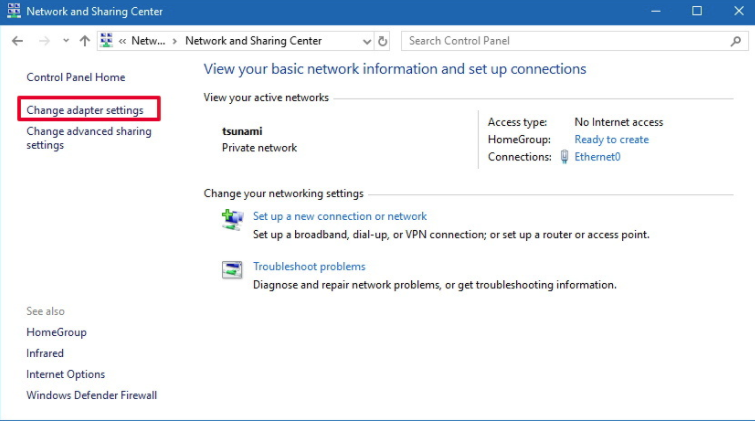
- Click on Network and Sharing Center.
- Click the Change adapter settings option from the left pane.
- Right-click the network adapter and select the Properties option.
- Select the Internet Protocol Version 4 (TCP/IPv4) option.
- Click the Properties button

Under the “Use the following DNS server addresses” section set Preferred DNS server, which is IP address of the server providing DNS resolutions (for example, 8.8.8.8).
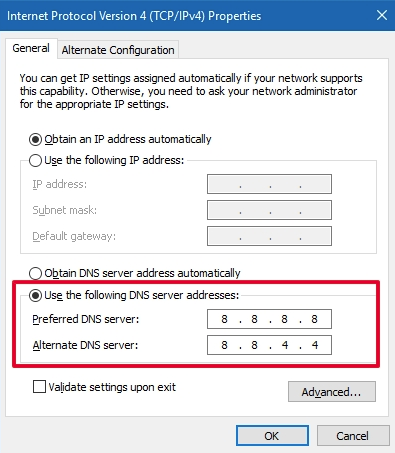
- Optional) Set the Alternative DNS server, which is the DNS address that your device will use if it can’t reach the preferred server address.
- Click the OK button.
- Click the Close button.
Once you complete the steps, you can open your web browser and try loading a website to see if the new configuration works. Whatever the method you use, make sure the IP address for the DNS server is correct to allow proper resolution. Otherwise, you won’t be able to connect to the internet.
Leave A Comment?