How To Linux Hard Disk Encryption With LUKS

Many enterprises, small businesses, and government users need to encrypt their laptops to protect confidential information such as customer details, files, contact information, and much more. Linux supports the following cryptographic techniques to protect a hard disk, directory, and partition. All data that is written on any one of the following techniques will be automatically encrypted and decrypted on the fly.

Linux encryption methods

There are two methods to encrypt your data:

Filesystem stacked level encryption
  1. eCryptfs – It is a cryptographic stacked Linux filesystem. eCryptfs stores cryptographic metadata in the header of each file written, so that encrypted files can be copied between hosts; the file will be decrypted with the proper key in the Linux kernel keyring. This solution is widely used, as the basis for Ubuntu’s Encrypted Home Directory, natively within Google’s ChromeOS, and transparently embedded in several network attached storage (NAS) devices.
  2. EncFS -It provides an encrypted filesystem in user-space. It runs without any special permissions and uses the FUSE library and Linux kernel module to provide the filesystem interface. You can find links to source and binary releases below. EncFS is open source software, licensed under the GPL.
Block device level encryption
  1. Loop-AES – Fast and transparent file system and swap encryption package for linux. No source code changes to linux kernel. Works with 3.x, 2.6, 2.4, 2.2 and 2.0 kernels.
  2. VeraCrypt – It is free open-source disk encryption software for Windows 7/Vista/XP, Mac OS X and Linux based on TrueCrypt codebase.
  3. dm-crypt+LUKS – dm-crypt is a transparent disk encryption subsystem in Linux kernel v2.6+ and later and DragonFly BSD. It can encrypt whole disks, removable media, partitions, software RAID volumes, logical volumes, and files.

In this tutorial, I will explain how to encrypt your partitions using Linux Unified Key Setup-on-disk-format (LUKS) on your Linux based computer or laptop.

[mai mult...]

How To Find Out FreeBSD Version and Patch Number

You can use any one of the following command to display the FreeBSD operating system version and patch level.

Unix commands to find out FreeBSD Version

Open the terminal and then type:

  1. freebsd-version – Display the FreeBSD version and patch level of the installed system
  2. uname -mrs – Get information about the system including FreeBSD version

Let us see all commands and examples in details .

How to use freebsd-version command

The freebsd-version command appeared in FreeBSD 10.0 and above. To see the FreeBSD server ver and patch level of the installed kernel, run:
freebsd-version -k
To see the version and patch level of the installed userland:
freebsd-version -u

Fig.01: freebsd-version and other commands in action to display FreeBSD version

Fig.01: freebsd-version and other commands in action

How to use freebsd-version command from Live CD

Boot from a live FreeBSD CD/DVD. To see a system being repaired using a live CD:
mount -rt ufs /dev/ada0p2 /mnt ## assuming it is ufs ##
env ROOT=/mnt /mnt/bin/freebsd-version -ku

How to find out if I am using 32 or 64 bit FreeBSD kernel

You can also use the following command to find out if FreeBSD kernel is running in 32bit or 64bit mode:
# getconf LONG_BIT

The 64 means I am using 64 bit kernel on 64-bit hardware either from Intel/AMD:

64
Display FreeBSD version using old good uname command

Type the following command (it works on all versions of FreeBSD):
umame -a
uname -mrs

My 11.x version:

FreeBSD 11.2-RELEASE-p4 amd64

When I upgraded to 12.x, I see:

FreeBSD 12.2-RELEASE-p1 amd64
Understanding uname command options on FreeBSD
Table 1 – Command options
Option Description
-a Behave as though the options -m, -n, -r, -s, and -v were specified.
-i Display the kernel ident.
-K Find the FreeBSD version of the kernel.
-m Show the type of the current hardware platform.
-n Write the name of the system to standard output.
-o This is a synonym for the -s option, for compatibility with other systems.
-p Find the type of the machine processor architecture to screen
-r Get the current release level of the operating system.
-s Find the name of the operating system implementation to monitor.
-U Show the FreeBSD version of the user environment.
-v Write the version level of this release of the operating system.
[mai mult...]

How to find Linux kernel version

Linux stores version information in a file called /proc/version. As a sysadmin you need to know the Linux distro ver number of the Linux kernel on given server or workstation. This information can be used for the following purpose.

  1. To fix device driver issue.
  2. Install correct device driver for NIC/RAID card.
  3. Diagnosing system problems.
  4. Security and patching system for bugs.
  5. Upgrading system and more.
How to find Linux kernel version

You need to type the following command at shell prompt:
$ uname -r
Sample outputs from RHEL 5:

2.6.18-194.3.1.el5

Another outputs from Fedora 30:

5.1.16-300.fc30.x86_64
How to check Linux version using /prov/version file

Type the following cat command to print out information about the running Linux kernel:
$ cat /proc/version
Sample outputs from RHEL 5:

Linux version 2.6.18-194.3.1.el5 (mockbuild@x86-004.build.bos.redhat.com) (gcc version 4.1.2 20080704 (Red Hat 4.1.2-48)) #1 SMP Sun May 2 04:17:42 EDT 2010

Please note that you can also use the following command:
$ uname -a
Sample outputs:

Linux b1 3.2.0-51-generic #77-Ubuntu SMP Wed Jul 24 20:18:19 UTC 2013 x86_64 x86_64 x86_64 GNU/Linux

Another outputs from my Fedora Linux desktop:
Check Linux Kernel Version in Command Line

Checking Linux kerne version using dmesg

Another useful option is to type the following dmesg command along with grep command:
dmesg | grep 'Linux version'
dmesg | grep Linux

Sample outputs:

[    0.000000] Linux version 5.1.16-300.fc30.x86_64 (mockbuild@bkernel04.phx2.fedoraproject.org) (gcc version 9.1.1 20190503 (Red Hat 9.1.1-1) (GCC)) #1 SMP Wed Jul 3 15:06:51 UTC 2019
[    0.667677] SELinux:  Initializing.
[    0.667697] *** VALIDATE SELinux ***
[    0.691958] ACPI: Added _OSI(Linux-Dell-Video)
[    0.691958] ACPI: Added _OSI(Linux-Lenovo-NV-HDMI-Audio)
[    0.691958] ACPI: Added _OSI(Linux-HPI-Hybrid-Graphics)
[    0.808940] pps_core: LinuxPPS API ver. 1 registered
[    1.754325] Linux agpgart interface v0.103
[    1.788277] usb usb1: Manufacturer: Linux 5.1.16-300.fc30.x86_64 xhci-hcd
[    1.789649] usb usb2: Manufacturer: Linux 5.1.16-300.fc30.x86_64 xhci-hcd
[   31.626968] SELinux:  policy capability network_peer_controls=1
[   31.626970] SELinux:  policy capability open_perms=1
[   31.626970] SELinux:  policy capability extended_socket_class=1
[   31.626971] SELinux:  policy capability always_check_network=0
[   31.626972] SELinux:  policy capability cgroup_seclabel=1
[   31.626972] SELinux:  policy capability nnp_nosuid_transition=1
[   31.653735] systemd[1]: Successfully loaded SELinux policy in 755.735ms.
[   32.980279] Intel(R) Wireless WiFi driver for Linux
[   34.349592] VBoxPciLinuxInit
[ 1784.165279] SELinux:  Converting 2546 SID table entries...
[ 1786.470382] SELinux:  policy capability network_peer_controls=1
[ 1786.470383] SELinux:  policy capability open_perms=1
[ 1786.470383] SELinux:  policy capability extended_socket_class=1
[ 1786.470383] SELinux:  policy capability always_check_network=0
[ 1786.470384] SELinux:  policy capability cgroup_seclabel=1
[ 1786.470384] SELinux:  policy capability nnp_nosuid_transition=1
[ 1804.575674] SELinux:  Converting 2559 SID table entries...
[ 1807.034856] SELinux:  policy capability network_peer_controls=1
[ 1807.034857] SELinux:  policy capability open_perms=1
[ 1807.034858] SELinux:  policy capability extended_socket_class=1
[ 1807.034859] SELinux:  policy capability always_check_network=0
[ 1807.034859] SELinux:  policy capability cgroup_seclabel=1
[ 1807.034860] SELinux:  policy capability nnp_nosuid_transition=1
Using hostnamectl command

Simply run the following hostnamectl command on systemd based distros:
hostnamectl
Sample outputs:

   Static hostname: mum1-vpn1
         Icon name: computer-vm
           Chassis: vm
        Machine ID: 612892249edc4cf7b40cdfd1534feded
           Boot ID: f6285443d8544cb1a04878e0f2b13056
    Virtualization: kvm
  Operating System: Ubuntu 18.04.2 LTS
            Kernel: Linux 4.15.0-54-generic
      Architecture: x86-64

The above command displays both the Linux distribution and kernel version.

[mai mult...]

How to update from RHEL 8.3 to 8.4

Let us see what’s new in RHEL 8.4 and how to update 8.3 to 8.4 using the dnf command-line option.

RHEL 8.4 released

From the RedHat Enterprise Linux version 8.4 product page:

  • Hybrid cloud your way: RHEL 8.4 enables the innovation and transformation required to get to the cloud, the edge and beyond.
  • RHEL at the Edge
  • Red Hat Insights: Expanded capabilities in the Red Hat Insights services — Vulnerability, Compliance, Resource Optimization, and Subscriptions — help organizations to more efficiently and effectively manage their RHEL estates across the open hybrid cloud, including deployments in the public cloud.

New software and feature in RHEL 8.4:

  1. Python 3.9
  2. Redis 6
  3. PostgreSQL 13
  4. MariaDB 10.5
  5. GCC 10
  6. LLVM 11
  7. Rust 1.49
  8. Go 1.15.7
  9. Intel Tiger Lake GPUs are now supported which includes Intel UHD graphics and Intel Xe integrated GPUs.

WARNING: Make sure you keep verified RHEL 8.x backups before performing minor or significant RHEL version upgrades.

How to update RHEL 8.3 to 8.4

The procedure to upgrade or update RHEL from version 8.3 to 8.4 is as follows:

  1. Open the terminal application and then type the following commands. Another option is to log in using ssh
  2. Login as the root user. For example: ssh ec2-user@rhel-8-ec2-box
  3. Check for updates using the sudo dnf check-update command
  4. Update the system using the sudo dnf update command
  5. Reboot the server/box using the sudo reboot command
  6. Verify new kernel and updates

Another option is to deploy updated images and get rid of older instances. Let us see all commands and steps in details.

Step 1 – Note down the current kernel version

Type the following uname command or cat command to view RHEL kernel version and OS info:
$ uname -a
$ uname -r
$ cat /etc/os-release

Step 2 – Backups

Make a backup – it cannot be stressed enough how important it is to backup your system before you do this.

Step 3 – Check for updates using dnf

Type the following dnf command:
$ sudo dnf check-update

Step 4 – Upgrading RHEL 8.3 to 8.4

Type the following dnf command to apply/install updates:
$ sudo dnf upgrade -y

================================================================================
 Package          Arch   Version         Repository                        Size
================================================================================
Installing:
 kernel-core      x86_64 4.18.0-305.el8  rhel-8-for-x86_64-baseos-rpms     36 M
 kernel-modules   x86_64 4.18.0-305.el8  rhel-8-for-x86_64-baseos-rpms     28 M
Upgrading:
 NetworkManager   x86_64 1:1.30.0-7.el8  rhel-8-for-x86_64-baseos-rpms    2.6 M
 NetworkManager-libnm
                  x86_64 1:1.30.0-7.el8  rhel-8-for-x86_64-baseos-rpms    1.8 M
 NetworkManager-team
                  x86_64 1:1.30.0-7.el8  rhel-8-for-x86_64-baseos-rpms    145 k
 NetworkManager-tui
                  x86_64 1:1.30.0-7.el8  rhel-8-for-x86_64-baseos-rpms    327 k
.....
..
.....
rdma-core        x86_64 32.0-4.el8      rhel-8-for-x86_64-baseos-rpms     59 k
 tpm2-tss         x86_64 2.3.2-3.el8     rhel-8-for-x86_64-baseos-rpms    275 k
 volume_key-libs  x86_64 0.3.11-5.el8    rhel-8-for-x86_64-appstream-rpms 149 k
Installing weak dependencies:
 udisks2          x86_64 2.9.0-6.el8     rhel-8-for-x86_64-appstream-rpms 474 k
Removing:
 kernel-core      x86_64 4.18.0-240.10.1.el8_3
                                         @rhel-8-for-x86_64-baseos-rpms    62 M
 kernel-modules   x86_64 4.18.0-240.10.1.el8_3
                                         @rhel-8-for-x86_64-baseos-rpms    21 M
 
Transaction Summary
================================================================================
Install   38 Packages
Upgrade  210 Packages
Remove     2 Packages
Step 5 – Reboot the RHEL 8.3 box

Type the following reboot command or shutdown command to reboot Linux system:
$ sudo reboot
## OR ##
$ sudo shutdown -r now

Step 6 – Verify the RHEL 8.4 update

Type the following commands:
$ uname -a
$ uname -r
$ cat /etc/os-release
$ tail -f /var/log/logfilenames
$ dmesg | grep -i 'err|warn|cri'
$ ss -tulpn

Sample session from version 8.4:

RHEL 8.4 released and my box updated to 8.4 from 8.3 using dnf

[mai mult...]

How to Beta Test iOS Apps with TestFlight

Have you ever wanted to try out beta versions of your favorite apps? Perhaps, you want to get early access to certain app features that the developers are working on? TestFlight makes it easy to beta test apps on iPhone and iPad, so let’s review how it all works.

For the unfamiliar, Apple offers an app called TestFlight that allows developers, beta testers, and even regular users to try out test versions of apps that haven’t been published on the App Store yet. This essentially gives you early access to new features weeks or sometimes even months ahead of the public release. Even though they tend to be buggy and prone to crashes, a lot of iOS and iPadOS users seem to be interested in installing beta versions of their favorite apps.

Before you get started, we’d like to point out you can’t access beta tests just like that. You’ll need either a private invite or a public Testflight link to gain access to the beta versions of the app. This depends completely on the app developer, though many developers have public betas to solicit feedback for their apps.

  1. First, download and install TestFlight from the App Store.
  2. TestFlight Icon
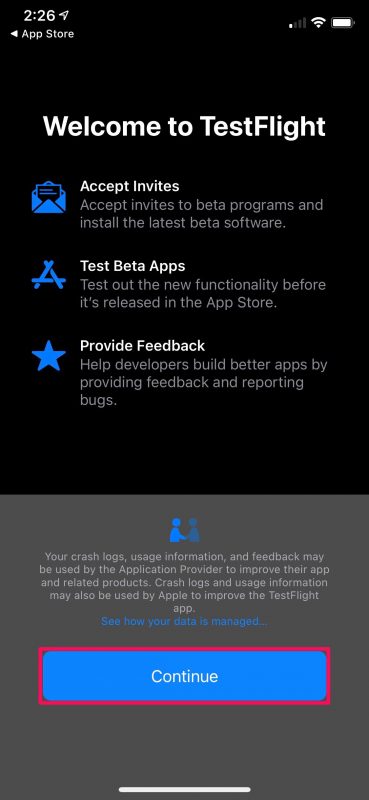
  3. Now, open the app and tap on “Continue” in the welcome page to access the main menu.
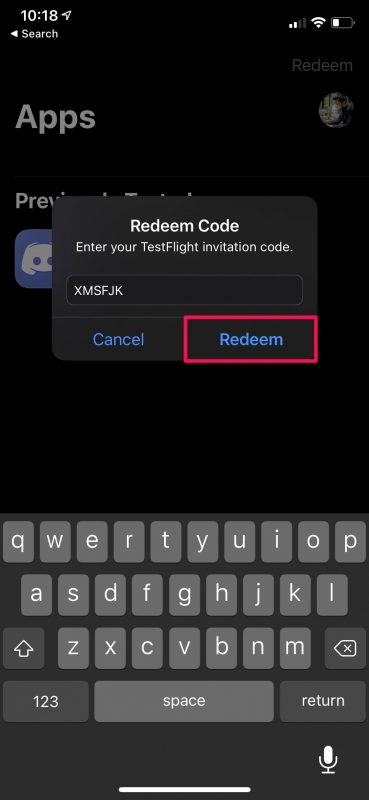
  4. Unlike the screenshot below, everything will be empty here. Now, if you have an invitation code which is usually sent via email, tap on “Redeem” located at the top-right corner.
  5. How to Beta Test iOS Apps with TestFlight
  6. Next, enter the code and tap on “Redeem”
  7. How to Beta Test iOS Apps with TestFlight
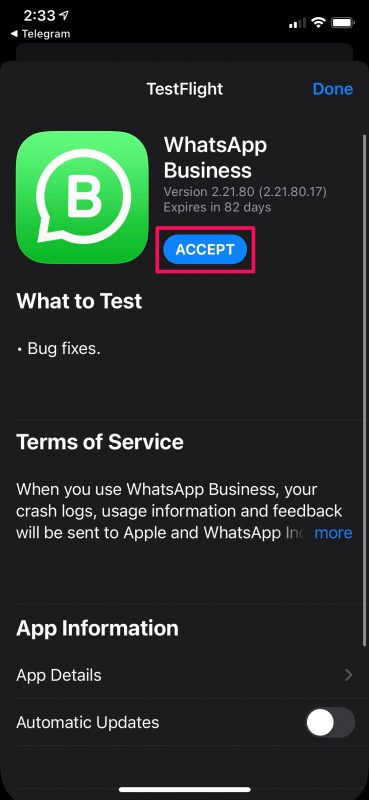
  8. If you’re a regular user, you’ll need to find a public TestFlight link. You can browse and find it with a simple Google search. When you have the link, just tap on it to open the invitation in TestFlight. You’ll see a similar page as indicated here. Tap on “Accept”.
  9. How to Beta Test iOS Apps with TestFlight
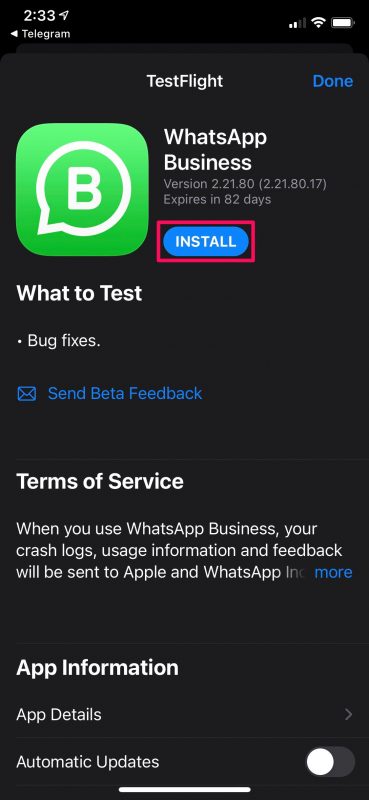
  10. Now, wait for a couple of seconds and the Accept option will change to Install. Just tap on “Install” to continue.
  11. How to Beta Test iOS Apps with TestFlight
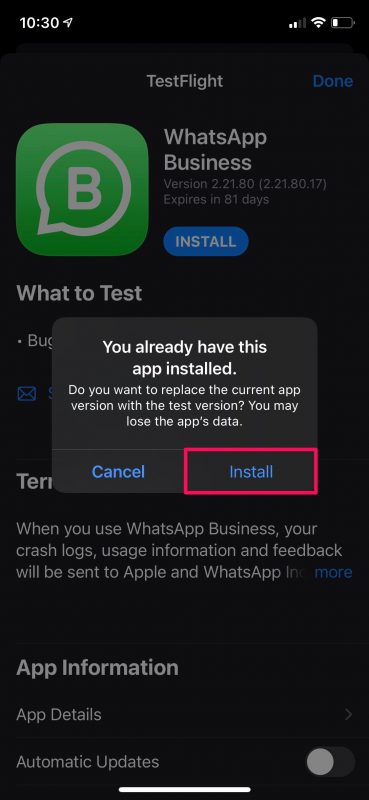
  12. If you have the public version of the app installed on your device, you’ll get the following prompt to replace the current version with the test version. To confirm and proceed with the installation, simply choose “Install”.
  13. How to Beta Test iOS Apps with TestFlight

There you go. You’ve successfully installed the beta version of the iOS app on your iPhone.

[mai mult...]

How to Factory Reset M1 Mac to Wipe & Reinstall macOS

Do you have an M1 Mac that you’d like to factory reset as if it were brand new? The process of factory resetting the M1 Mac line to restore the Mac to factory defaults basically erasing all data and reinstalling a blank macOS.

Before you go ahead with the steps mentioned below, make sure you back up the Mac and all the important files and data you want to keep as they will be permanently erased during the factory restoration. Without a backup, you will not be able to get those files back.

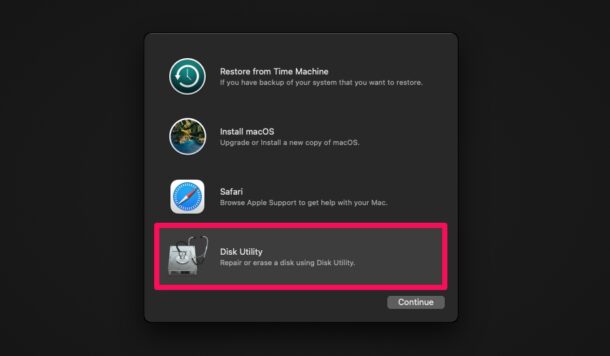
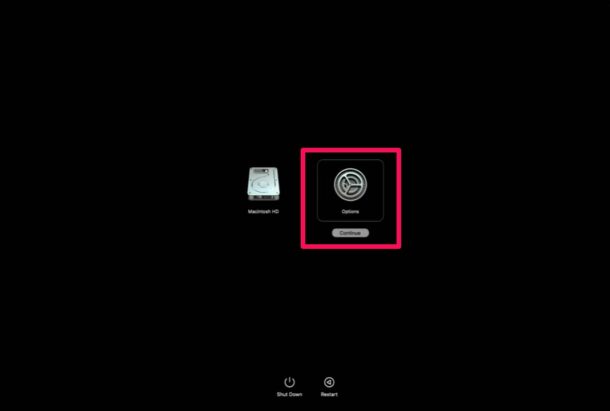
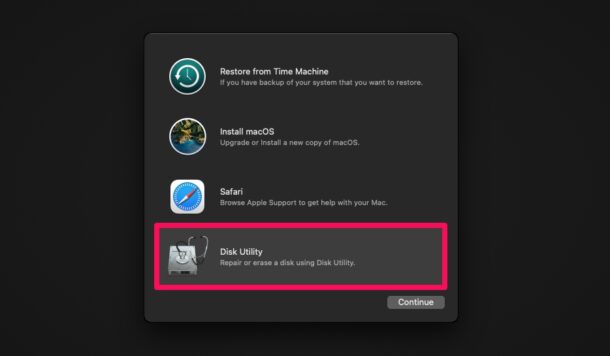
  1. Entering recovery mode is different on Apple silicon Macs. You need to shut down your Mac and then hold down the Touch ID/power button until you see “Loading startup options”. Now, choosing “Options” will take you to macOS Utilities. Here, select “Disk Utility” and click on “Continue” to get started.
  2. How to Factory Reset M1 Mac
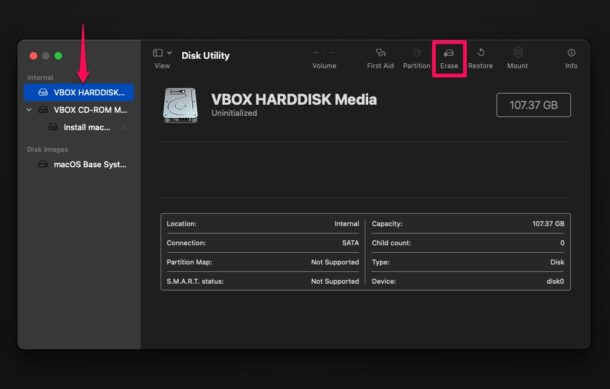
  3. Next, select the hard drive where macOS is currently installed from the left pane, typically “Macintosh HD”, and click on the “Erase” option located at the top of the window.How to Factory Reset M1 Mac
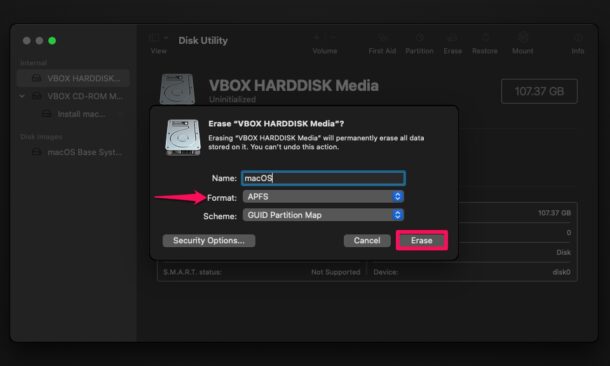
  4. Next, select the drive format as “APFS” and click on “Erase Volume Group” (or “Erase” if that is not available).
  5. How to Factory Reset M1 Mac
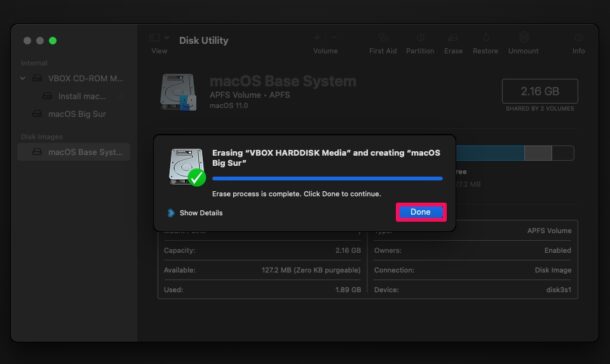
  6. This will initiate the drive wipe. It may take a few seconds to complete. Click “Done” to continue.How to Factory Reset M1 Mac
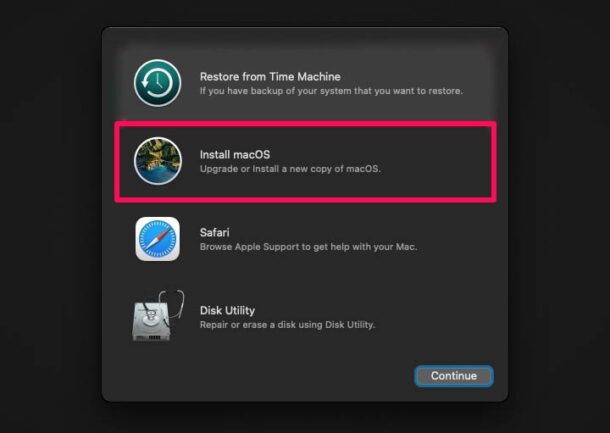
  7. Now, go back to the macOS Utilities screen, select “Install macOS” and click on “Continue”. You’ll be prompted to select the drive where you want to install macOS. Make the selection and click on “Install” to begin installing the factory version of macOS.How to Factory Reset M1 Mac

That’s all you need to do to perform a factory reset. At this point, you just need to patiently wait for the installation process to complete which could take a while. After the factory reset, you’ll need to go through the initial set-up screen like it’s a brand new Mac.

[mai mult...]

How to Use Disk First Aid with M1 Macs

For those who aren’t aware, Disk Utility has been an integral part of macOS since the beginning of Mac OS X. In addition to allowing users to erase and format their Mac’s storage drive before reinstalling macOS, it’s also capable of searching for errors related to the formatting and directory structure of the disk. Be cautious about disk errors though, as they can often lead to unexpected system behavior, and sometimes major errors can even prevent your machine from booting completely. Thus, using the repair function may be useful.

Before you go ahead with the following procedure, make sure you have made a Time Machine backup of your Mac so that you don’t permanently lose files that may be damaged during the process or if Disk Utility detects errors that it can’t repair. You’ll need to boot into recovery mode, a process that is different with ARM Apple Silicon Macs compared to Intel.

  1. If your Mac is turned on, you’ll need to shut down your Mac first. Once you’re done, press and hold the Touch ID / power button on your Mac to boot it up. Keep pressing the power button until you see “Loading startup options” right below the Apple logo. This will take you to the Startup Disk and Options screen. Hover the cursor over “Options” and click on “Continue”.
  2. How to Repair the Startup Disk on M1 Apple Silicon Macs
  3. Now, you’ll be taken to the macOS Utilities screen. Here, select “Disk Utility” and click “Continue” to get started.
  4. How to Repair the Startup Disk on M1 Apple Silicon Macs
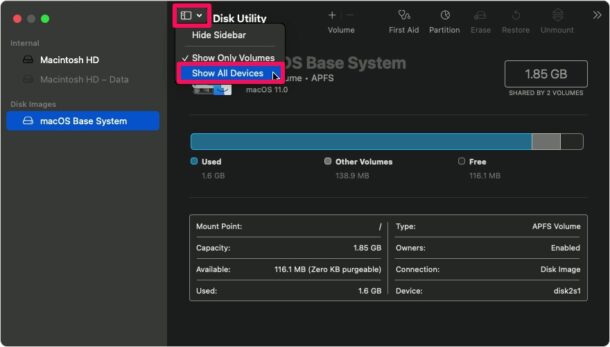
  5. Here, click on the View icon next to Disk Utility and choose “Show All Devices” as indicated in the screenshot below.
  6. How to Repair the Startup Disk on M1 Apple Silicon Macs
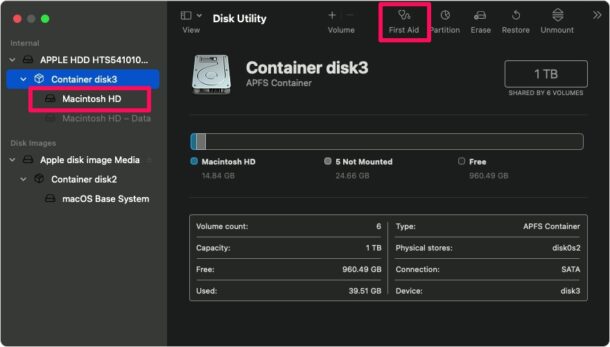
  7. Now, all the internal and external disks, their volumes and containers will show up on the left pane. The startup disk is located at the top of the sidebar and you’ll need to expand it to access its containers and volumes. Next, you need to select a particular volume as shown below and then click on the “First Aid” option located at the top of the window.How to Repair the Startup Disk on M1 Apple Silicon Macs
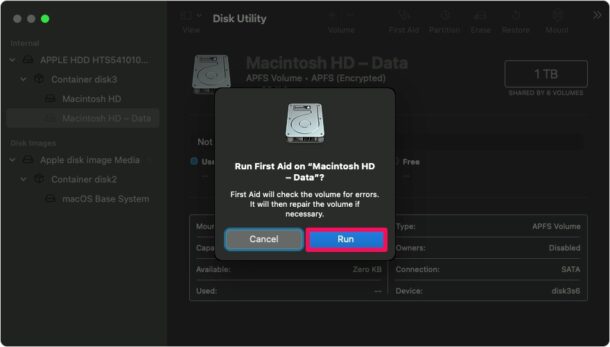
  8. When you’re prompted to confirm your action, choose “Run” to begin checking the volume for errors and repair if necessary.
  9. How to Repair the Startup Disk on M1 Apple Silicon Macs
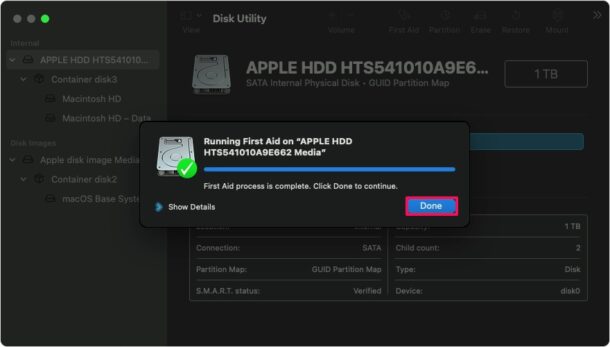
  10. Once it’s complete, click on “Done” and repeat the above steps to run First Aid on the other volumes, containers, and disks.
  11. How to Repair the Startup Disk on M1 Apple Silicon Macs

Once you’re done repairing your disk, you can exit out of macOS Utilties by clicking on the Apple logo from the menu bar and choosing “Restart” to reboot your Mac normally.

[mai mult...]

How to Play Flash Files

With Flash shutting down in 2020, you won’t have many options for playing old Flash files once big browsers like Chrome and Firefox stop supporting it. This project is a Flash player and web archive project rolled into one. You can download the software and use it to play over 38,000 old Flash games on your PC—no browser required, and entirely for free.

To use Flashpoint, you’ll need to download one of the available Flashpoint packages. The recommended option is Flashpoint Infinity, which will download games as you want to play them, with only an approximate 300MB file size.

Otherwise, you’ll need to download the full Flashpoint Ultimate package, which is nearly 300GB in size. This contains the entire archive of Flash games that Flashpoint has to offer, allowing you to play them whenever (or wherever) you want, completely offline.

Emulating Flash Online With Ruffle

If old Flash games aren’t your thing, you could use the Ruffle Flash emulator to run other types of Flash media content. This allows you to run old SWF Flash files in your PC browser, replacing Flash entirely.

With Ruffle, you won’t need to worry about Chrome support for Flash being dropped. Ruffle converts Flash content into a modern, web-friendly format. It shouldn’t be blocked by your browser, and you won’t need a Flash player built-in to do it.

Using The Adobe Flash Player 

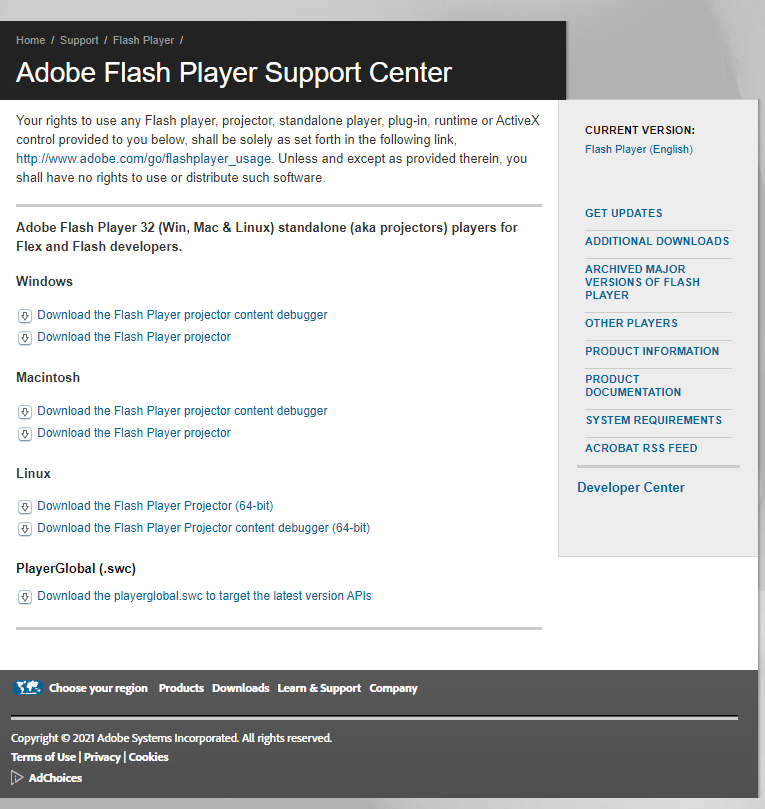
While Adobe has dropped support for Flash, you can still download Adobe Flash Player as a standalone player for your PC and Mac. To play SWF Flash files on your PC without a browser, you’ll need to download the Flash Player projector content debugger from Adobe.

  • At the moment, you can download this from a non-maintained Adobe support page. Click the Download the Flash Player projector content debugger option for your operating system, then run the file.

  • This version of Adobe Flash Player is self-contained, so you don’t need to install it to use it—just run the file, then in the Adobe Flash Player window, press File Open

  • Select your SWF Flash file in the Open box. You can use a web address link, or press Browse to run an SWF file from your computer.

The standalone Adobe Flash Player file will load and run your Flash content, allowing you to continue to play and interact with Flash files once Chrome and other browsers stop supporting it.

[mai mult...]

How to enable Family Sharing on Mac

Family Sharing is a great feature for any family who wishes to share content with each other. With Family Sharing enabled on your Mac it’s possible for up to six family members to share and access from iTunes, the App Store, and Apple Music. The only requirement is that one adult in the household needs to act as the administrator. They can invite other family members, choose features, and approve purchases; while the rest of the family enjoys shared music, photos and more.

To get started:
  1. Open System Preferences. You can do this by clicking the Apple logo in the desktop menu, then System Preferences.
  2. Click on iCloud.
  3. Click Family Sharing.
  4. Follow the on-screen prompts to enable Family Sharing.
How to invite a family member

Whenever you want to add a family member:

  1. Go to System Preferences, then click iCloud.
  2. Click Manage Family.
  3. Click +, or click the Add Family Member button,.
  4. Enter your family member’s name, email address, or Game Center nickname.

If they’re with you they can enter their Apple ID address and password and be added straight away. Otherwise, an invitation will be sent on your behalf. Once they have accepted they will appear in the Family Members sidebar.

How to enable Purchase Sharing

With Purchase Sharing enabled, once something is purchased from iTunes, iBooks, or the App Store, everyone in your family can download it for free too. To turn Purchase Sharing on:

  1. Go to System Preferences, then click iCloud.
  2. Click Manage Family.
  3. Click the My Apps & Services tab.
  4. Click Share my purchases with family.

You can manage the shared payment method from this panel, or disable Purchase Sharing at a later date.

[mai mult...]

How to edit a video using QuickTime on Mac

How to edit a video using QuickTime on Mac - macOS Guides

You might not know it, but QuickTime Player supports basic video editing tools, enabling you to trim a video then re-save it in various formats. This can be particularly helpful if you have a video saved on your Mac and you want to make it shorter.

Here’s how it works:

  1. Open a video in QuickTime Player.
  2. Press Command-T to access the trim tools.
  3. Drag the yellow handles to trim the video to its new length.
  4. Click the Trim button to save your changes.
  5. Press Command-S to save the video. It will be saved as a new video, so you will need to give it a new name.
[mai mult...]