
In this method, first, you need to add the sticker to the sticker gallery. Once in the sticker gallery, use the Markup editor in any app like Photos to paste the sticker on your picture as shown below:
[mai mult...]How to fix there was a problem with the NVIDIA App
The NVIDIA app is a handy way to keep your system up to date with the latest drivers and to optimize the games you’re currently playing. If you’re encountering an error on startup that reads “There was a problem with the NVIDIA app,” then you’ll be looking for some ways to fix it. We’ve got some troubleshooters in this article to help.
Fixing “There Was a Problem With the NVIDIA App”
This error shows up when the NVIDIA app fails to open correctly. There can be a few causes for this, ranging from outdated software to backend conflicts. It’s also important to note that the NVIDIA app only supports graphics cards from the GeForce GTX 900 series and onwards. Regardless of the cause of your error, we’re here to help you get it sorted.
Restart the App
The first and most obvious troubleshooter is to restart the app and then your PC. Long-running programs and machines can become more erratic over time due to memory leaks and related issues.
Stop and Restart Services
Multiple NVIDIA services are running on your PC beyond the app. If one isn’t working properly, it might affect your app. Stopping and restarting these can fix the issue:
How to combine multiple storage drives in Windows
I have built up a rather large collection of movies and TV shows that I’ve ripped from Blu-ray discs. Every few years, I find I need a bigger hard drive to hold them all, and with the introduction of 4K Blu-ray, even my multi-terabyte drive is bursting at the seams. If only there was a better way to organize and consolidate all these files. It just so happens that Windows has the perfect solution in a feature called Storage Spaces.
If you use multiple drives to organize all your files, Storage Spaces can combine them into a pool that Windows sees as one unified volume—with one drive letter. This is a helpful alternative to having all your data spread across multiple internal and external storage locations in a disorganized fashion.
Storage Spaces also allows you to add redundancy: If one drive fails, you can pop in a new one and rebuild your storage space without losing any data.
If you’ve heard of RAID, Storage Spaces is similar, only it’s performed entirely in software—no need for an extra RAID controller card. The performance of your storage space won’t be as fast as it would be with a RAID card, but it’s significantly cheaper and easier to implement when you’re just getting started with these types of pooling technologies.
[mai mult...]iOS 26.1: Bring back the Tap-to-Stop alarm button
Apple has changed how you dismiss iPhone alarms in iOS 26.1, and your morning muscle memory may have needed tweaking as a result. By default, the Clock app now requires a slide gesture to stop an alarm from the Lock Screen, replacing the previous tap-to-stop button that was redesigned in iOS 26. Snoozing still works with a simple tap, but turning off an alarm entirely demands the extra swipe motion.
The change appears designed to prevent accidental dismissals when you’re reaching for your phone in the morning. By requiring a more deliberate action, you’re less likely to silence your alarm when you meant to hit snooze. If you don’t like the change, you can revert the alarm interface back to the previous Stop button by following these steps.
[mai mult...]How to maximize laptop battery life
iOS 26: Switch back to the classic Phone App layout
Apple’s redesigned Phone app in iOS 26 introduces a unified view that combines recents, favorite contacts, and search on a single screen. But if you prefer the familiar tabbed interface from iOS 18, you can easily switch back to the classic layout.

The new unified design consolidates recent phone activity into one streamlined view in which your favorite contacts appear at the top for quick access. You can navigate to Contacts, Keypad, and Search through the bottom tab bar, while screens for voicemail and missed calls can be accessed via the three-line icon in the top-right corner.
Switching Back to the Classic View
If you don’t get on with the new look in iOS 26, here’s how to revert to the traditional Phone app layout:
iOS 26: See your full Call History with any iPhone contact
Buried within iOS 26 is a hidden history that lets you see every call you’ve ever exchanged with a specific contact, potentially going back years. You might not know it, but you can access this detailed call history on your iPhone in seconds.
Viewing the new extended history screen can come in handy when you need to recall when you last spoke with someone. It’s also pretty useful when you want to verify a call duration for whatever reason. Here’s how to get there.
Access Extended Call History
[mai mult...]Apple Maps may be Logging Places you visit – how to disable
In iOS 26, Apple Maps has a feature called Visited Places that when enabled automatically logs where you’ve been, with the aim of making it easier to revisit your favorite spots or to share locations with friends. While it can be useful for tracking your travels, you might prefer to keep your location history private.
[mai mult...]iOS 26: Track Emailed Orders in Apple Wallet
In iOS 26, Apple Intelligence makes the Wallet app’s order tracking feature genuinely useful by scanning your email for shipping details.
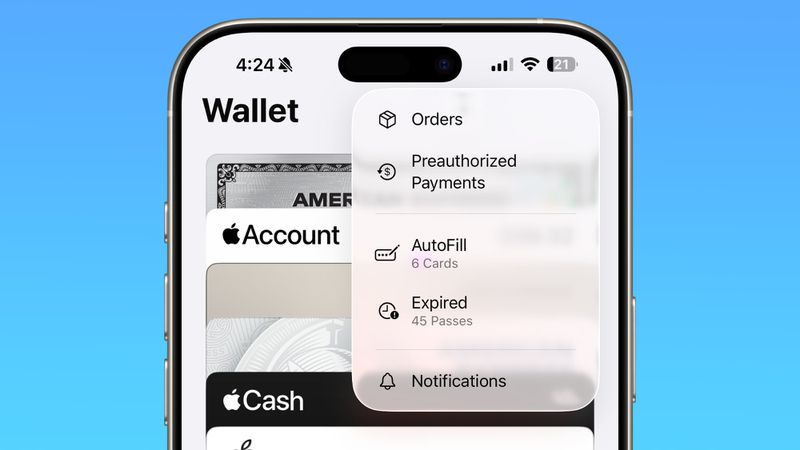
The ability to track orders in Apple Wallet isn’t new – it’s actually been around since iOS 16. But if you’ve never noticed it before, don’t worry. Most people haven’t used it either.
The feature initially struggled because it relied on merchants to actively support it, but not many bothered. In fact, despite being available for years, order tracking in Apple’s Wallet app remained largely unused. But there’s a decent chance iOS 26 will change all that.
Order Tracking Meets Apple Intelligence
In iOS 26, Apple Intelligence now scans your emails to automatically extract order tracking information. This means virtually any online purchase that generates a confirmation email can now appear in the Wallet app.
The on-device AI identifies shipping details from emails sent by merchants or delivery carriers, then consolidates everything in the Wallet app’s Order Tracking page.
Just note that you’ll need an iPhone 15 Pro, iPhone 16, iPhone 17, or iPhone Air to access the improved order tracking, since Apple Intelligence isn’t available on older devices.
Enabling Order Tracking in Settings
You can enable the AI-enhanced order tracking feature in the following way: