How to Reset a ProtonMail Password

ProtonMail logo

Since ProtonMail is a secure email service that prioritizes privacy and security, resetting your password is a bit different from “regular” webmail providers like Gmail. You can do it, but here’s what you need to know.

ProtonMail has two password modes: single-password mode and two-password mode. If you haven’t enabled two-password mode, you don’t need to worry about this, as you’ll be using the default single-password mode.

In single-password mode, the same password is used to log in and decrypt your inbox. In two-password mode, you have one password for logging in (your account password) and another for decrypting your mailbox (your mailbox password). ProtonMail itself does not have access to any of your passwords, regardless of which mode you’re using.

ProtonMail Two-Password Mode

If you’re using two-password mode, changing either of your passwords will default you to single-password mode. When the password used to decrypt your mailbox is changed, you will no longer be able to read your old emails. If you remember it later, you can restore access to your older emails by recovering the decryption key.

Regardless of which password mode you’re using, changing your password will result in your older emails no longer being readable. You will still be able to see unencrypted data like the sender, subject line, and metadata, but you won’t be able to read the message body or access attachments.

When you create a new password, you’ll also create a new key used to decrypt data stored in your inbox. You will only be able to read any emails sent or received after the reset, since they will be encrypted using the new key.

Reset Your ProtonMail Password via Recovery Email

This method assumes that you set up a recovery email when you registered your ProtonMail account. To reset your account password, visit mail.protonmail.com and click on the “Get help” link below the “Login” button.

ProtonMail Login

Using two-password mode? To reset your mailbox password, log in using your account password. Then, on the “Decrypt Mailbox” screen, use the “Forgot Password” link, and follow the rest of the process as normal.

Reset ProtonMail Password

Click on “Reset Password” and enter your ProtonMail username and a recovery email. This email must match the one that you specified when signing up in the first place.

ProtonMail Recovery Email and Username

Confirm your decision in the box that appears and make sure that you understand that proceeding will prevent you from being able to decrypt the contents of your inbox. In the next step, you will be sent a recovery code, but be sure to leave the recovery web page open while waiting for the email to arrive.

Warning: This will wipe all the emails in your account. You’ll be able to access your account again, but all of your previously received emails will be gone. You will still receive emails sent to the address in the future.

confirm your password reset

Once you have the email, enter the recovery code, followed by the “Reset Password” button. Another window will appear warning you about what will happen to your inbox when you proceed with the next step.

ProtonMail Reset Password Recovery Code

Enter the word “DANGER” in capital letters into the box to confirm your decision, followed by the “Reset” button.

ProtonMail Confirm Reset

Finally, enter a new password, and make a note of it in a secure place (like a password manager). Hit “Reset Password” to complete the process. You can now head back to mail.protonmail.com and log in with your new password.

Reenable Additional Security When You’re Done

Resetting your password will disable two-password mode and two-factor authentication. If you want to carry on using these features, make sure that you reenable them via Settings > Account (two-password mode) and Settings > Security (two-factor authentication).

Enable Two-Factor Authentication in ProtonMail

[mai mult...]

Cum setezi ca default restrangerea sau extinderea grupurilor in Outlook

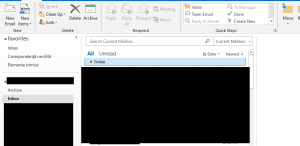
Se doreste setarea implicita a mail-urilor in format restrans sau extins in grupuri ce sunt sortate pe perioade de timp.In mod implicit, Outlook va grupa mail-urile in grupuri bazate pe momentul primirii/trimiterii mail-urilor.Aceste grupuri sunt: Today, Yesterday, Last Week, Two Weeks Ago, Three Weeks Ago, Last Month si Older.
Grup extins(in care se vad toate mail-urile din perioada respectiva):

Grupuri restranse(in care mail-urile sunt ascunse by default, iar pentru a expanda cu scopul de a se vedea mail-urile se va apasa pe sageata de dinaintea denumirii momentului primirii/trimiterii mail-ului):

[mai mult...]

How to Clear Your Tracked Step History on iPhone

If you’ve ever set up a profile in Apple Health on your iPhone, the app will collect data on how many steps you take each day. If you’d like to clear this record of your physical activity, it’s easy to erase it in the Health app. Here’s how. First, open the Apple Health app. If you can’t find it, swipe downward with one finger in the middle of your iPhone screen, then type “health” in the search bar. Tap the “Health” app icon that appears.

Using Spotlight, search for "Health" then tap the Health icon.

In the Health app, scroll down until you see “Steps,” then tap it. (Depending on how many other health metrics you use, the “Steps” section could be located on various parts of the screen.)

In the Health app, tap "Steps."

On the “Steps” screen, scroll down to the very bottom and tap “Show All Data.”

Tap "Show All Data"

On the “All Recorded Data” screen, tap “Edit” in the upper-right corner of the screen.

Tap "Edit"

The screen will change to an edit screen where you can delete data from individual days using the red circles beside each entry. To delete all recorded step data, tap “Delete All.”

Warning: Once you delete your step data, you won’t be able to get it back.

Tap "Delete All"

After confirming the deletion, Health will erase all of your step data. This does not prevent Health from collecting future step data, however. To do so, we’ll need to take a trip to Settings in the section below.

How to Disable Apple Health Activity Tracking on iPhone

If you’ve just cleared your step data and would like to prevent the Health app from collecting activity data in the future, it’s easy to turn off in Settings. First, open the Settings app.

Tap the "Settings" icon on iPhone

In Settings, tap “Privacy.”

In iPhone Settings, tap "Privacy."

In “Privacy,” scroll down and select “Motion & Fitness.”

Tap "Motion & Fitness."

In “Motion and Fitness,” tap the switch beside “Health” to turn it off. This will prevent the Health app from receiving any future activity data from your iPhone’s sensors.

Turn off the switch beside "Health."

Alternately, you can completely disable “Fitness Tracking” at the top of the screen, but doing so will also prevent other apps from using activity data. If that’s fine with you, just switch “Fitness Tracking” to “Off.” After that, exit Settings, and you’re done. From now on, Health will no longer know how many steps you take every day. Stay healthy out there!

[mai mult...]

How to Add a Gmail Account to Outlook Online

Microsoft Outlook Online has a dedicated button for adding a Gmail account to your online email client. Here’s how to pull your Gmail emails into Outlook in just a few clicks.

We’ve shown you how to add other email accounts into Outlook Online, but that process involved configuration pages that wanted to know things like port numbers and POP or IMAP server names. Granted, Outlook would usually fill that information in for you if it could, but it’s still a bit intimidating.

In an effort to make the process simpler and as an acknowledgment that there are well over 1.5 billion Gmail accounts, Microsoft added a dedicated “Add Gmail Account” button to Outlook Online. Here’s how it works.

[mai mult...]