Social

How to Create Conditional Formulas in Adobe Acrobat

There are several ways to create complex calculations in a clean elegant PDF file. Here’s how to integrate conditional formulas into your next document.

Conditional Formulas in Acrobat

We’ve previously covered the basics of automatic calculations in Adobe Acrobat. Conditional formulas let you go beyond the basics, creating more complex formulas in a PDF.

If you use formulas in Excel or Google Sheets, you likely already know what conditional formulas are. Also called logical formulas, they display a particular value or activate a calculation if a certain condition is met, such as if a number is negative or if a score is above the passing grade. Some of the most common conditional formulas in excel include the standard “IF,” as well as “SUMIF,” and COUNTIF.” There is also conditional formatting, where changes to the format are made if a cell meets a certain condition.

Using calculated fields, these kinds of formulas can also be applied in Adobe PDFs. You can display a number, text, or run a calculation based on the results of another input box. You can also use them in conjunction with other calculated fields. Conditional formulas are useful for many types of PDF forms, such as:

  • Financial Documents: For example, if the principal determines someone’s interest rate, a conditional formula can be used to display the corresponding price based on the amount they input.
  • Tests and Exams: You can make an assessment that automatically shows either “pass” or “fail” at the end based on the test taker’s total score.
  • Sales: If you’re using this for transactions, you can make a box that recommends products depending on a prospective buyer’s answers to specific questions.

Take note that while calculated fields can only be made in Adobe Acrobat, the actual calculations will display in any PDF reader.

Creating Simple Conditional Statements

Adobe Acrobat’s custom calculated fields use javascript as a programming language. Fortunately, you don’t need to know how to program in javascript to create a simple conditional field; you just need a basic pattern to follow.

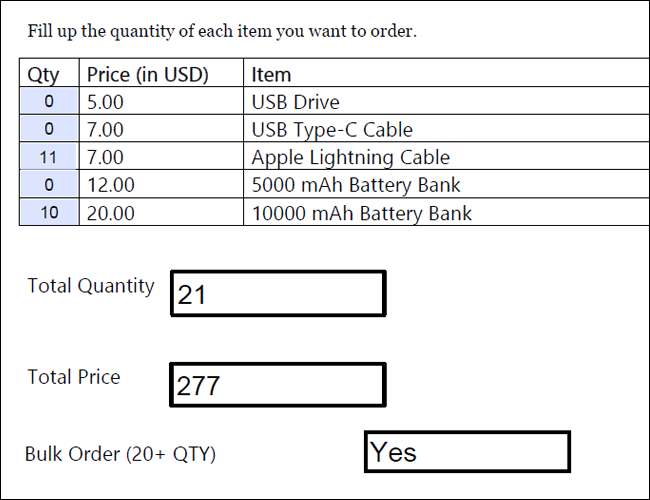
In the following example, we’ll be using this simple company order form. This currently has seven fields: one for quantities of each of the five products, the total quantity, and the total price.

A conditional statement in Adobe javascript follows this basic syntax:

var variable name = this.getField("name of field").value;
if( variable name condition) event.value = true result
else event.value = false result

The first line defines the value that will be used for your conditional formula. In this particular case, we used the “this.getField” to obtain the value of one of the other fields in the document. On the second line, we define the condition. Similar to excel, we specify the condition as being greater than, less than, or equal to a particular value.

Lastly, we define the results. The true result is the value that will be displayed if the condition is met. On the next line, we use “else” to generate the false result, which is the value that will be displayed if the condition is not met.

To put this into practice, we’ve created a calculated field called “Bulk Order.”  To enter a custom calculated script, right-click the chosen field in Acrobat, and select “Properties.” From here, go to “Calculate > Custom Calculation Script > Edit.”

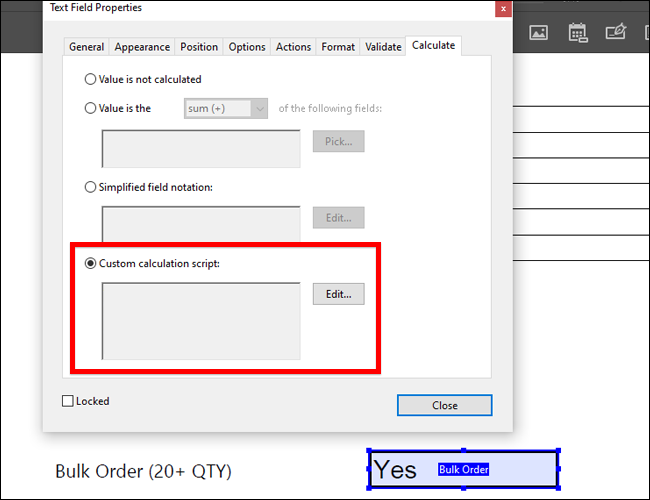
This field will determine whether or not an order counts as bulk. The box will display “Yes” if the total quantity is greater than 20 items, and “No” if it is less than 20. Considering these conditions, we have the formula:

var TQ = this.getField("Total Quantity").value;
if( TQ > 20) event.value = "Yes"
else event.value = "No"

In the image above, you can see that we set the variable name to “TQ,” and pulled the value of TQ from the field “Total Quantity.” Take note that these fields are case-sensitive. Then, we set our condition, which is that TQ must be greater than 20. If it meets this condition, it will display “Yes.” Otherwise, the box will generate “No.”

If we ordered a total of 11 Lightning Cables and 10 Battery Banks, for example, we’d have a total of 21 items. It would then be considered a bulk order, and generate the following result:

Multiple Conditions

There are cases where you may want to have multiple conditions met instead of just one. Fortunately, there is a way to create a conditional field that generates values based on multiple conditions.

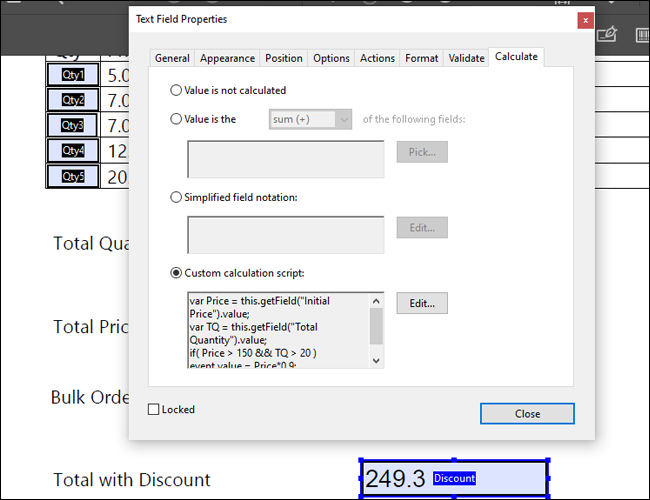
Let’s say that in your store, all orders that reach at least 20 products and have a total price of 150 are eligible for a discount of 10%. The final amount would appear in a field called “Total With Discount.” In that case, we’d have to specify two variables and two conditions. We would have the following field:

var Price = this.getField("Initial Price").value;
var TQ = this.getField("Total Quantity").value;
if( Price > 150 && TQ > 20 ) event.value = Price*0.9;
else event.value = Price;

As you can see, we defined two variables on two separate lines. You will also have to use the “&&” notation to combine the two different conditions. Take note that the final value is also a calculation that takes into account the discount.

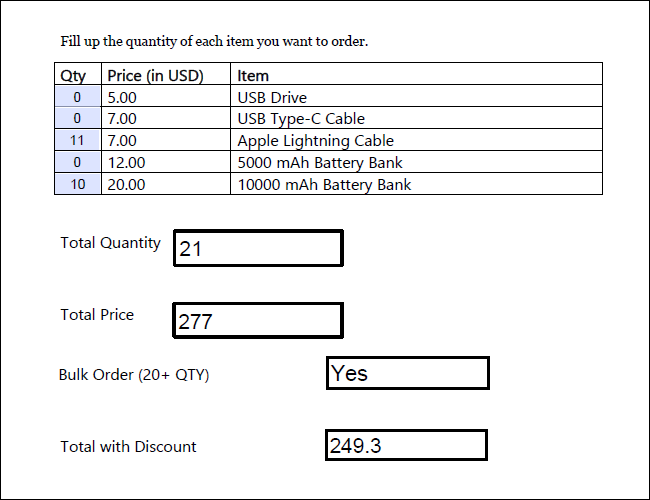
Therefore, if we use the same total as the example above, we’d generate the following result:

Calculation Orders

One important consideration you should make is the calculation order. Unlike Excel, which renders calculations simultaneously, Acrobat relies on the user to determine which formulas come first.

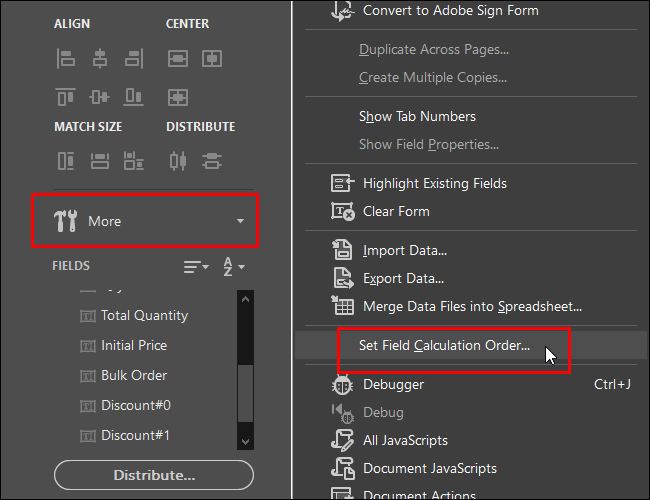
To set the calculation order, go to the “Edit Form” sidebar and navigate to More > Set Field Calculation Order. In the above example, because the formulas for Bulk Order and Total With Discount are both reliant on Total Quantity and Total Price, we want to make sure that TQ and TP are calculated first.

Make sure to review the calculation order before publishing your form. It’s a good idea to try a few sample inputs on your form to make sure everything is working correctly.


[mai mult...]

Opera adds the Play Music sidebar to Opera Browser for Spotify, Youtube and Apple

Opera Software released a new Developer version of its Opera web browser. The new version introduces support for music playback from the browser’s sidebar. Opera Developer is the cutting-edge development version of the browser. Features are introduced in the browser first before they land in Beta and Stable versions.

If you do like to play music in your browser, you may have noticed that it usually involves juggling between different windows, e.g. different browser tabs in a single browser, or, in the case of a dedicated desktop music player, between different program windows.

Some browsers introduced global media controls, e.g. Firefox and Chrome, to control playback in that browser without switching windows. While that is useful to some, it still requires accessing the music service’s interface for some operations, e.g. searching for music, playing a different playlist, or adding new songs to the existing playlist.

The Opera browser implementation is controlled via an icon in the browser’s sidebar. A click on it display the supported services — currently Apple Music, Spotify, and YouTube Music — that you may access from the sidebar. You can resize the interface and pin it if you want to make it stick to the screen.

A click on a service opens its startpage. What happens next depends on that service, as you may need to sign-in to an account to start using it. A click on YouTube Music displays the service’s startpage and options to play one of the listed playlists, e.g. top 100 charts, or to search for music

A click on the play button starts playback right away. Some services may display ads to free users, and these are played even if you have enabled Opera’s built-in adblocker.

Music playback continues even if the sidebar interface is hidden; Opera indicates playback by changing the icon of the player. If a site is opened that plays music or audio as well, music playback is paused automatically by the player to avoid that multiple sounds play at the same time in the browser. Playback is resumed once all other audio stops playing in the browser.

Opera users may customize the sidebar; they may hide any service that they don’t use to avoid clicking on these unintentionally. Click on the three dots at the bottom of the sidebar and toggle the options to hide them in the interface. You can also hide the entire sidebar if you don’t use it.

Installation links:

[mai mult...]

How to Switch From Google Play Music to YouTube Music

Google Play Music is going away. Google’s first music service will be shut down by December 2020. To keep your data, you’ll have to switch to YouTube Music—or download it. Here’s what you need to know.

When is Google Play Music Going Away?

Google has announced that “YouTube Music will replace Google Play Music by December 2020.” YouTube Music is Google’s replacement for Google Play Music. It appears to have the same big library of streaming music, but the interface is changing—and the app you’ll use to stream is changing, too. Google has been adding features from Google Play Music to YouTube Music, including the ability to upload and stream your own songs.

You will no longer be able to use the Google Play Music app to stream music starting October 2020. (The cutoff date is September 2020 in New Zealand and South Africa.) If you’re currently paying for a Google Play Music subscription and don’t transfer your account, Google will cancel your subscription at the end of your billing cycle in October (or September in New Zealand sn South Africa.)

However, you will be able to transfer everything you have in Google Play Music—your playlists, music uploads, purchases, and likes—to YouTube Music. The transfer service will be available through the end of December 2020.

After December 2020, Google will delete your Google Play Music data from its servers.

How to Switch to YouTube Music

You can transfer your Google Play Music account by using Google’s YouTube Music transfer tool. This is a one-time transfer process that will migrate all your Google Play Music data to YouTube Music. Visit the web page and click “Start Transfer.”

Whether you subscribe to Google Play Music’s streaming library or you’ve uploaded some of your own songs and you use Google Play Music to listen to them—or both—you can continue using YouTube Music to play your music after the switch.

If you’re an existing subscriber, you’ll now be billed through YouTube but your monthly subscription price and benefits will stay the same (“unless you are in a location with fluctuating currency,” according to Google.) Even if YouTube now charges extra for the benefits you’re paying for, you’ll keep any discounts you have.

After you’ve switched, head to the YouTube Music website and use the YouTube Music apps for Android, iPhone, and iPad to stream your music.

How to Download Your Music

If you’re done with Google’s music services, you can also download any uploaded music and take it with you.

Until late August 2020, you can still use the Google Play Music Manager application to download your uploaded music files from Google Play Music.

You can also use Google Takeout to download your Google Play Music data and take it with you. Ensure “Google Play Music” is checked to download everything—from a list of all the songs you’ve added to your library to any music files you’ve uploaded. Google Takeout should work until Google Play Music shuts down at the end of December 2020.

[mai mult...]

How to Choose Your Shopping List App in the Google Home App

Google Assistant and Nest smart speakers (aka Google Home) make it easy to add items to shopping lists with just your voice. If you don’t want to use Google’s built-in list, you can connect your device to a third-party app. Here’s how.

You can simply add things to a shopping list using the Assistant or your Nest speaker by saying, “Okay Google, add milk to my shopping list.” If you have a Google Nest speaker or display, you don’t even need to pull out your phone. Selecting a preferred shopping list is the first step in getting the most out of this feature.

Choose a Shopping List App on Google Home

Open the Google Home app on your iPhoneiPad, or Android device, and tap the “Settings” gear icon in the top section.

Scroll down to the “Services” section, and tap “Shopping List.”

Navigate to the “Select your notes & lists provider” section, and you will see a few different apps to choose from. Select the app you wish to use.

After selecting an app, a pop-up message will tell you that all future notes and lists created with Google Assistant will be visible in the selected app. Tap “Continue.”

You will be redirected to sign in to the selected app. Follow the steps outlined by your selected app.

Once finished signing in, you will be brought back to the “Notes & Lists” page in the Google Home app. Now, whenever saying something like “Okay Google, add milk to shopping list,” the Google Assistant will add the item to your chosen shopping list app.


[mai mult...]

Best Ways to Hide Your Identity Online

WHY IS HIDING YOUR IDENTITY IMPORTANT?

It’s far too easy for our personal details to leak on the internet, either via hackers, companies selling the information, or some other dishonorable method. Securing your identity as you use the web helps keep your personal details at a minimum so that you don’t have to worry so much about identity theft, harassment, privacy intrusion, spam, etc.

[mai mult...]