How to fully close discord
Restarting Discord isn’t as straightforward as restarting any other app. This is because Discord continues to run in the background even if you’ve closed it.
[mai mult...]Soluții pentru problemele tale IT

Restarting Discord isn’t as straightforward as restarting any other app. This is because Discord continues to run in the background even if you’ve closed it.
[mai mult...]Do you want to start getting calls and text messages from someone who you once blocked on your iPhone? Unblock their phone number on your iPhone, and they’ll be able to contact you again.
[mai mult...]Gaming headsets deliver immersive audio while allowing you to use your voice to communicate with other players. Wireless headsets offer a degree of freedom that wired ones can’t match, but most require a dedicated USB dongle to ditch the cable.
Microsoft made the decision not to support Bluetooth headsets in the Xbox Series X and S consoles. That means that you can’t natively connect your Bluetooth headset to your console or controller. You can still technically connect a Bluetooth headset to your controller’s 3.5mm stereo jack (which passes through audio) if you use a Bluetooth transmitter like the Uberwith Bluetooth Xbox One Transmitter.
Aftermarket Bluetooth transmitters are best avoided. They often introduce latency, which is disorientating in single-player games and could put you at a serious disadvantage in multiplayer.
[mai mult...]Atunci când achiziționați un desktop sau un laptop nou este mai accesibil să alegeți mai întâi un model mai ieftin, iar mai târziu să faceți upgrade la memoria RAM pentru a atinge performanța maximă. Întrebarea este cât de multă memorie RAM poate suporta calculatorul dumneavoastră. Este deja la maxim sau mai este loc pentru upgrade?
Pentru a afla câtă memorie RAM are în prezent computerul dvs. folositi combinatia de taste CTRL + SHIF + ESC pentru a deschide Task Manager. Din poza de mai jos putem observa ca laptopul are 8GB RAM si ambele sloturi sunt folosite ( slots used: 2 of 2).
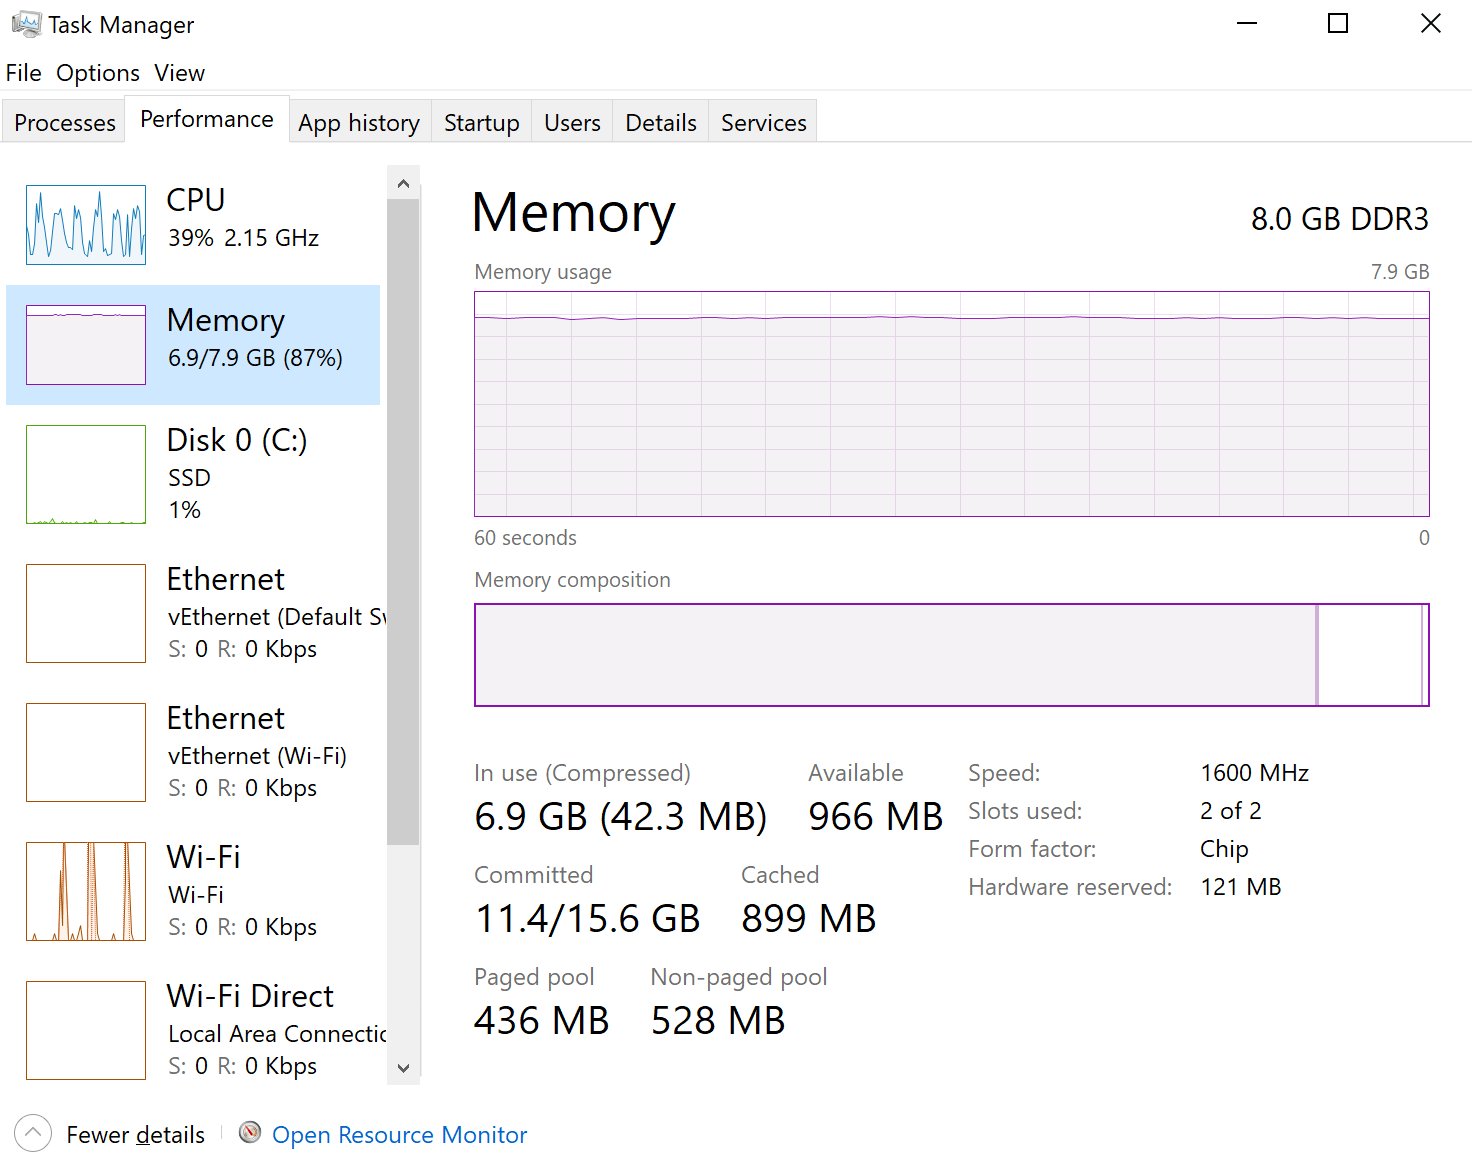
Din poza se poate vedea ca este nevoie sa marim capacitatea RAM (sunt folositi 6.9GB din totalul de 8GB). Pentru a afla ce capacitate RAM suporta sistemul nostru deschidem Comand prompt (linia de comanda) si introducem urmatoarea comanda:
wmic memphysical get MaxCapacity, MemoryDevices
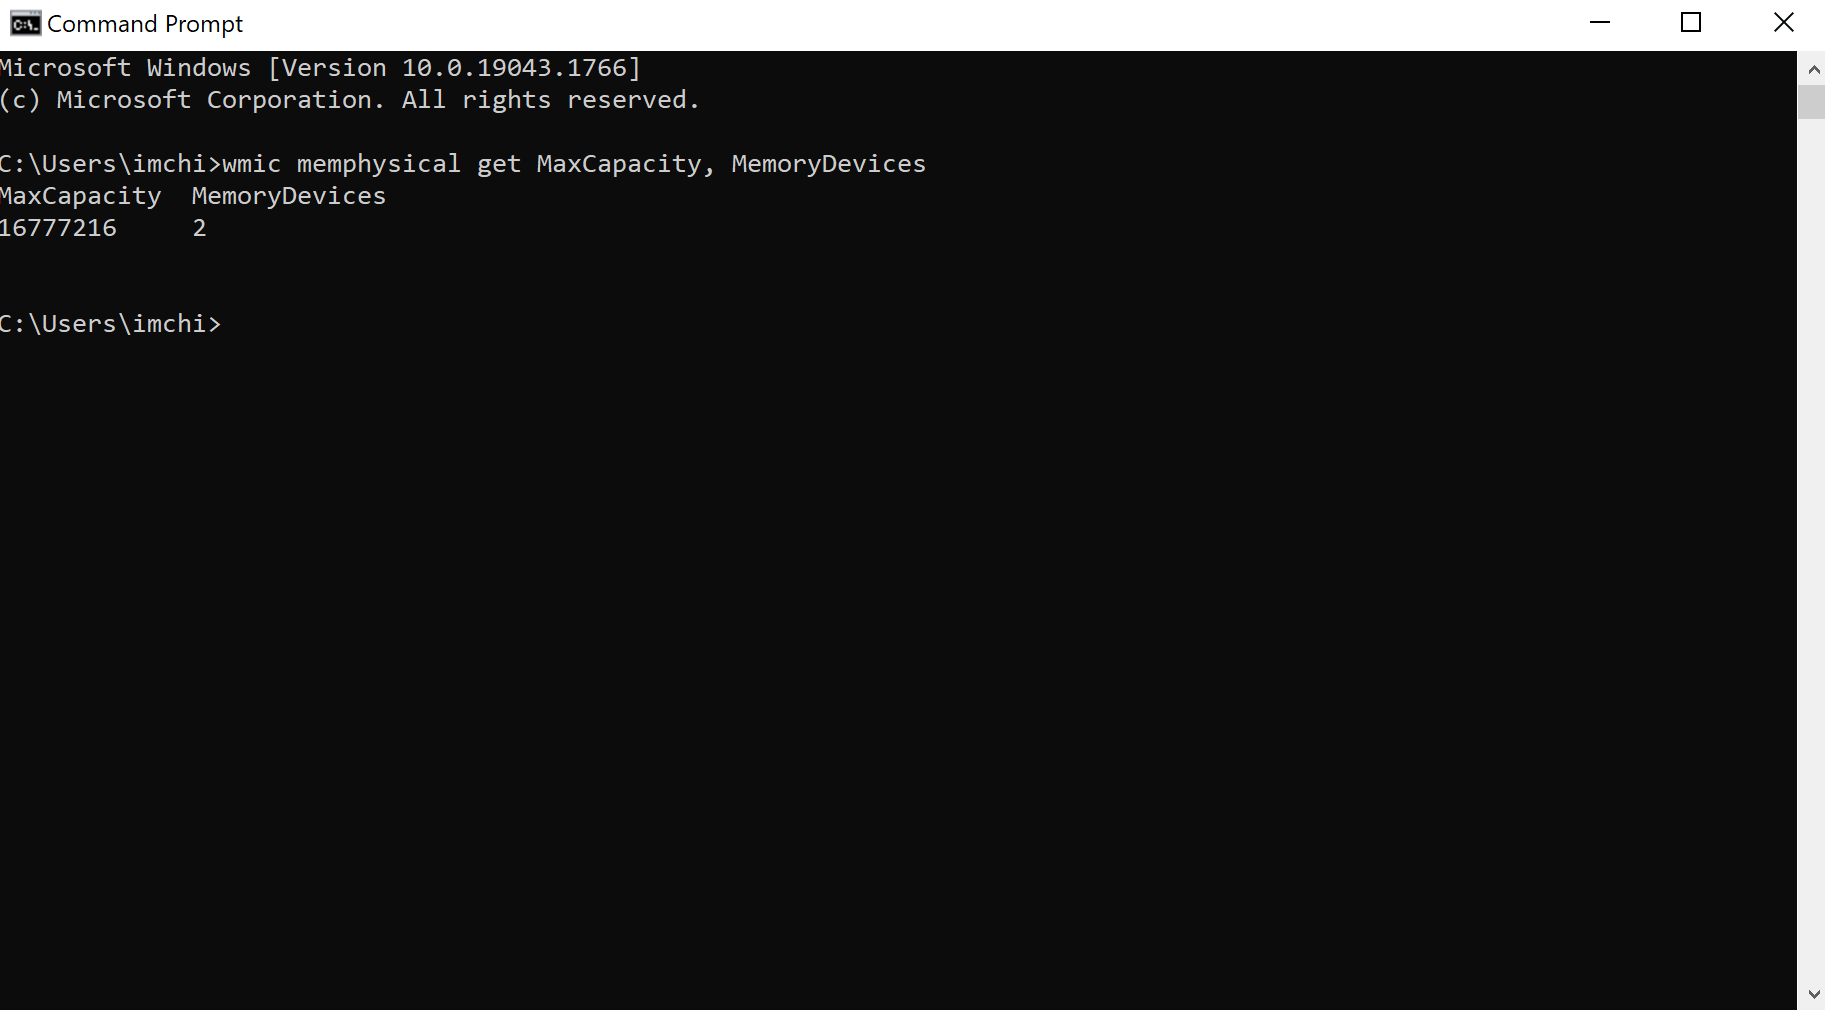
Capacitatea este exprimata in KB (Kilobytes). Pentru a converti KB in GB se imparte numarul de KB la 1048576. Din poza de mai sus se poate observa ca laptopul are 2 sloturi si o capacitate maxima RAM de 16GB. Se pot instala 2 memorii RAM de 8GB fiecare.
[mai mult...]Switching from an iPhone to an Android phone is not as difficult as you might think. The most tedious part is transferring all your personal stuff. We’ll show you how to move your iPhone SMS messages to Android, including iMessages.
Along with photos and videos, text messages are probably one of the things you care about the most when switching phones. Nobody wants to lose all of their conversations—some of which may be very important. The good news is you don’t have to. The first thing we need to do is prepare your iPhone to transfer text messages. To do that, we simply need to make sure you’re syncing your messages with iCloud.

Tap your profile at the top of the screen.

Select “iCloud.”

Scroll down and make sure “Messages” is toggled on.

Samsung offers an app called “Smart Switch” that you can use to move text messages (and other stuff) from your iPhone to a Galaxy phone. You’ll need the little USB-C to USB-A adapter that came with your Samsung phone. If you don’t have one, you can buy a cheap USB-C to USB-A adapter online.
First, open the “Smart Switch” app on your Galaxy phone—download here—and select “Recieve Data.”

Select “iPhone/iPad” as the source.

Plug the adapter into your Samsung phone and then connect it to your iPhone with the USB Lightning cable.

Smart Switch will begin “Searching for Data to Transfer.” When it’s done, you’ll see a list of things you can transfer from your iPhone. Select “Messages” and anything else you might want and tap “Transfer.”

This process can take a while depending on what you’re transferring. You can select “Keep Screen On” to ensure it’s not interrupted.

After it’s done, you can tap “Next.”

The next screen will remind you to turn off iMessage on your iPhone to make sure you get all messages.

That’s all there is to it! You can skip through the next few screens and you’ll see all your conversations —including iMessage—from your iPhone in your default texting app.
Samsung Smart Switch is a great tool because you can use it at any time. Google Pixel phones don’t have that option. You can only transfer data from a secondary phone during the initial setup process. So if your Pixel is already set up, you’re stuck with putting your data in the hands of a third-party app or resetting your phone.
Regardless, we’ll show you how it’s done. Go through the Pixel setup process and connect to your mobile network or Wi-Fi. Tap “Next” when it asks if you want to copy apps and data.

The next screen will instruct you to turn on your iPhone and unlock the screen. Tap “Next.”

Now we’ll need the USB-C to USB-A adapter that came with your Pixel phone. If you don’t have one, you can find them for cheap online. Plug it into your Pixel and then connect it to your iPhone with the USB Lightning cable. Tap “Next.”

Sign in with your Google account to continue with the setup.


You’ll be given the option to “Continue” with setup or leave and finish it later. Tap “Continue.”

Continue with setup until you get to the “Your Phone’s Almost Ready” screen. Tap “Done” to finish up.

The next screen will instruct you to turn off iMessage on your iPhone to ensure you don’t miss any messages.

Shadowsocks is a tool that uses the SOCKS5 proxy to reroute and disguise internet traffic and thus get past censorship blocks. It was developed initially by a Chinese programmer and is thus particularly useful in getting past the Great Firewall of China, though we’ve received reports you can use it for bypassing other regimes’ blocks, too.
Assuming you want to give Outline a shot, though, let’s get started with downloading the program. For this. For this, go to the Outline website and click on “get Outline.” The next page will show you download links for both the Manager and the Client, for now just install the Manager.

Once downloaded, open the program (for Linux you need to open the .AppImage file) and you’ll be met with a screen where you can choose the cloud service or server you’re using to route your traffic through. We’re using DigitalOcean for ours, but there are plenty of other options. DigitalOcean is the easiest option by far, though; you don’t even need to have a server ready.

In most cases, you’d have to set up your server beforehand, but using DigitalOcean all you need to do is link Outline to your account and the hard work is done for you. Just follow the on-screen prompts to authorize Outline to access your hosting account, all you need to do is choose a server location.

If you’re in China, Singapore is probably your best bet, though Bengaluru in India is a good alternative; we went with Amsterdam. Whichever location you go with, just click “set up Outline” in the top right when you’re done and the program will get started. The setup process will take a few minutes.

Once it’s done setting up, you’ll be greeted by Outline’s connection center, where you can set up connections—both your own as well as those of whomever you want to share the connection with—and track data usage. In the top right, you can also go to the settings screen to find information about the server as well as tweak functions to your liking. In our case, though, we want to hook up a device to the server, so we need to click on the icon next to “my access key.”

You’ll get a pop-up, just click “connect this device” and then make sure to copy the secure key in the next screen. After that, you’ll go to a third screen where you need to install the Outline Client. Just click “install outline” and the download will automatically start.

Once it’s downloaded, go to your downloads folder and open up the installer for the client. If it’s on the same device as the Outline Manager, the key will be automatically detected. Otherwise, you can enter it manually (in the image below, we’ve blanked part of the secure key.) Then hit “Add Server.”

Then all you need to do to connect to your new Shadowsocks server is to hit “Connect.”

You should now be able to access the internet through your new server. If you want to connect any other devices—including mobile devices, as Outline will work on Android and iOS as well—you should install the Outline Client on that device and enter the secure key. You can also create new secure keys if you want to spread security credentials around among friends and family, it’s up to you. Either way, you should now be able to browse the free internet.
[mai mult...]