Cum ștergi lista de descărcări în Opera GX (Clear Downloads)
Vrei să păstrezi browserul curat și organizat? Iată cum poți șterge rapid întreaga listă de descărcări din Opera GX:
[mai mult...]Soluții pentru problemele tale IT

Vrei să păstrezi browserul curat și organizat? Iată cum poți șterge rapid întreaga listă de descărcări din Opera GX:
[mai mult...]The Control Center on the Apple Watch is a quick and easy way to access some of the key features of your smartwatch. For example, if you want to see how much charge your Apple Watch has, you can press the side button to bring up the Control Center.
[mai mult...]When I first got started with my homelab, everything was run on IPs and ports. If I wanted to access Nginx Proxy Manager, I’d have to navigate to 192.168.0.6:7818. For Scrypted, it was 192.168.0.152:10443 (different machines on different IPs).
You can see how running 10, 20, 30, or more services on a network could get really confusing, as ports could be the same on different IPs for different services. Overall, it was just a jumble of IPs and ports I was trying to memorize. It didn’t work well.
Going with a domain for my homelab allowed me to start to set up DNS resolution for local IPs. While I typically use my public IP, you could also use your local IP for the domain resolution, which allows it to only resolve on your LAN.
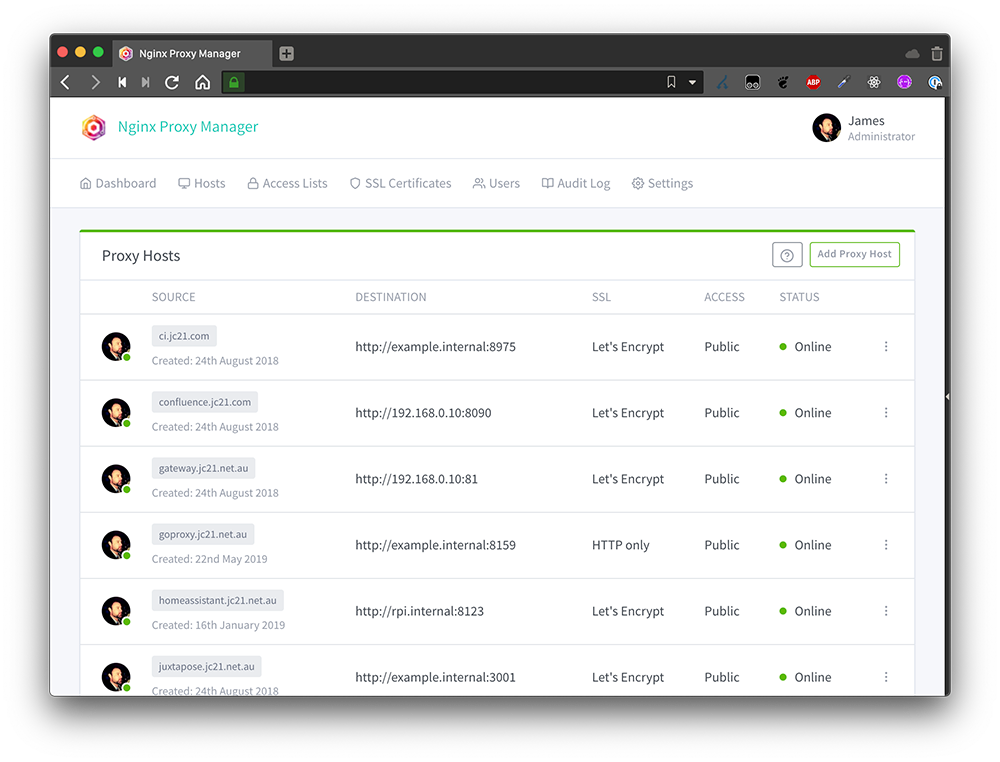
Now, instead of trying to navigate to 172.16.0.151:7818 for NPM, I just go to npm.mydomain.com. It’s much easier to remember, and if my LAN IP or port ever change for some reason, I don’t have to update my brain to remember the new info. I just update the DNS record, and now I’m heading to the same service with the same address, even though internally it’s located somewhere new.
OTV, or Overlay Transport Virtualization, is a network virtualization technology developed by Cisco that enables Layer 2 extension across a Layer 3 IP core—without the typical challenges of traditional tunneling or bridging.
In simple terms: OTV lets you connect multiple data centers as if they were part of the same LAN, even if they’re geographically distant.
OTV is designed to solve several problems when extending Layer 2 networks:
Avoids Layer 2 loops and broadcast storms
Requires no complex GRE or MPLS tunnels
Multicast-agnostic (doesn’t rely on multicast support in the core)
Ideal for data center interconnect (DCI), disaster recovery, and VM mobility
How OTV Works
Edge Device: Connects the local LAN to the OTV overlay. Typically a Cisco Nexus 7000 or 9000 switch.
Join Interface: The Layer 3 interface used to reach the IP core.
Overlay Interface: A virtual interface that bridges Layer 2 domains across sites.
OTV encapsulates Layer 2 Ethernet frames inside IP packets (MAC-in-IP) for transport over the Layer 3 infrastructure.
OTV vs. Other Layer 2 Extension Technologies
| Technology | Overlay Type | Scalability | Complexity | Multicast Dependency |
|---|---|---|---|---|
| OTV | L2 over L3 | High | Medium | No |
| VPLS | L2 over MPLS | Medium | High | Yes |
| VXLAN | L2 over L3 | Very High | Medium | Optional |
Use OTV when you need:
Seamless connectivity between data centers
Zero-touch VM migration (vMotion)
Efficient disaster recovery configurations
Clean separation between core IP routing and Layer 2 domains.
If you’ve never heard of Wacom tablets before, let me give a brief introduction to some of the best consumer drawing tablets that you’ll ever use.
Wacom has quite a few models of drawing tablets to choose from. Wacom has drawing tablets both with and without built-in displays, depending on what you’re looking for. Also, some tablets require a Bluetooth connection, while others are just over USB-C. Drawing tablets come in a mess of different prices, but they all seem to have the same specs. How are popular drawing tablets actually different from one another, and which one is right for you?
A drawing tablet is a slate that uses a pressure-sensitive pen, allowing you to draw, sketch, write, or do anything else on your screen. Some Chromebooks have a built-in touchscreen that allows you to do this, and some even come with styluses.
However, if you want the most accurate drawing experience, or if you want to add drawing capabilities to a Chromebook that didn’t come with a touchscreen, then Wacom’s drawing tablet lineup is perfect for you.
The Wacom One 13 Touch Pen Display is a drawing tablet that features a paper-like display and drawing surface, meaning when you draw, it feels like you’re drawing on paper. With two USB-C ports, it can connect to Windows, macOS, some Android devices, and even ChromeOS. It features a 13.3 inch 1080p touchscreen with a 11.6 x 6.5 inch active area. Plus, it offers 4,096 levels of pressure sensitive when used with compatible software.
For this article, I’m going to be using the Wacom One 13.3-inch Drawing Tablet with Display, with a USB-C connection to my Chromebook. I’ll still give some guidance on how to pair over Bluetooth if you opt for one of those drawing tablets instead.
My Wacom One only supports a USB-C connection, and not Bluetooth. USB-C provides the power, display, and touch inputs for the Chromebook.Your Chromebook does need to support USB-C display output for it to function optimally. If your Chromebook doesn’t have that, then it’ll still work, but only as a tablet and not as a secondary display.
If your Wacom is Bluetooth-enabled, then you can simply open the Bluetooth settings of your Chromebook, click Pair new device, and the tablet should show up there (once in pairing mode).
Truthfully, setting up the Wacom drawing tablet on a Chromebook is as simple as plugging the tablet in over USB-C (or pairing it over Bluetooth). Only a single connection is required for it to function, even though two are available on the Wacom One.
ChromeOS Automatically Identifies the Tablet and Recognizes Pen Input
Once the Wacom One is plugged into my Chromebook, it automatically detected the tablet and began recognizing pen input. I was a bit surprised at how flawless this was, but it really did work that easily.
The pen itself worked right away and in everything I tried. It either functioned as a mouse input for things like Chrome, or as a stylus when I was drawing. There wasn’t a single thing that I tried to do that didn’t work properly. The best part is, I truly had to install no drivers and I had to do no configuration to get it to work. It was just plug-and-play.
Pressure Sensitivity Is Slightly Hit or Miss
Now for the not-so-fun part: not everything works fully when using a Wacom tablet in ChromeOS. Yes, all Wacom tablets will work with ChromeOS natively. However, pressure-sensitive drawing isn’t natively part of the Chromebook’s operating system yet.
There are a few workarounds here, though. You can download some Android apps if your Chromebook supports the Play Store, and those will typically support pressure-sensitive inputs. Sketchbook, Infinite Painter, and others will typically support pressure-sensitive drawing.
If your Chromebook supports Linux, then you can also use apps like Krita or GIMP. Some Linux apps properly work with pressure-sensitive drawing, and others don’t, with the list changing all the time. So your mileage may vary here a bit.
The HP Chromebook x360 14b delivers an Intel i3-N305 8-core procesor, 8GB of LPDDR5 memory, and 128GB of UFS storage to pack a solid punch as a portable computer. Flanked by a 14-inch 1080p touchscreen and a 360-degree hinge, this Chromebook is ready for whatever you want to throw at it. You’ll find two USB 3.1 5Gbps ports alongside one USB-A 3.1 5Gbps port on this Chromebook, plus a 3.5mm combination headphone/microphone jack. With over 10 hours of usage per charge, this Chromebook is ready to go all day with you.
For me, Gimp installed on Linux via apt worked with pen input properly, but it did not work for pressure-sensitive drawing. On the other hand, Sketchbook from the Play Store worked flawlessly out of the box for pressure-sensitive drawing.
Chromebooks can be far more useful than you might think. In fact, they can even be capable gaming machines thanks to the new Steam Beta that’s out for ChromeOS! If you’ve not tried gaming on your Chromebook, you definitely should. While it might not play Call of Duty all that great, older retro titles are perfect on Google’s portable computers.
[mai mult...]The Best Portable Speakers of 2024
Compact and lightweight, portable Bluetooth speakers are a great way to bring your music with you.
Alternatively, compact speakers that can be linked together for a larger array (more on this later) can also sound big and cover larger areas, too.
The JBL Xtreme 4 pumps out impressive bass and clear mids and highs, with enough volume to not get lost in the open air of your camping or beach day. Nothing can grind a great pool party to a halt like a rogue cannonball washing the Bluetooth speaker clear off the deck. To ensure the party keeps going rain or shine, sand or swim, you need a Bluetooth speaker with an IP rating to suit your needs.
“Ingress Protection” ratings are an internationally recognized and standardized code that identifies the levels at which everyday electronics such as speakers and headphones can repel water and/or dust and debris.
With regards to Bluetooth speakers suitable for outdoors, the one you choose is going to depend on how you plan to use it. On one end of the spectrum, for outdoor use I don’t recommend a speaker with anything less than an IPX5 rating—it’s only going to fend off light splashes, rain, and “low pressure water jets,” (read: you can rinse it off under the tap) but it might suit your purposes.
Next, a Bluetooth speaker with an IPX7 or higher will be great poolside, and most other places, and can actually be submerged in up to one meter of water for up to 30 minutes. IPX8 goes one step further, with up to three meters of immersion for longer periods, but this is rare with Bluetooth speakers. Many of these speakers are also buoyant; if you’re worried about a speaker, say, falling off your stand-up paddleboard.
Lastly, for sandy beaches, salt water, and dusty trails, I recommend no less than a dust/foreign object rating of 6—IP67, for example, which provides “dust-tight” protection and can also be submerged in water.
The JBL FLip 7 has one of the highest water- and dust-proof ratings, at IP68.
Bluetooth speakers come in all shapes and sizes these days, but it all depends on what your definition of portable is. It’s also worth keeping in mind that typically, the bigger the speaker, the more powerful and better sounding it will be. Smaller speakers are great, but you should expect less from them in the sound department.
For big family picnics and backyard parties that may or may not end in sing-alongs or karaoke, you might consider a party speaker that can pump out hundreds of watts of power. Sure, some of them (like the JBL PartyBox Stage 320) are big, but many are surprisingly movable, with sturdy wheels and retractable telescopic handles making them easy to fit in a trunk and roll to the festivities. Loads of them, like the Soundcore Rave 3S, also have fun features like karaoke and LED lights.
If you don’t need quite that level of power, a great mid-sized boombox-style Bluetooth speaker like the Soundcore Boom 2 Plus is a good option. If you’re not going too far from home or the car, like to the beach or car camping, these speakers often have sturdy handles and/or shoulder straps that make them manageable when toting around. Their bigger size means more power and volume, and they can often be used as a power bank to charge your devices.
Often designed with outdoorsy types in mind, compact Bluetooth speakers are among the most rugged on the market, able to take a beating and withstand the elements. Many, like the Ultimate Ears Wonderboom 4, JBL Clip 5, and Tribit StormBox Micro 2 also come with sturdy clips and straps for hanging off trees, inside tents, or mounting on your handlebars.
Ultimate Ears Wonderboom 4
For extended parties that rage into the night or even weekend camping trips, you’re going to want to look at speakers in the 18-hour plus range, such as the compact JBL Charge 6 (24 hours), the mid-sized Soundcore Boom 2 (24 hours), and the new Sony ULT Field 3 and Field 5 speakers, that boast 24- and 25-hour batteries, respectively.
The Sony ULT Field 5 offers clean, clear sound, big bass to spare, and most importantly, a battery that lasts up to 24 hours.
I’ve gone through all the main things to consider when looking for a Bluetooth speaker, but with there being so many to choose from, it could come down to one or two unique or premium features to nudge you towards one or another.
As I mentioned briefly above, many Bluetooth speakers can connect wirelessly to other speakers, either to create a stereo pair for a more traditional-like left-and-right profile for a more dynamic soundstage, or to link up several to simply expand the sound over a larger area. Some manufacturers do this with their own branded linking tech (with names like Party Link, Stack Mode, and Party Connect), while more companies are starting to use the newer Bluetooth-LE-based tech called Auracast to connect an almost limitless number of speakers together.
One of the more useful battery-related features to arrive over the years has been the ability of a speaker to double as a power bank. Charge up phones, tablets, and other devices over a USB cable to keep them powered up. This feature has come in handy more times than I can count while on camping trips when my phone has died. Of course, it means less music, but in a pinch, it’s good to know your phone will be good to go in an emergency.