Cum sa stergi un drive mapat pe statie folosind CMD
Se doreste stergerea unei mapari facute in trecut de care nu mai avem nevoie
[mai mult...]Soluții pentru problemele tale IT
Se doreste stergerea unei mapari facute in trecut de care nu mai avem nevoie
[mai mult...]Pictogramele care se afișează pentru fișierele din Windows sunt salvate într-o memorie cache, astfel încât acestea să poată fi afișate rapid, în loc să fie nevoie să le scanați manual și să le încărcați lent de fiecare dată.
Cache-ul de icon-uri poate fi uneori deteriorat, cauzând afișarea incorectă sau distorsionată a pictogramelor fișierelor. Când se întâmplă acest lucru, memoria cache trebuie ștearsă pentru resetare și pentru recreația automată a acesteia.
Reconstruirea memoriei cache a pictogramelor ne va ajuta cu următoarele probleme legate de pictograme:
Pictograma unei comenzi rapide care nu se afișează corect din cauza sursei țintă a comenzii rapide a fost mutată sau ștearsă. Este posibil să fie nevoie să creați o nouă comandă rapidă direct din fișierul sursă (ex: program exe).
Toate pictogramele pentru o extensie specifică de fișier afișează pictograma greșită. Acest lucru se poate datora setării unei asociații greșite pentru ce aplicație să se deschidă tipul de fișier. În acest caz, restaurarea asocierii implicite a extensiei de fișier va remedia această problemă.
Miniaturi de foldere, imagini, videoclipuri și documente.
GPO pentru accesul cu Remote Desktop + Advanced Security.
Windows Server 2012
[mai mult...]Se doreste aflarea zilelelor ramase din licenta trial pentru “Remote Desktop”
[mai mult...]Urmeaza sa expire perioada de licenta pentru conexiunile Remote Desktop
[mai mult...]Windows Defender is the default antimalware security software that comes built into Windows 10. It protects your system in real-time against all sorts of security threats such as viruses, worms, rootkits, spyware, and even ransomware.
Windows Defender continues to improve with each major update of Windows 10.
While Windows Defender does a pretty good job with the default settings, nothing is 100 percent effective, and it doesn’t hurt to amp it up when it comes to changing cloud-level protections. Selecting a higher level of protection makes Windows Defender more proactive in scanning and detecting suspicious files.
These initial steps require using Group Policy which isn’t available in the Home versions of Windows 10. Use the Windows Key + R to bring up the Run dialog and type: gpedit.msc and hit Enter or click OK.

Next, navigate to the following location:
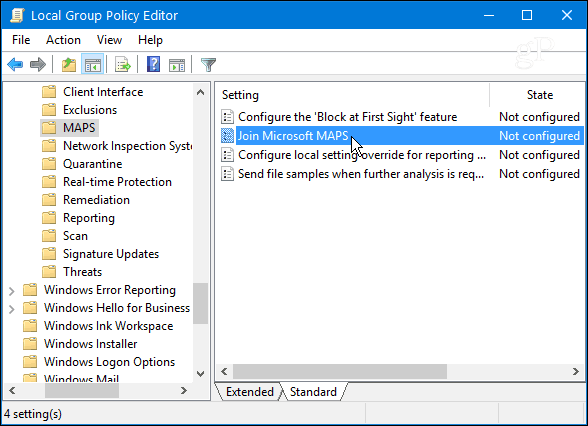
Computer Configuration > Administrative Templates > Windows Components > Windows Defender Antivirus > MAPS
Double-click Join Microsoft MAPS located in the right-panel.

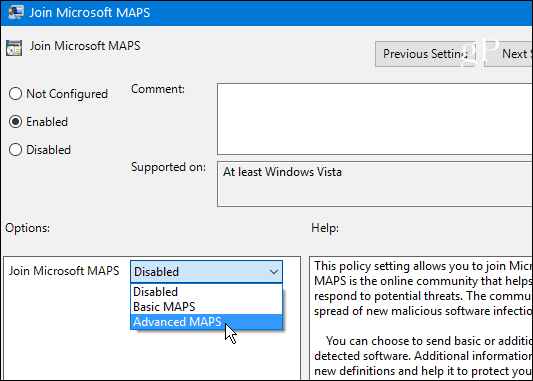
Select Enabled and under Options select Advanced MAPS from the drop-down and click OK.

Now that you have enrolled your Windows 10 device in the MAPS program you can change the cloud protection level of Windows Defender. Continuing in Group Policy head to the following path:
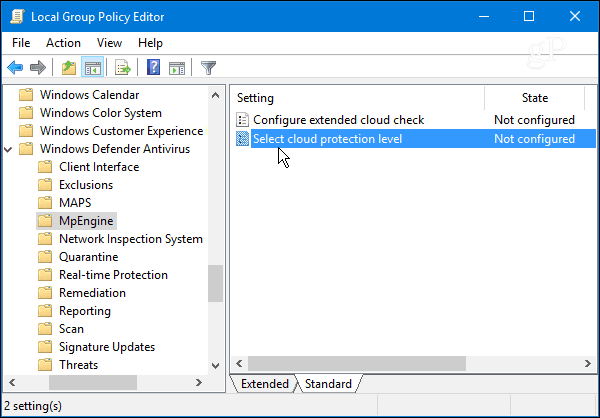
Computer Configuration > Administrative Templates > Windows Components > Windows Defender Antivirus > MpEngine
Then double-click Select cloud protection level in the right panel.

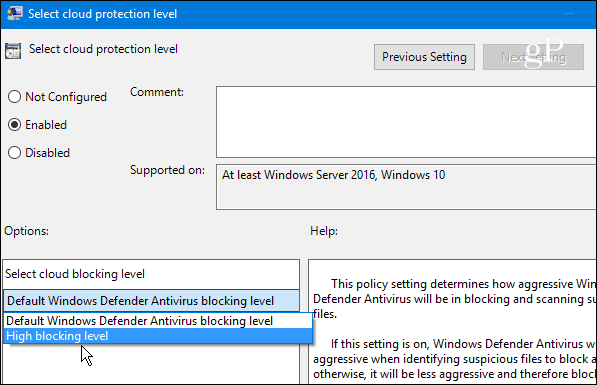
Select Enabled and under the Options section select High blocking level from the drop-down menu and click OK to close out of Group Policy.

