Situatie
Creating forms with Microsoft Word is easy, but the challenge comes in when you decide to create fillable forms with options that you can send to people and have them fill out digitally.
Solutie
There are two main options to get started with your form creation. Option one is easy to use if you can find a template that suits your needs.
- To find templates, click on the File menu and select “New.”
- You will see many premade templates available for download. Simply click on “Forms” and look through the selection of templates to find one that suits your needs.

For other versions of Word, select the File tab and click “More Templates” in the Home section. Enter “Forms” into the Search box and you’ll see a collection of forms you can use.
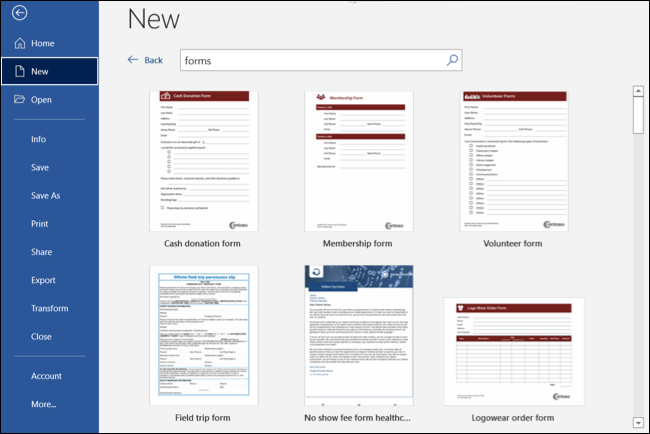
When you have found your template, just download it and edit the form as needed.
Create a Form From Scratch
Since that is the easy way and you may not be able to find a template that fits your needs, we will discuss the best way to create forms from scratch. Begin by creating a blank document.
Enable the Developer Tab
In order to create fillable forms, you will need to start by enabling the developer tab by clicking on the File drop-down menu and then choose “Options.” Open the Customize Ribbon tab and select the “Main Tabs” option under Customize the Ribbon.

Now you will need to select the Developer box and press “OK.” Once you have done this, you will notice that an additional menu has been added to the top of the screen with several new developer options.
Populate the Form
Now that you have a blank document, you are ready to start adding information to the form. The form we will create in this example is a simple form to collect information about people who fill them out. First, you will need to enter the basic questions. For this tutorial, we will try to get the following information:
- Name (Plain Text Response)
- Age (Drop-Down List)
- D.O.B. (Date Response)
- Sex (Check Box)
- Zip Code (Plain Text Response)
- Phone Number (Plain Text Response)
- Favorite Primary Color and why: (Combo Box)
- Best Pizza Toppings (Check Box and Plain Text Response)
- What is your dream job and why? Limit your answer to 200 words (Rich Text Response)
- What type of vehicle do you drive? (Plain Text Response)
Click on the Developer tab which you added earlier and under the Controls section, choose “Design Mode” to begin creating different control options. If you want to see what it looks like in action, remember to deselect the Design Mode option.
Text Sections
For any answers that require a text-based answer, you can add text sections. You will do this by selecting the Rich Text Content Control (allows users to edit formatting) or the Plain Text Content Control (only allows plain text without formatting) option.
Remember that you can edit the text in the content control boxes to match the questions by clicking in them and typing as seen in the image above.
Insert a Drop-Down List with Options
- For questions that only allow one answer such as numbers (question 2), a drop-down list is handy. We will add simple list and populate it with age ranges. You will need to add the content control box, right-click on it, and select the “Properties” option.
- Next, click on “Add” to add age ranges.
- When you are done, it should look something like this (Design Mode Disabled).
Alternatively, you can add the Combo Box Content Control, which will allow you to add any options you want, as well as allow users to enter additional text if needed. Let’s add a combo box to question 7. Since it is a combo box, users will be able to select an option and type why they like the color.
Add Check Boxes
For the fourth question, we will add check box options. You will first enter your options (male and female). Now you can add the Check Box Content Control after each option.
Repeat the process for any other questions that require one or more options. We will add check boxes to question 8 as well. We will also add a plain text response box for any toppings not listed.
Wrapping Up
The completed blank form should look like the images below depending on whether you have design mode enabled or disabled.