Situatie
If you find yourself working on-the-go in the Excel mobile app, you might struggle when it comes to tables. That tiny screen isn’t always sufficient for viewing table data, much less editing it. Luckily, there’s a feature that can help.
Microsoft introduced what’s called Cards View for working with tables in Excel on Android and iPhone. Using this feature, you can see portions of your table in full view. You can then add more data, make changes, and manage your table data easier.
Solutie
Open Cards View in Excel
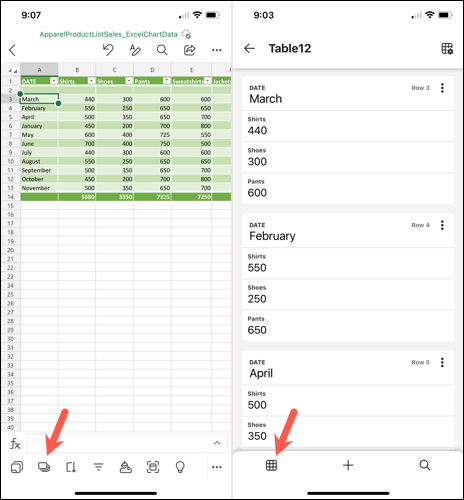
To get started, open Excel on your mobile device to the sheet you want to use. Head to your table and select any cell within it. Tap the Cards View icon (a stack of cards) that appears at the bottom.
You’ll then see cards for your table in full view. Simply scroll down to see all of the cards. To return to your original view at any time, tap the Table View icon (grid) on the bottom left.
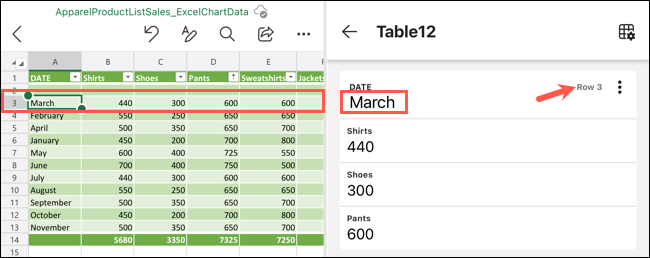
Each row of your table is a card. You can see the row number on the top right and your row header as the main field for the card.
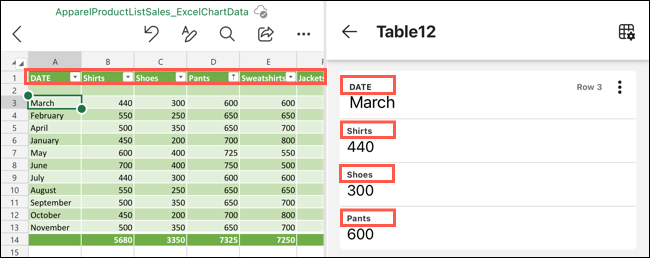
And, each column in your table is a field on the card.
Edit Table Data
- To edit the existing data in the table, select the card containing the data you want to change. Tap the data, make your change, and select “Done” on the keyboard.
- You’ll notice when you select a specific card, the Previous and Next buttons appear at the bottom. This allows you to move through each card and make additional changes easily.
- Tap the arrow on the top left to return to the main Cards View screen.
Add a Card
- You can add a card, which is another row, to your table easily. To simply add a row to the end of your table and list in Cards View, tap the plus sign at the bottom.
- To add a card in a specific spot, open either the main Cards View page or a card’s detail screen. Tap the three dots on the top right of a card. Select either “Insert Above” or “Insert Below.”
- You’ll then see a blank card with your existing table fields. Enter your data and tap the arrow on the top left to go back. Your new data saves automatically.
Delete a Card
To remove a card, tap the three dots on the top right in Cards View or the card’s detail screen, pick “Delete,” and confirm by tapping “Yes.”
Warning: Keep in mind that removing a card deletes that row from your table.
Share a Card
You can share a card from Excel as an image. This is helpful if you want to save, send, or share certain table data.
Do one of the following to open the Share Card option:
- On the Cards View screen, tap the three dots on the card and pick “Share Card.”
- On the card’s detail screen, tap the three dots and pick “Share Card.”
- On the card’s detail screen, tap the Share icon (enclosed arrow) on the top right.
Next, select “Continue to Share” at the bottom and choose a sharing method per your device’s sharing options.
Edit the Table Structure
In addition to editing your existing data or adding more as described above, you can change the current table fields (columns) and formatting.
- On the main screen for Cards View, select the Table Settings icon (grid with a gear) on the top right. You’ll then see the Field Label (column header) and Format for each piece of data.
- Tap a Field Label to change the text or the Format icon to change the format.
- To add a field, either tap the plus sign at the bottom and enter the Field Label or choose a specific field type like general, text, or number using the Add Field section at the bottom.
- To remove a field from the table, tap the Delete icon (trash can) on the top right. Select the Delete icon to the right of the field you want to remove and then tap “Yes” to confirm the action.