Situatie
If you installed the latest Windows 10 OS version on your computer and you want to fix Windows 10 update error code 0x80070057. We’ve got a piece of good news for you, if you carefully follow the steps listed below in the order they are described, you can get on with your Windows 10 usage in no time at all.
For you to fix the 0x80070057 error code, you will need to have administrator rights on Windows 10 for the group policy editor feature you have available in the operating system. Also, you will need to have administrator rights to run the required command lines in the Command Prompt window. I am sure that if you already installed the latest Windows 10 OS version, you’ll have no problems in accessing Command Prompt.
Solutie
Pasi de urmat
1. Configure Automatic Updates
- Press and hold the “Windows” button and the “R” button.
- This should bring up the “Run” window.
Note: Another way to open the Run window is by left clicking on the Start button and in the search box present there you need to write “Run” then left click on the Run icon that appears after the search. - In the run dialog box you will need to write the following: “gpedit.msc” without the quotes.
- Press the “Enter” button on the keyboard.
- Now that you have the Local Group Policy Editor in front of you, double click on the “Computer Configuration” icon present in the right side.
- Now double click to open the “Administrative Templates” folder.
- From the “Administrative Templates” folder, double click to open “Windows Components” folder.
- From within the “Windows Components” folder, double click to open “Windows Update” folder.
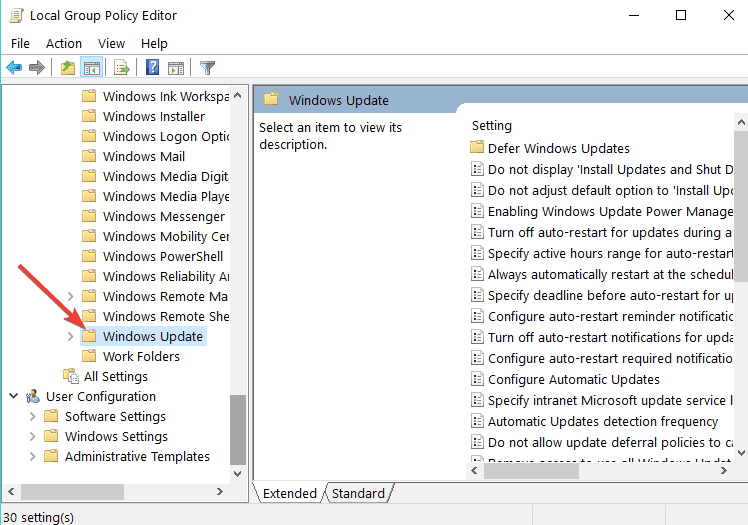
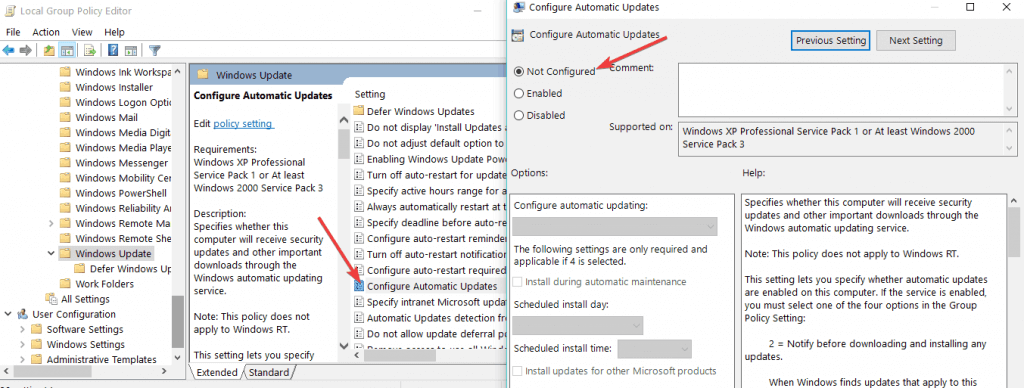
- In the Windows Update folder search for “Configure Automatic Updates” file and check if it is set to “Not Configured”.
- If it is set to “Not Configured”, then left click or tap on the Start button.
- In the search box write the following: “Cmd” without the quotes.
- After the search has finished right click on the “cmd.exe” icon and left click or tap on the “Run as Administrator”.
Note: if you get a pop up from User account control left click or tap on the “Yes” button to continues. - In the Command Prompt window write the following: “gpupdate /force” without the quotes.
- Press the “Enter” button on the keyboard.
- Let the process finish and reboot your Windows 10 computer.
- After the system starts check again to see if you are able to use the updates feature in Windows 10.
2. Repair your partition/ Run Disk Cleanup
Error 0x80070057 often occurs when the partition that you reserved for your OS is damaged. Fortunately, you can quickly fix this issue by running a dedicated hard drive repair software to restore your partition health.
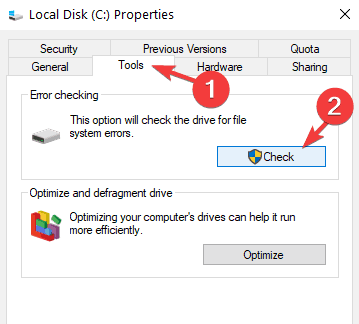
You can also check your drive for errors. Here are the steps to follow:
- Right-click on the problematic partition > Go to Tools
- Under ‘Error checking’, click on the Check button to check your drive for system errors.
Temporary files and other junk files may also cause your hard drive and OS partition to behave erratically. You can fix this by running Disk Cleanup.
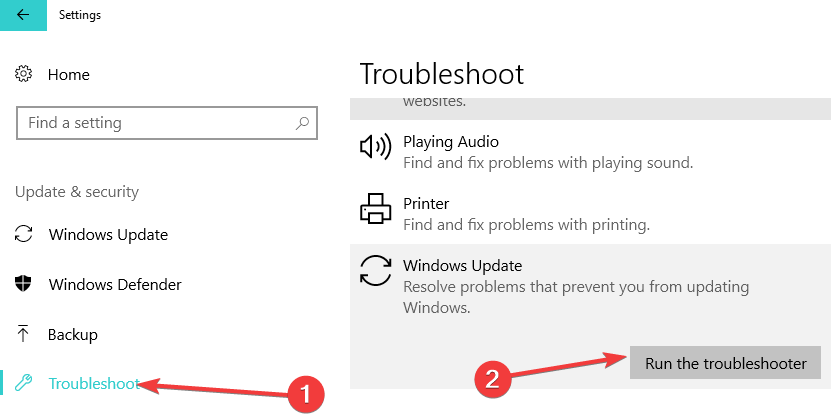
3. Run the Windows Update troubleshooter
If you’re looking for a quick and reliable method to fix Windows update errors, you can try running the built-in Windows Update Troubleshooter. This tool quickly scans and repairs Windows Update components so that you can then install the available OS update without any problems. You can run the troubleshooter by going to Settings > Update & Security > Troubleshoot > Windows Update.
4. Download the latest Servicing Stack Update (SSU)
First of all, you need to see what OS version you’re using: 32-bit or 64-bit Windows. To do this, go to Settings > System > About > scroll down to System type.
Now, go to Microsoft’s Update Catalog website and simply download the version of the latest SSU — which is KB4090914 at the time of writing.
5. Reset Windows Update components
If the issue persists, you can also reset all the Windows Update components using Command Prompt:
- Launch Command Prompt as administrator > enter the following commands and hit Enter:
- net stop bits
- net stop wuauserv
- net stop appidsvc
- net stop cryptsvc
- Delete the qmgr.dat update files by running this command:
- Del “%ALLUSERSPROFILE%Application DataMicrosoftNetworkDownloader*.*”
- Cleanr Windows Update cache by running these commands:
- rmdir %systemroot%SoftwareDistribution /S /Q
- rmdir %systemroot%system32catroot2 /S /Q
- Now, you’re going to register all the Windows Update DLL files on the Windows Registry. All you need to do is enter the following commands and then hit Enter after each one:
- regsvr32.exe /s atl.dll
- regsvr32.exe /s urlmon.dll
- regsvr32.exe /s mshtml.dll
- regsvr32.exe /s shdocvw.dll
- regsvr32.exe /s browseui.dll
- regsvr32.exe /s jscript.dll
- regsvr32.exe /s vbscript.dll
- regsvr32.exe /s scrrun.dll
- regsvr32.exe /s msxml.dll
- regsvr32.exe /s msxml3.dll
- regsvr32.exe /s msxml6.dll
- regsvr32.exe /s actxprxy.dll
- regsvr32.exe /s softpub.dll
- regsvr32.exe /s wintrust.dll
- regsvr32.exe /s dssenh.dll
- regsvr32.exe /s rsaenh.dll
- regsvr32.exe /s gpkcsp.dll
- regsvr32.exe /s sccbase.dll
- regsvr32.exe /s slbcsp.dll
- regsvr32.exe /s cryptdlg.dll
- regsvr32.exe /s oleaut32.dll
- regsvr32.exe /s ole32.dll
- regsvr32.exe /s shell32.dll
- regsvr32.exe /s initpki.dll
- regsvr32.exe /s wuapi.dll
- regsvr32.exe /s wuaueng.dll
- regsvr32.exe /s wuaueng1.dll
- regsvr32.exe /s wucltui.dll
- regsvr32.exe /s wups.dll
- regsvr32.exe /s wups2.dll
- regsvr32.exe /s wuweb.dll
- regsvr32.exe /s qmgr.dll
- regsvr32.exe /s qmgrprxy.dll
- regsvr32.exe /s wucltux.dll
- regsvr32.exe /s muweb.dll
- regsvr32.exe /s wuwebv.dll
- You can now restart the Windows Update components by running these commands (don’t forget to hit Enter after each one):
- net start bits
- net start wuauserv
- net start appidsvc
- net start cryptsvc
6. Run DISM and SFC commands
If you’re experiencing Windows Update issues, Microsoft also recommends you run the DISM and SFC commands. Here are the steps to follow:
- Open Command Prompt as administrator > type the following command, and then hit Enter:
- DISM.exe /Online /Cleanup-image /Restorehealth (You may need to wait for a few minutes for the process to complete).
- Now use the System File Checker tool > enter this command and hit Enter:
- sfc /scannow
- Exit command prompt > run Windows Update again.
7. Uninstall third-party tools
Some users confirmed that uninstalling third-party software helped them fix the problem. So, if you recently installed new apps and programs on your computer, remove then and then check for updates again to see if this fixed the problem.
It is worth mentioning that many Windows 10 users reported that uninstalling Cybereason Ransomefree solved the problem. So, if you installed this tool on your computer, uninstall it as soon as possible and then run Windows Update.
Was it hard? I am sure that even if you have a basic knowledge of the Windows operating system, you managed to follow the steps above in just a few minutes of your time and get the Windows Update feature up and running. If you do have questions about this tutorial, please write us in the comments section below and I will assist you further as soon as possible.

Leave A Comment?