Situatie
Solutie
One way to get a low battery level notification is by using Windows 11’s built-in warning feature. You can configure this feature to alert you when your laptop’s baterry drops below the specified percentage. With this method, you don’t get a toast notification or anything like that. Instead, you get a system tray alert, letting you know your battery is low.
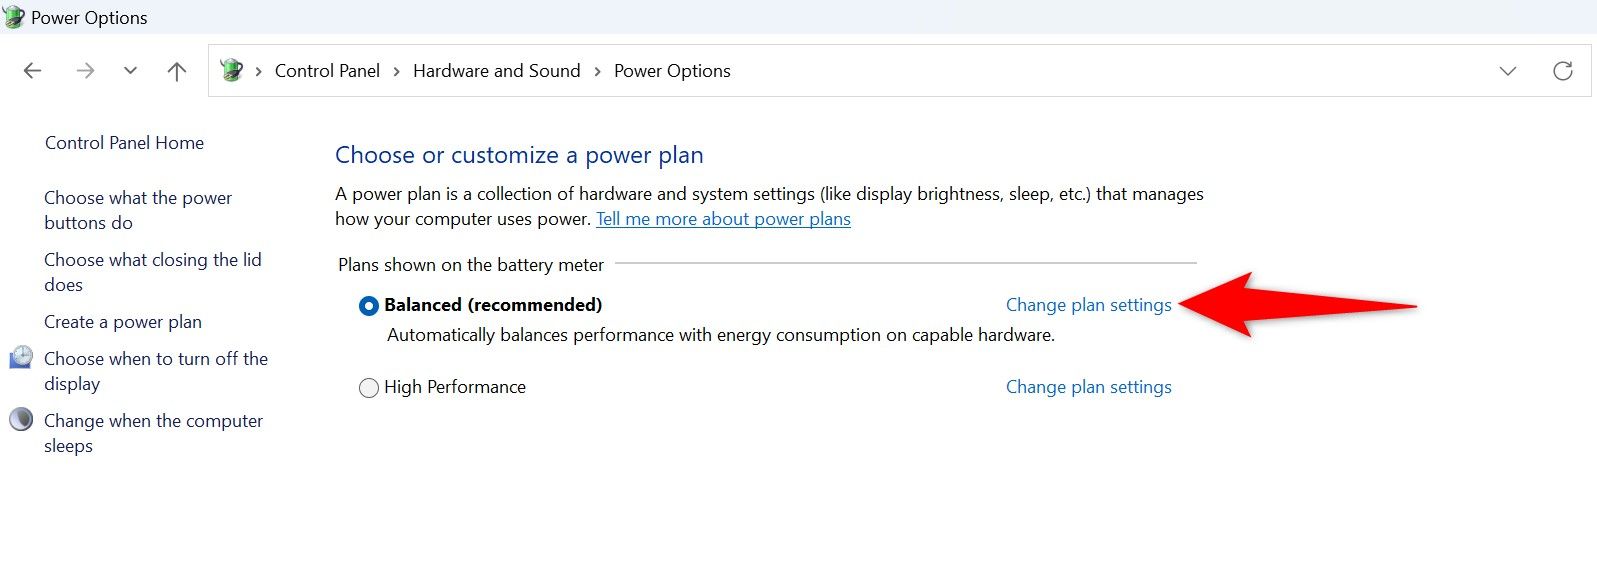
To configure the feature, access Windows Search (press Windows+S), type Control Panel, and launch the utility. Select “Hardware and Sound” and choose “Power Options.” Next to your active power plan, click “Change Plan Settings.”
On the following page, choose “Change Advanced Power Settings.” On the open window, expand the “Battery” section (which is at the bottom). Expand “Low Battery Level.” For both “On Battery” and “Plugged In” options, specify the battery level in percentage. This is when you’ll get an alert.

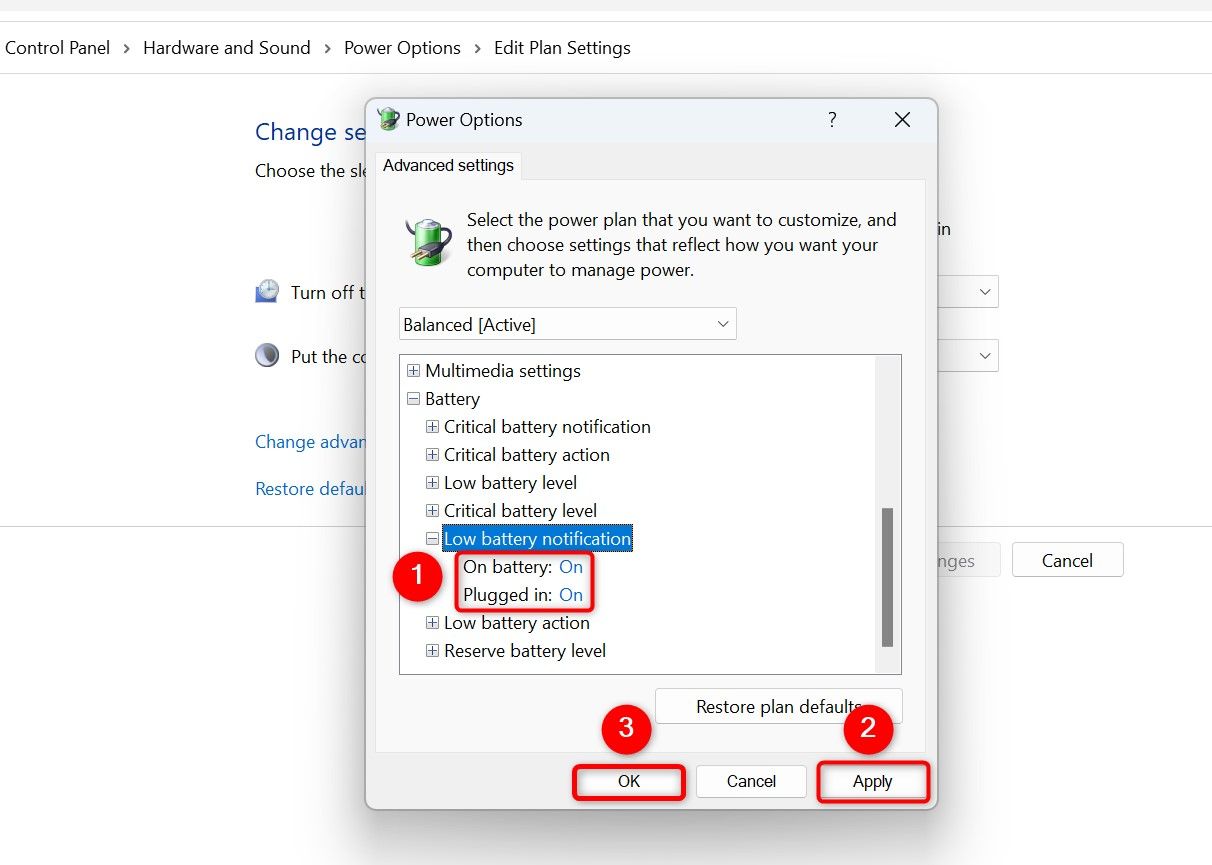
Choose “Apply” followed by “OK” to save your changes. Note that the options you configured above are per-plan. If you switch to a different power plan in the future, you’ll have to reconfigure these options. In the new power plan, you’ll make the exact same changes.
If you’d like to receive a toast notification alerting you of low battery, you can achieve that using a PowerShell script and Task Scheduler.
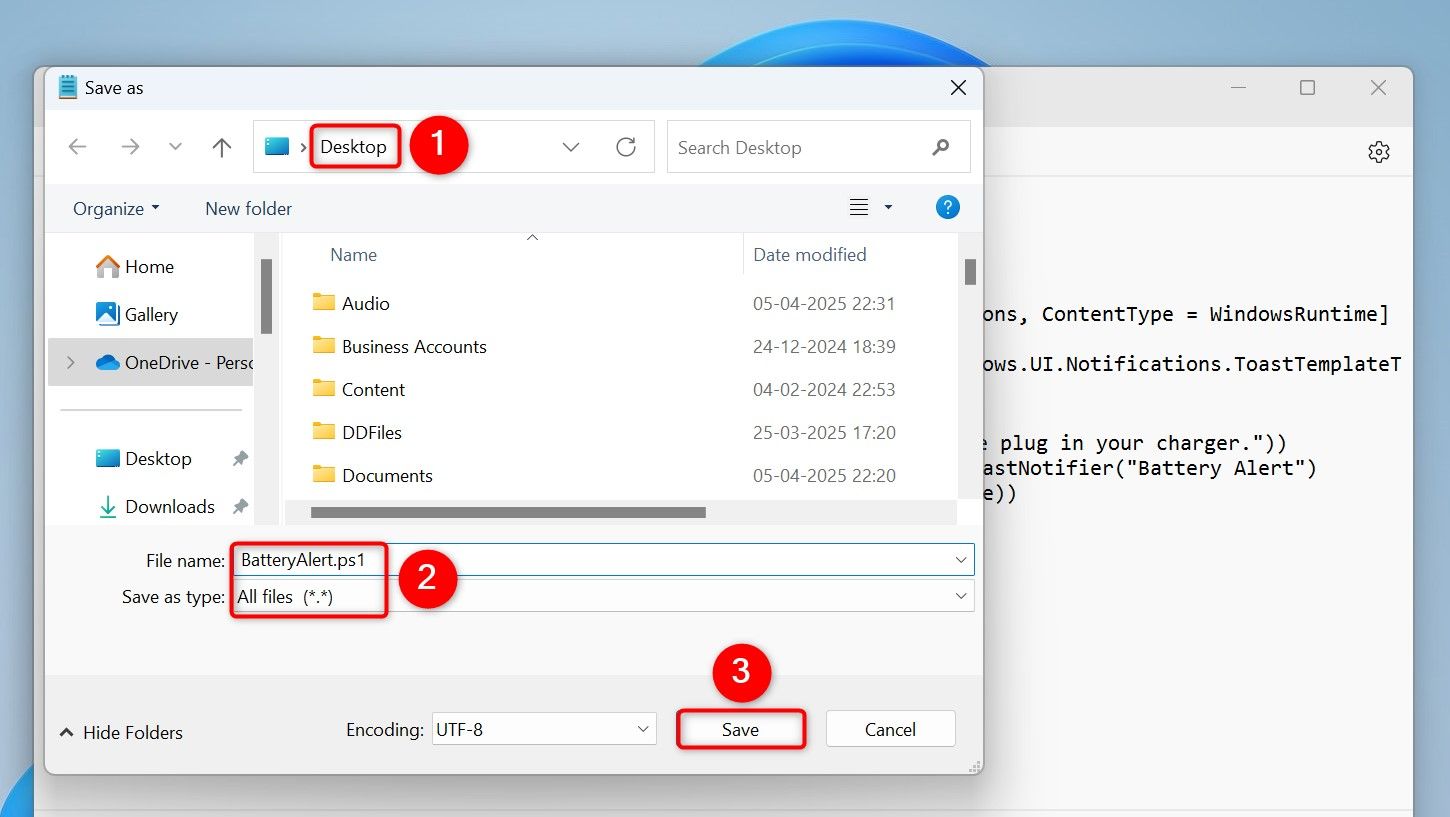
To do that, open Windows Search (press Windows+S), type Notepad, and launch the app. Type the following code. Replace “30” with the percentage you want when the system should send you an alert.
$Battery = Get-WmiObject -Class Win32_Battery
$Level = $Battery.EstimatedChargeRemaining

if ($Level -lt 30) {
[Windows.UI.Notifications.ToastNotificationManager, Windows.UI.Notifications, ContentType = WindowsRuntime]
$template = [Windows.UI.Notifications.ToastNotificationManager]::GetTemplateContent([Windows.UI.Notifications.ToastTemplateType]::ToastText01)
$toast = $template.GetElementsByTagName("text")[0]
$toast.AppendChild($template.CreateTextNode("Battery below 30%! Please plug in your charger."))
$notifier = [Windows.UI.Notifications.ToastNotificationManager]::CreateToastNotifier("Battery Alert")
$notifier.Show([Windows.UI.Notifications.ToastNotification]::new($template))
}
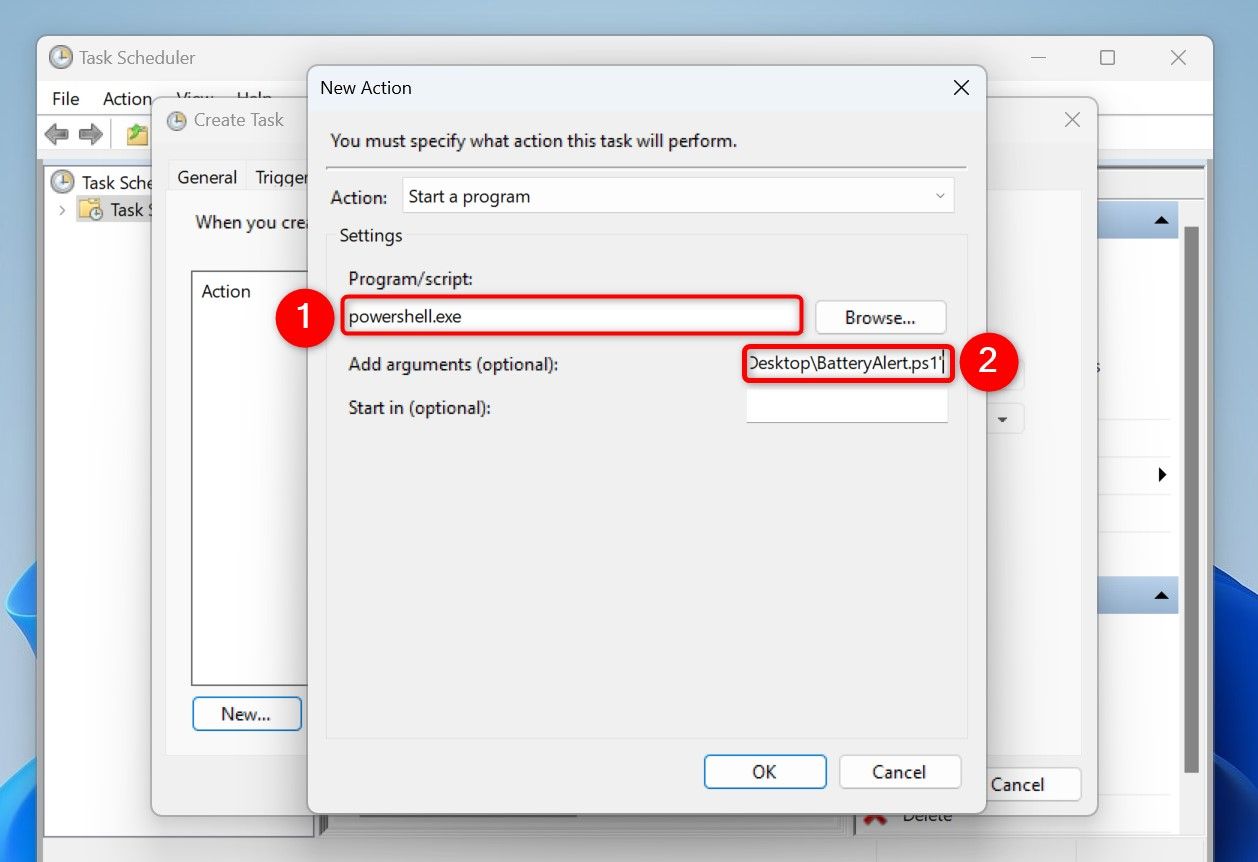
To now run your PowerShell script every few minutes, access Windows Search (press Windows+S), type Task Scheduler, and launch the utility. On the right pane, click “Create Task”.
Select the “Name” field and type a name for your task. This could be something like Low Battery Level Alert. In the Security Options section, enable “Run Whether User Is Logged On or Not”.

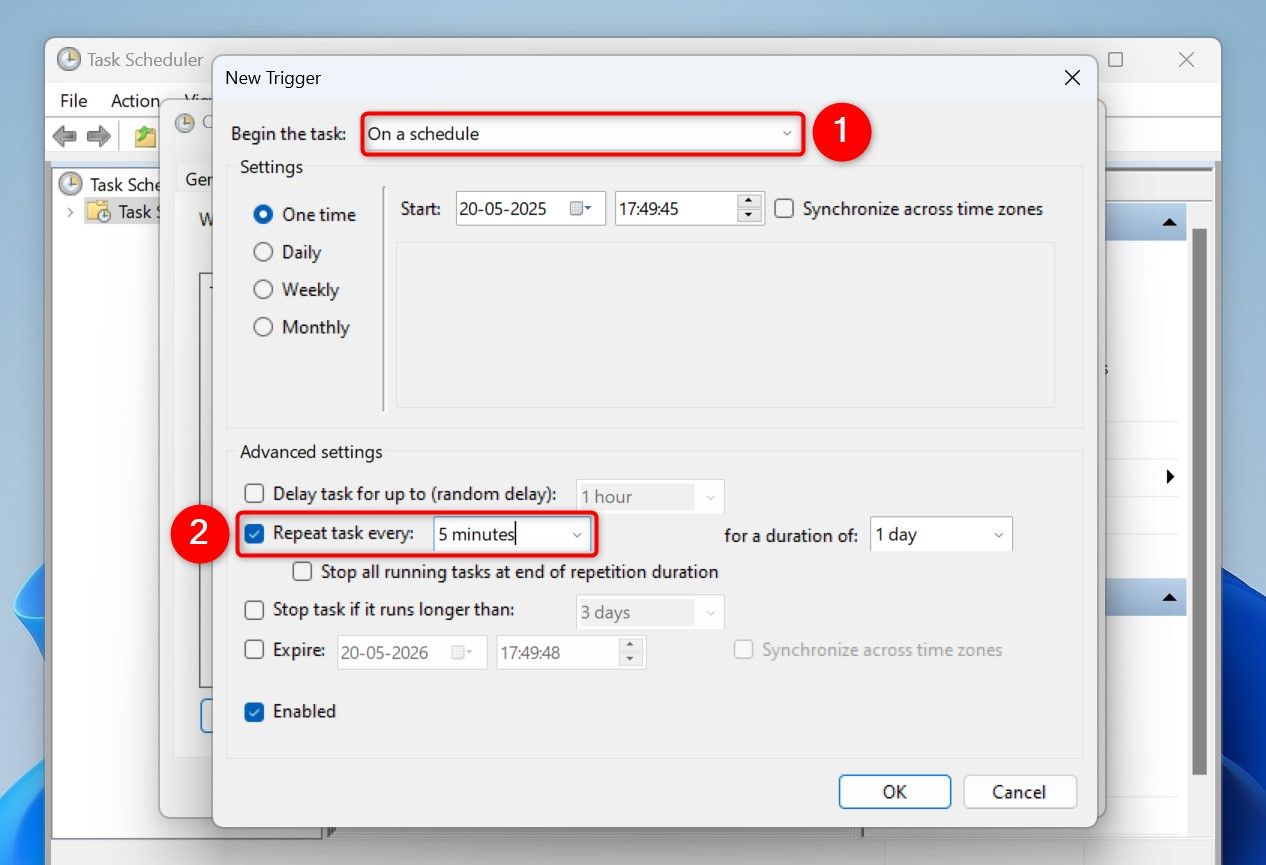
At the top, access the “Triggers” tab. Click “New” to add a new trigger. Make sure the “Begin the Task” drop-down menu says “On a Schedule.” In the Advanced Settings section, turn on “Repeat Task Every” and choose something like “5 Minutes.” This makes Task Scheduler run your PowerShell script every five minutes to check the laptop battery level.
-ExecutionPolicy Bypass -File "C:\Users\Username\Desktop\BatteryAlert.ps1"
On the Create Task window, choose “OK,” and enter your account’s password.
Task Scheduler will run your PowerShell script every five minutes (as specified) to check your laptop’s battery level. If the battery level drops below the specified percentage, you’ll get a notification. Note that you must not move the PowerShell script to another folder. If you do so, Task Scheduler won’t be able to locate it, and hence you won’t get any alerts. If you need to move the script, make sure to update the script’s path in your Task Scheduler task.
Leave A Comment?