Situatie
Oracle’s VirtualBox is a free virtualization application that you can install on Windows 10, Mac, and Linux to create and use virtual machines to run other versions of Windows or other platforms alongside the main operating system without the need to set up dual-boot or configure another computer.
Usually, you would use this virtualization technology to test pre-releases of Windows 10 available through the Windows Insider Program, run other operating systems like Ubuntu or Kali Linux, or create another virtual machine to test software without affecting the main installation.
Solutie
Pasi de urmat
To install VirtualBox on Windows 10, use these steps:
- Open Oracle download page.
- Under the “VirtualBox binaries” section, click the Windows hosts link to download the software.

- Double-click the VirtualBox-x.x.x-x-Win.exe file to launch the installer.
- Click the Next button.
- Use the default settings selection, and click the Next button.
7.(Optional) Clear the options you do not want to use.
8.Click the Next button.
Click the Yes button to confirm the virtual network adapter install warning.
9.Click the Install button (if applicable).
10.Click the Finish button.
Installation with winget command
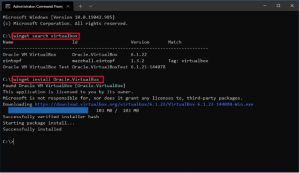
Alternatively, you can also install VirtualBox using the Windows Package Manager (winget) in Command Prompt. To install VirtualBox with the winget command, use these steps:
- Open Start.
- Search for Command Prompt, right-click the top result, and select the Run as administrator option.
- (Optional) Type the following command to search for the name of the application and press Enter:
winget search virtualbox
Quick note: While the search command is not required, the install query must match the ID, name, or moniker of the package, which can change at any time. So, it’s a good practice to search the application to execute the correct install command. - Type the following command to install VirtualBox on Windows 10 with winget and press Enter:winget install Oracle.VirtualBox

- After you complete the steps, the package manager will download and install the virtualization application without extra steps.
Configure VirtualBox on Windows 10
Although the default settings will suit more users, VirtualBox comes with many settings and features. In the steps below, we will outline some of the most basic ones everyone should consider changing when working with virtual machines.
To configure VirtualBox settings, use these steps:
- Open VirtualBox.
- Click the File menu and select the Preferences option.
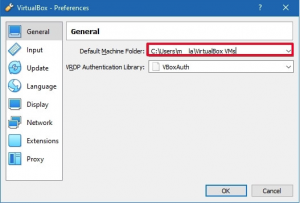
- Click on General.
- In the Default Machine Folder option, specify the folder location to store the virtual machines. Usually, you want to use an external hard drive since using the primary drive can slow down the system.
- Click on Update.
- Select the Check for updates option.
- Confirm the update settings and whether you want to use pre-releases of the software.
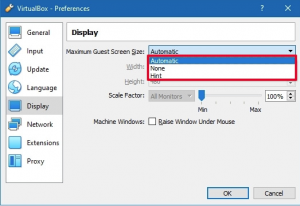
- (Optional) Click on Display.
- In the Maximum Guest Screen size option, specify the maximum screen resolution for virtual machines.
- In the Scale Factor option, select the scale virtual machines should use to make text and visual elements smaller or bigger.
- Click the OK button.
After you complete the steps, the custom configuration will apply to the virtualization software.


Leave A Comment?