Social

WhatsApp va primi funcția de video call și pe desktop

WhatsApp a avut o criză majoră la începutul acestui an. Odată cu schimbarea regulilor platformei, milioane de utilizatori au ales alte platforme. Acum WhatsApp încearcă să-i atragă înapoi cu o opțiune surpriză. Conform WABetaInfo, Facebook lucrează acum la implementarea apelurilor în interfața Web și în aplicația desktop de WhatsApp. Acestea ar trebui să fie lansate în următoarele câteva săptămâni și vor fi cel mai probabil disponibile în stadiu „beta” atunci când vor fi lansate.

[mai mult...]

Write notes in a new tab and save them locally with the TextNotes extension for Firefox

Found something interesting and want to save it for future reference? You could save the web page, or copy the content and save it in Notepad, or a cloud-based note taking service. But if you would like to save the note directly in Firefox, you’ll probably like the TextNotes extension.

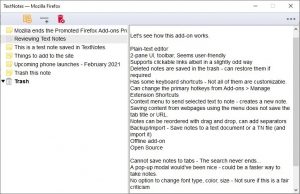
Before you get your hopes up and think this is an add-on that saves notes to specific tabs, let me tell you that it doesn’t. Click on the extension’s button on the toolbar and a new tab opens. This is TextNotes’ interface, and the page is divided into two panes. The one on the left is the tree panel which lists the notes that you have added, select a note and its contents will appear on the right pane.

Well, there is no note available to begin with, so let’s add one. Click the + button above the tree and a new blank note is created. Place the cursor in the right pane and type away. TextNotes will automatically save the note. Where does it save it? The extension does not rely on cloud services, as I hinted earlier it is an offline add-on. Your notes are saved directly in your browser’s storage (in your current profile).

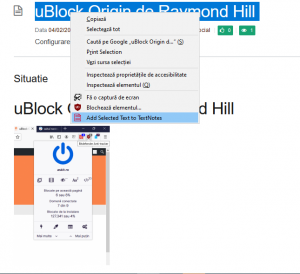
There is another way that you can create new notes. Select some text on a web page, access the right-click menu, and choose the option that says “Add Selected Text to TextNotes”. This creates a new note which contains the text, but it doesn’t include the title or the URL of the tab/page that the content was saved from.

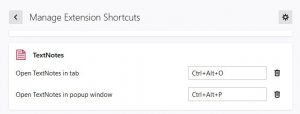
You can open TextNotes with a hotkey; Ctrl + Alt + O. Don’t want to open it in a new tab? Use Ctrl + Alt + P, or click the toolbar button while holding the Ctrl key, to open the interface in a new window.

The hotkeys can be changed from Firefox’s add-ons page: Add-ons > Manage Extension Shortcuts > TextNotes.

You can trash notes, and the deleted notes are stored in the add-on’s built-in trash bin, from where they can be recovered instantly if required. Drag and drop notes to rearrange their order. Right-click on the sidebar to create a new note, add a separator to manage a collection of notes or to delete a note.

TextNotes has a feature called hyperclicks, which are clickable hyperlinks or URLS, paste the link in a note, and you’re good to go. To use a saved link, hold the Ctrl key and the left mouse button for a few seconds, that’s a Ctrl + long-click. This action opens the link in a new tab in the foreground. To open it in a background tab, make sure that Caps Lock is enabled while you Ctrl + long-click.

Since TextNotes does not support cloud-based synchronization of its own, you will have to rely on Firefox sync. But, in order to prevent loss of data, you may want to save your notes manually. Click on the three-dot icon in the top right corner of the add-on’s interface. Select Preferences and a pop-up window appears with 3 options. Hit the Save button to store your notes as a TN (compressed document) file. Or you can save the content directly to a plain-text file, which you can open with Notepad or any text editor of your choice.

The TN document is useful if you want to Load (import) it back to TextNotes. If you want cloud-support, you can save this file to your online storage account, as a backup. The add-on’s menu also has a Help file which explains how TextNotes works.

[mai mult...]

uBlock Origin de Raymond Hill

În sfârșit, un blocant de reclame eficient. Folosește procesorul și memoria foarte puțin.

  • Despre această extensie

Un blocant (paravan) eficient: folosește foarte puțin procesorul și memoria și totuși poate încărca și aplica mii de filtre în plus față de alte paravane populare.

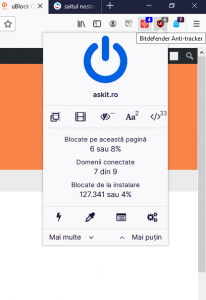
Utilizare: Butonul mare de pornire/oprire în fereastra paravanului este pentru a activa/dezactiva uBlock pentru site-ul curent. Funcția este valabilă doar pentru site-ul curent, nu la nivel global. Flexibil, mai mult decât un „blocant de reclame”: acesta poate citi și crea filtre din fișierele de gazde (hosts).

  • În mod implicit, aceste liste de filtre sunt încărcate și aplicate:

– EasyList
– Lista serverelor de reclame a lui Peter Lowe
– EasyPrivacy
– Domenii malițioase

  • De asemenea, mai sunt disponibile și alte liste precum:

– Lista îmbunătățită pentru urmărire a lui Fanboy
– Lista de gazde a lui Dan Pollock
– Lista de reclame și urmărire hpHosts
– Gazdele MVPS
– Spam404

Desigur, cu cât sunt mai multe filtre active cu atât mai mult este utilizată memoria. Totuși, chiar și după adăugarea în plus a două liste Fanboy și lista de reclame și urmărire hPhosts, uBlock₀ tot folosește mai puțină memorie decât restul paravanelor. De retinut că odată cu selectarea în plus a unora dintre liste se poate ajunge la afectarea aspectului site-urilor — în special listele care sunt în mod normal liste de gazde.

Fără listele prestabilite de filtre această extensie nu face nimic. Așadar, dacă totuși vreți să contribuiți, gândiți-vă la persoanele care muncesc să întrețină aceste filtre pe care le utilizați, care sunt oferite pentru utilizare gratuită.

Acest supliment trebuie să:

  • Să citească și să modifice setările de confidențialitate
  • Să acceseze filele browserului
  • Să stocheze un volum nelimitat de date pe partea de client
  • Să acceseze activitatea browserului în timpul navigării
  • Să îți acceseze datele pentru toate site-urile web
[mai mult...]

Cum sa activezi Dark theme pe Facebook Android

Pasul 1: Se deschide aplicatia Facebook instalata pe telefonul dumneavoastra

Pasul 2: Se deschide tab-ul Optiuni (Options). Apasam cele 3 linii orizontale situate in dreapta ecranului:

Pasul 3: Se da scroll pana in partea de jos unde regasiti meniul “Mod intunecat (Dark Theme)”

Pasul 5: Se seteaza optiunea “Activat (Activate)” respectiv “Dezactivat (Deactivate)” daca se doreste dezactivarea optiunii.

[mai mult...]

Cum aflu ce date personale imi colecteaza aplicatiile?IOS

Odata cu update-ul 14.3 pe dispozitivele iOS vine si o revolutie interesanta pe AppStore, dar si o lovitura grea din partea Facebook. Mai nou, de fiecare data cand doresti sa descarci o aplicatie, ti se ofera o lista detaliata a  tuturor datelor pe care aceasta ti le poate colecta. Politica Apple va interzice colectarea și partajarea anumitor date, cu excepția cazului în care utilizatorii acceptă în mesaj urmărirea pe dispozitivele iOS 14.

[mai mult...]