Soluții

How to optimize Windows 11 for older PCs

Windows 11 offers various visual effects to enhance user experience. However, these effects use up quite a lot of PC resources, often causing older PCs to run slower. To fix that, turn off all or select effects on your system.

  • To do that, launch Windows Search (press Windows+S), type View Advanced System Settings, and select the item with that name.
  • On the window that opens, in the Performance section, click “Settings”
  • On the Performance Options window, enable the “Adjust for Best Performance” option. This ensures you get the most performance out of your current hardware.
  • If you want to choose the visual effects to disable, select the “Custom” option.
  • Then, select the effects you would like to enable or disable. This gives you more control as to what remains turned on and off on your system.
  • After making either change, click “Apply” followed by “OK” at the bottom.

Prevent Apps from automatically Launching on your PC’s Startup

Windows 11 automatically launches various apps when you turn on your computer. Either these apps or a user has configured these apps to automatically open on your PC’s boot. These apps can slow down your system’s performance even if you don’t use them. It’s a good idea to disable these apps.

  • To do that, right-click the Windows taskbar and choose “Task Manager”
  • In Task Manager, from the left sidebar, select “Startup Apps”
  • In the right pane, each app whose Status column says Enabled automatically opens on your PC’s boot.
  • To disable such apps, right-click an app and choose “Disable”
  • Do this for all the apps you don’t want automatically launching.

Many Windows 11 updates bring bug fixes and performance improvements, allowing the operating system to run smoother on your computer. Therefore, it’s important to keep Windows up to date.

  • To update your Windows 11 system, launch Settings by pressing Windows+i. From the left sidebar, choose “Windows Update.” On the right pane, click “Check for Updates”
  • Allow Windows 11 to download the available updates. Then, install those updates and reboot your computer.

Update Device Drivers

Older device drivers often have bugs and performance issues, which newer versions fix. Keeping your device drivers up to date ensures Windows 11 runs smoothly on your computer.

You have multiple ways to update device drivers on your Windows 11 PC. One way is to update Windows, which automatically downloads and installs the latest drivers. Another way is to visit the device manufacturer’s site and manually download and install the drivers.

If your PC has downloaded the drivers but those drivers aren’t installed for some reason, get Device Manager to install them. To do that, launch Windows Search (press Windows+S), type Device Manager, and open the utility.

  • Expand the section for your specific device, right-click the device, and choose “Update Driver”
  • On the window that opens, click “Search Automatically for Drivers” to let Windows automatically find and install the available drivers.
  • If you want to manually choose the folder where the drivers are located, select “Browse My Computer for Drivers.” Click “Browse” and choose your driver folder, then click “Next”

Use High-Performance Power Plan

Windows 11 offers multiple power plans and you can use the ones that suit your needs. For better system performance, switch to a high-performance plan, which is designed to help you get the most performance from your hardware.

  • To make that change, open Run by pressing Windows+R. Type the following in the open box and select “OK” or press Enter:

powercfg.cpl

  • On the open window, enable the “High Performance” plan.

If you don’t see that plan, in the left sidebar, click “Create a Power Plan.” On the following page, select “High Performance.” Click the “Plan Name” field and type a name for the plan. Then, choose “Next” and activate the newly created plan.

Windows 11’s widgets let you take a quick peek at various pieces of information, but these widgets are always running in the background, consuming your PC resources. If you don’t use this feature, it’s a good idea to turn it off.

  • To do that, right-click the Windows taskbar and choose “Taskbar Settings”
  • On the following page, in the Taskbar Items section, turn off “Widgets”
  • Later, you can re-enable widgets by turning on the “Widgets” toggle.
[mai mult...]

How to send and use money with Apple Cash on an iPhone

Apple Cash, formerly known as Apple Pay Cash, is a digital payment system that allows users to send and receive money from other Apple device users. It can be used to send and receive money through the Messages or Wallet app.

If you’d like to deposit the money you receive from a friend or family member, you can connect the card to your bank. Additionally, you can pull funds from your bank to reload the card if you’d like to use it as a form of payment. Apple Cash is only available to people over the age of 18. If you are under 18, you can still use Apple Cash through Family Sharing and Apple Cash Family.

Send Money from your Apple Cash Card

There are multiple ways to send money via Apple Cash; you just need to decide which route to take. The most popular way to send money is through the Message app. To do this, you just open a conversation with the person you want to send money to, tap the plus icon in the lower left of the screen, and tap Apple Cash.

Once the iMessage app for Apple Cash launches, type in how much money you’d like to send, tap the “Send” button underneath the amount, and then confirm with Face or Touch ID. Once you do, the money will be sent to the chosen person.

  • Another route to send money to someone is through the Wallet app. While the outcome will be the same, you may want to use this method if you are trying to send money to someone who is not in your contacts.
  • To go this route, launch the Wallet app, tap on your Apple Cash card, and then tap the “Send or Request” button next to your current balance. From there, you can choose someone you’ve recently sent money to or “Tap to Cash”.
  • Tap to Cash is similar to Tap to Pay and has the same animation as NameDrop for contacts. It’s a great way to send money to someone outside your contacts and only requires you to hold your phones close together.
  • Additionally, you can include the same information you could if sending the money via Messages, such as including a note on the transaction.

When you view your card, any money you send with Apple Cash will appear in the “Latest Transactions” section. You can filter your transactions by Daily Cash (if you have an Apple Card), sent or received, Tap to Cash transactions, bank transfers, or purchases.

Redeeming the funds on your Apple Cash card is straightforward. When viewing your Apple Cash card, tap on the three dots in the upper right corner of the screen and then tap “Transfer to Bank” from the drop-down menu.

You will then enter how much money you want to transfer. You can either use the whole amount—where next to “Current Balance” will tell how much money is currently on your Apple Cash card—or any amount lower. Entering any amount will show your Apple Cash balance after the amount is withdrawn. After you input it, you’ll confirm your bank and transfer option (either instant or one to three days), authenticate with Face or Touch ID, and initiate the deposit request.

Another way to redeem the amount on your Apple Cash card is to use it at places or websites that accept Apple Pay. You can use your Apple Cash card like any other debit or credit card in your Wallet app; just select it, hold it to the reader, and complete the transaction. Once the transaction is completed, it will appear in the “Latest Transactions” section of your Apple Cash card screen.

You can still use your Apple Cash card on websites that don’t accept Apple Pay. Recently, Apple enabled a feature that allows you to access the digital number of your Apple Cash card, expanding the area where you can use it. To find the number, navigate to the Wallet app and open your Apple Cash card. Then, tap the three dots in the upper right corner of the screen and tap “Card Number.”

You’ll be asked to authenticate using Touch or Face ID. Once you do, you’ll be presented with your virtual card number, its experience date, security code, and card network. Tapping on “Additional Card Numbers” under that information will also give you your card’s PIN and the last four digits to identify Apple Pay transactions.

You can also request a new card number by tapping “Request New Card Number.” After authenticating yourself, your card information will instantly be updated before your eyes. Like using your Apple Cash card with Apple Pay, any transactions you make using the card number will be shown in the “Latest Transactions” section.

If you use your Apple Cash card frequently and need to reload, you can do so by tapping the three dots in the upper left of the screen, selecting “Add Money” from the drop-down menu, and entering the amount you want to add.

You can also automatically load funds onto your card when it reaches a certain amount by tapping “Set Up Auto Reload.” You’ll choose the amount you want to reload the card with—from $25 to $200 —and then the minimum balance you need to reach to load the funds automatically.

Sending and Canceling Reoccurring Payments

Your Apple Cash card also allows you to send recurring payments to another Apple Cash user, which is great for giving kids an allowance or paying someone back in installments.

To set this up, choose which app you want to start the payment in, the Messages or Wallet app, and then select the person to whom you’re sending the payments. After entering the amount you want to send, tap on “Send Recurring Payment” at the bottom of the screen.

When you do, you’ll be greeted by a screen that allows you to choose when the recurring payments start and how often they repeat. You can also add a memo with an icon to the payments. Once you set it up, you’ll authenticate yourself like usual, and the payments will begin.

To cancel a recurring payment, go to your Apple Cash card in the Wallet app, tap on the three dots in the upper left of the screen, and then tap “Recurring Payments” from the drop-down menu. From there, you can select and cancel your recurring payment.

[mai mult...]

Diagnostic policy services not running/program compatibility issues

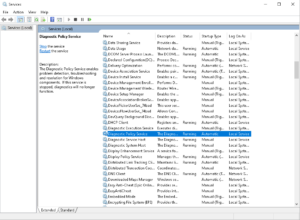
1.Press “Windows key + R” and open “services.msc” as shown below

Go ahead and find “Diagnostic Policy Service”

Right click on it and press “restart”

And after this, also restart your computer.

2.If you’re having trouble opening different versions of programs this might help you out.

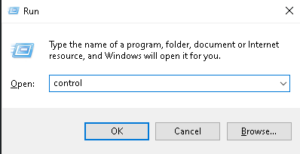
Press “windows key + R” and open up “control” as shown below

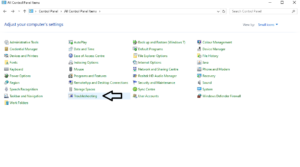
Find “troubleshooting”

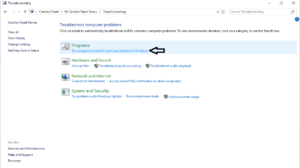
Right below the “Programs” tab click on “Run programs made for previous versions of Windows”

Choose the app that doesn’t run from the drop down menu (we’ll use Excel as an example)

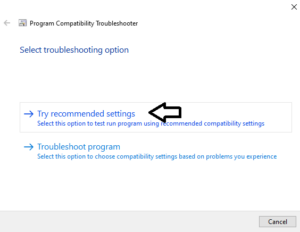
Click on the “Try recommended settings”:

And on the next tab go ahead and click on “Test the program…”

Your chosen app should run smoothly now.

[mai mult...]