Soluții

Cum dezinstalam KB5063878 update pentru a remedia: SSD Failures on Windows 11

Inițial, au apărut rapoarte conform cărora actualizarea Windows 11 (KB5063878, lansată pe 12 august 2025) ar cauza pierderi de date, corupție sau dispariția SSD-urilor în timpul scrierilor mari (peste 50 GB), mai ales pe SSD-uri. Microsoft a investigat și a concluzionat că nu există o legătură directă între actualizare și defectele de stocare raportate. Datele telemetrice nu au arătat anomalie, iar problemele nu au fost reproduse în testare.

Dar daca tot doresti sa dezinstalezi urmeaza urmatorii pasi:

1. Prin setările standard Windows

  1. Mergi la Setări → Windows Update → Istoric actualizări → Dezinstalare actualizări (Update History → Uninstall updates)

  2. Caută KB5063878 în listă și selectează-l pentru a-l dezinstala.

  3. Repornește computerul după finalizarea procesului.

2. Dacă dezinstalarea eșuează sau nu apare în listă

  • Pot apărea erori precum 0x800F0825 sau 0x800F0905 În acest caz:

    • Dezactivează (dacă este activat) Windows Sandbox — unii utilizatori au raportat că, odată dezactivat, dezinstalarea a reușit

    • Folosește Depanatorul Windows Update:
      Setări → Sistem → Depanare (Troubleshoot) → Alte depanări → Windows Update → selectează „I can’t download, install or uninstall an update” și urmează instrucțiunile

3. Alte metode și precauții

  • Poți pauza actualizările temporar pentru a preveni reinstalarea automată a KB5063878

  • Pentru companii: folosește Group Policy sau Windows Update for Business pentru a amâna sau bloca actualizări

  • Dacă dezinstalarea nu funcționează și problema persistă, poți încerca Pornirea Avansată → Recovery sau, în cazuri grave, restaurare de sistem sau resetare

4. Alternativă cu DISM (avansată)

Pas pentru utilizatorii confortabili cu linia de comandă:

dism /online /get-packages | findstr KB5063878
  • Apoi copiază identificatorul complet (Package Identity) al pachetului și rulează:

dism /online /remove-package /packagename:XYZ
  • Înlocuiește XYZ cu identitatea completă copiată.

  • Repornește sistemul.

  • Apoi poți pauza actualizările pentru a preveni reinstalarea.

[mai mult...]

No drives detected during Windows 11

În timpul instalării Windows-ului, utilizatorul primește mesajul „No drives were found”. Sistemul nu detectează nici HDD-ul, nici SSD-ul, iar procesul de instalare nu poate continua.

Ca si solutii pentru aceasta problema sunt urmatoarele:

  1. Verificarea in BIOS

La sectiunea Storage Configuration -> se seteaza SATA Mode -> AHCI si se activeaza UEFI boot.

  1. Incarcarea driverelor lipsa

Pe stick-ul de instalare se creeaza un folder Drivers si se descarca de pe site-ul producatorului laptop-ului Intel Rapid Storage Technology pentru RST.

In fereastra de instalare Windows -> Load Driver -> se selecteaza folderul cu drivere.

[mai mult...]

How to service your own Computer

  • Remove Viruses and Malware

Many people still wrestle with infected Windows PCs. If your computer is infected and isn’t working properly, you don’t have to pay someone else to fix it. The Geek Squad doesn’t have any magic tools — they use many of the standard antivirus tools you can use yourself.

To find an antivirus product that actually offers good protection, consult an antivirus test website and see how your antivirus of choice stacks up. If you don’t feel like doing all that research yourself, luckily we’ve done it for you.

Kaspersky and Bitdefender consistently rank in the top of both the AV-Test and AV-Comparatives rankings, and we’ve used both products with good results. They aren’t free, but most of the free antivirus out there is bundling extra nonsense or trying to redirect your search engine to their “secure” solution that isn’t really secure and just shows you more ads or spies on your shopping habits.

For a really deep infection, a good repair place may dig through your autostart entries and registry by hand and manually remove malware that isn’t being caught by tools. However, this can be time-consuming — and if the computer is already so infected, there’s no guarantee all the malware will be removed. In cases like this, they’ll often just reinstall Windows. You can do that yourself, too.

  • Reinstall the Operating System

Some people think that computers become slower over time and eventually need to be replaced — it’s sad, but true. Other people may take the computer to a repair place when it starts slowing down. When dealing with a computer that’s become bogged down by startup programs and toolbars, a simple Windows reinstall is often the fastest, easiest solution.

This can also help if you’re experiencing other problems with your computer, such as file corruption or weird errors. While it’s often possible to troubleshoot these things by replacing corrupted files and bad drivers, it’s usually faster to just reset Windows back to its factory state.

Most new computers come with factory restore partitions, which you can access by pressing the correct key during the boot process (check your computer’s manual). You may also have CDs or DVDs you can restore your computer from. If you installed Windows yourself, you can use the Windows installation disc. On Windows 8, use the Refresh or Reset feature to easily reinstall Windows.

Be sure to back up your important files before doing this. Some places may back up your important files for you, while some may ask you to back them up ahead of time — that’s because they’ll just be reinstalling Windows for you.

  • Remove Included Bloatware

If you’ve just purchased a new computer — or reset your old computer back to its factory default state — you’ll often find it packed full of useless software. Computer manufacturers are paid to include these programs, which slow your computer down (particularly during the startup process) and clutter your system tray.

Best Buy’s Geek Squad will charge you to remove this bloatware. Even Microsoft is getting in on the action — if you bring a Windows PC to a Microsoft store, they’ll remove the bloatware for $99.

Don’t fall for it: You don’t have to pay a dime to remove these preinstalled programs. There are three ways you can go about doing this:

  • Use a program like PC Decrapifier. It will automatically scan your computer for bloatware and automatically uninstall it.
  • Open the Uninstall a program control panel and manually uninstall each piece of bloatware, one-by-one. If you do this on a new computer, be sure not to uninstall any hardware drivers. Everything else should be fair game.
  • Reinstall Windows. Many geeks like performing a fresh install of Windows on their new computers to start from a clean state. You’ll often have to download and install hardware drivers from your computer manufacturer’s website after the reinstall

Upgrade your RAM or Hard Drive

Some computer upgrades are particularly simple. Adding new RAM to your computer is a very simple process — as long as you buy the right RAM for your computer, installing it is will be easy (even in many laptops.) You can also upgrade your hard drive (or add a new hard drive) to increase the storage space you have available. This is a bit more complicated, as you’ll have to reinstall Windows or move your existing operating system over if you’re replacing the original hard drive, but it’s not too hard.

If you bought a laptop or pre-assembled desktop computer, you don’t need to take it to a repair place if it breaks. If it’s still under warranty, you can contact the manufacturer to RMA the computer and have them repair it. RMA stands for “return merchandise authorization” — you’ll need to tell the manufacturer’s service department your problem and receive an RMA number before mailing it to their service center.

[mai mult...]

How to install Android 13 on a phone

Installing a new Android version can be straightforward if your device is supported, but it may also involve manual flashing for advanced users.

  • Back up all important data (installing may wipe your phone)

  • Make sure your phone’s bootloader and warranty terms are understood—manual flashing can void warranties

  • Your phone must have at least 50% battery

  • Use the original USB cable for best results.

Check Compatibility

Not every device supports Android 13.

  • Google Pixel phones officially support Android 13 (Pixel 4 and newer).

  • Other brands (Samsung, OnePlus, Xiaomi, etc.) roll out updates in phases.

📌 To check:

  • Go to Settings → System → System Update. If Android 13 is available, you’ll see a download prompt.

3. Method 1: Install Android 13 via OTA (Recommended)

This is the safest and easiest way.

  1. Connect to Wi-Fi

  2. Open Settings → System → System update

  3. Tap Check for update

  4. If Android 13 is available, tap Download and install

  5. Wait for installation → phone will reboot → Android 13 installed.

Method 2: Sideload Android 13 OTA (Manual Update)

If the OTA hasn’t reached you yet but your phone supports it, you can manually sideload.

Requirements

  • A PC with ADB & Fastboot tools installed

  • USB cable

  • Download the official OTA update file from Google’s developer site.

Steps

  1. Enable Developer Options:

    • Go to Settings → About phone → Tap Build number 7 times

    • Then enable USB debugging in Developer Options.

    • Reboot into Recovery Mode:

      • Power off phone → Hold Power + Volume Down until bootloader appears.

      • Use volume keys to select Recovery Mode → press Power.

  2. Connect to PC and verify connection:

    adb devices
  3. Apply update via ADB sideload:

    adb sideload ota_filename.zip
  4. Wait until the process finishes → reboot → Android 13 installed.

5. Method 3: Flash Factory Image (Advanced)

This is a clean install and will wipe your phone.

Requirements

  • A PC with ADB & Fastboot tools

  • Official factory image for your phone from Google’s factory images site.

  • Bootloader unlocked.

Steps

  1. Unlock Bootloader (this will erase all data):

    fastboot flashing unlock
  2. Extract Factory Image: Download and unzip the file.

  3. Run Flash Script: Inside the extracted folder, run:

    • On Linux/Mac:

      ./flash-all.sh
    • On Windows:

      flash-all.bat
  4. Phone will reboot → fresh install of Android 13.

6. After Installation

  • Go through setup wizard

  • Restore backup if you created one

  • Check for security updates in Settings.

[mai mult...]

How to free up space on Windows 11 by disabling reserved storage

With this update, Microsoft introduced a feature called Reserved Storage. As the name suggests, Windows automatically began reserving a certain amount of space, which was primarily used for installing updates without any issues.

Since then, the reserved storage feature has been a part of Windows, and you can still find it on your Windows 11 system. At the time of its release, Microsoft announced that Windows would set aside at least 7GB of space as reserved storage, regardless of how much disk space you have. This means it doesn’t matter whether you have only 50GB or 500GB of space, Windows will allocate at least 7GB for reserved storage.

There may also be times when Windows does not have any update files to store in reserved storage. In such situations, Windows will allocate the reserved storage to temporary files created by installed apps and to system cache data in order to improve overall functionality. These temporary files and cache data are regularly monitored by Storage Sense, and once it determines that the temporary data is no longer necessary, it is automatically removed from reserved storage.

Similarly, Storage Sense will monitor stored Windows update files, and if it determines that they are no longer necessary for your computer, they will be automatically deleted to make room for new, important Windows update files. If you are trying to install a major Windows update whose storage requirements cannot be met by the space available in the reserved storage, the update will use the required space from the available free storage on your computer.

For instance, if you have 7GB of reserved storage and want to install a Windows update that is around 10GB in size, Windows will use the remaining 3GB from the available free storage on your computer. However, if you don’t have that extra 3GB of free space, you might encounter an error message or receive suggestions from Microsoft to free up some disk space.

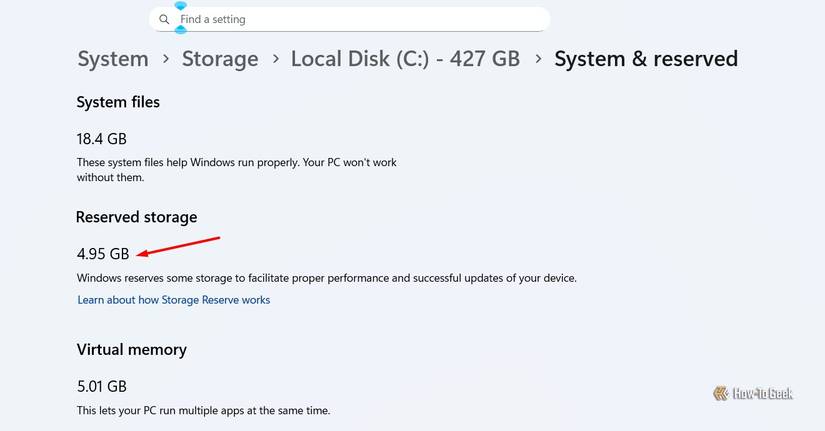
All that being said, to check how much reserved storage you have on your Windows 11 computer, open the Settings menu, then navigate to System > Storage > Show More Categories > System & Reserved. In the Reserved Storage section, you’ll find the amount of storage Windows has set aside. In my case, it’s 4.95GB.

Reserved storage on my computer.
[mai mult...]