Configurare program

How to Clear Your Browser History on Oculus Quest 2

First, open Oculus Browser on your Quest 1 or 2 headset (these instructions work for both models). You’ll find the browser in your app library.

Click "Browser" in your Oculus app library.

In the Oculus Browser window, select the menu button (three dots) in the upper-right corner.

In the Oculus Browser, click the three-dots menu button in the upper-right corner of the window.

In the menu that appears on the side of the window, select “Clear Browsing Data.”

In Oculus Browser, select "Clear Browsing Data."

After that, a small “Clear Data” window will open. If necessary, place a checkmark beside “Browsing History” (and any other items you want to clear), then click the “Clear Data” button.

In Oculus Browser, check "Browsing History" and select "Clear Data."

The Oculus Browser will clear the browsing data you selected. You can repeat this process any time you like. In the future, if you don’t want you clear your browsing data manually after every Oculus Browser session, you can use Private Mode by clicking the browser menu and selecting “Enter Private Mode.” Private Mode will prevent the browser from keeping track of your browsing history.

[mai mult...]

How to Change Your PayPal Password

Hand holding up a smartphone with the PayPal app logo on display.
Update Your PayPal Password

If you have not already chosen a new password for your account, consider learning a few tips to come up with a strong password. Then, start the password change process by opening a web browser on your device and launching the PayPal website. Log in to your account with your current password.

Once you’ve logged in, in PayPal’s top-right corner, click the gear icon to open settings.

On the page that opens, in the tab list at the top, click the “Security” tab.

Open the "Security" tab.

In the “Security” tab, click “Password.”

Select "Password" in the "Security" tab.

A “Change Your Password” window will open. In this window, click the “Current Password” field and type your current PayPal password. Then click the “New Password” field and type the new password you want to use with your account. Click the “Confirm New Password” field and re-enter your new password. Then save your changes by clicking “Change Password” at the bottom.

Change the PayPal account password.

And that’s it. Your PayPal account password is now changed. Going forward, you will use this new password to sign in to your account on all your devices.

  • If you also use Discord, you can change your Discord password just as easily.
  • If you’re like most of us, you probably struggle to remember your account passwords. Luckily, you can use a password manager and have it remember and retrieve your passwords for you. Check out our guide to learn more about those tools.
[mai mult...]

Cum să remediați eroarea TLS pe ​​Windows 11

TLS este un protocol de internet care ajută la furnizarea de comunicații sigure și confidențialitate pe internet. Când comunică prin protocolul HTTPS, atât clientul, cât și serverul trec printr-o strângere de mână TLS cu autentificare și criptare.

Întregul proces implică o schimbare a cheilor publice și private prin verificarea versiunii TLS și modificarea sesiunilor utilizate pentru comunicare. Există mai multe tipuri de TLS: TLS 1.0, TLS 1.2 și TLS 1.3. TLS folosește criptografia pentru a păstra informațiile sensibile și secretele în siguranță prin utilizarea sesiunilor.

[mai mult...]

Cum să vizualizați detaliile certificatului SSL în Google Chrome

Certificatele SSL sunt esențiale pentru ca HTTPS și criptarea modernă să funcționeze corect. Google Chrome a modificat ocazional locul în care puteți vizualiza certificatul SSL al site-ului web pe care îl vizitați.

  • Cum să vizualizați certificatele SSL în Google Chrome

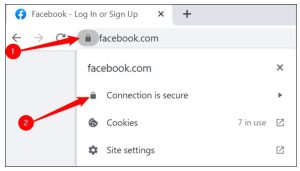
Inițial, Google Chrome vă permitea să vizualizați certificatele SSL făcând click pe pictograma de blocare din apropierea barei de adrese, dar a mutat această funcție în jurul lui Chrome 55. În versiunile moderne ale Google Chrome, detaliile certificatului SSL au revenit la pictograma de blocare.

Faceți click pe pictograma mică de lacăt din partea stângă a barei de adrese, apoi faceți click pe mesajul care spune “Conexiunea este securizată”.

Faceți click pe “Certificate is Valid” pentru a vedea mai multe informații.

[mai mult...]