Situatie
On Windows 10, sometimes, you may need to decrease or increase the available space of a given partition to make room to create additional partitions using the unallocated space or store more data on the same section of the drive. Whatever the reason it might be, W010 includes several tools to resize a partition without the need of formatting or risks of losing your data using the legacy Disk Management tool, Command Prompt, PowerShell, and the new Manage Disks and Volumes settings.
Solutie
Pasi de urmat
Change partition size using Disk Management on W 10
Shrink partition size with Disk Management
Using the legacy Disk Management tool is the easiest way to shrink or increase the partition size without formatting.To reduce the partition size with Disk Management, use these steps:
- Open Start on Windows 10.
- Search for Create and format hard disk partitions and click the top result to open the Disk Management console.
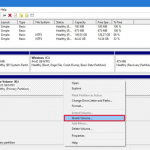
- Right-click the drive you want to change its partition size and select the Shrink Volume option.
4.Enter the amount of space you want to shrink the partition (in megabytes).
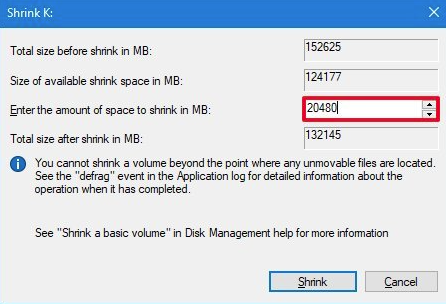
Click the Shrink button.
Increase partition size with Disk Management
To increase the drive partition size using Disk Management, use these steps:
- Open Start.
- Search for Create and format hard disk partitions and click the top result to open the Disk Management console.
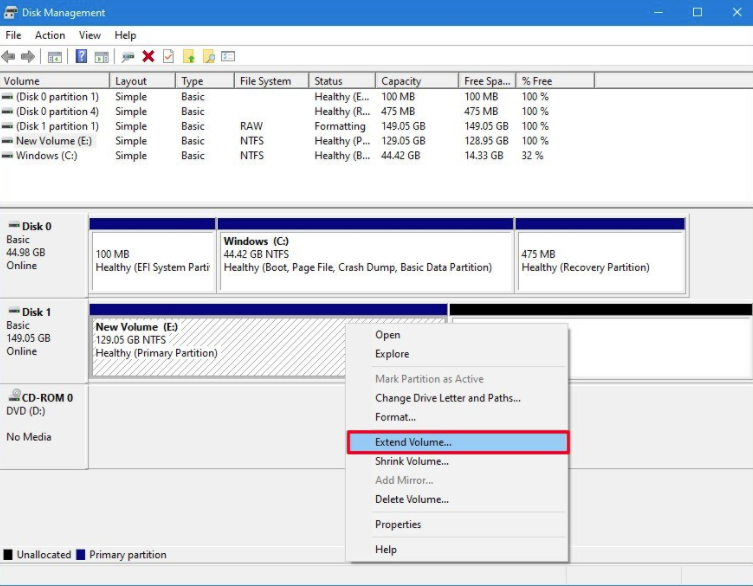
- Right-click the drive you want to change its partition size and select the Extend Volume option.

- Click the Next button
- Under the “Selected” section, make sure to choose the disk with available space (if applicable).
- Enter the amount of space you want to use to increase the drive partition (if necessary).
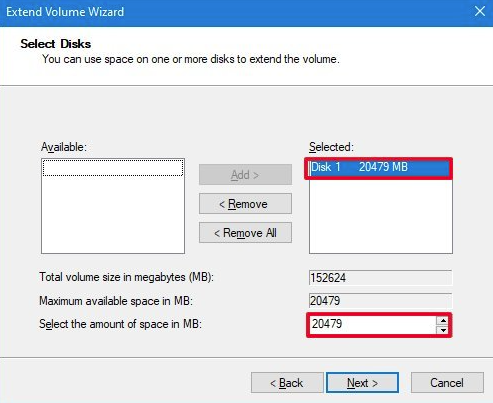
7.Click the Next button.
8.Click the Finish button.
After you complete the steps, the partition will change to the size you specified. If the “Extend volume” option is greyed out, then it means that the physical drive doesn’t have any space available that you can use to increase the volume.
Change partition size using Command Prompt on Windows 10
In the case you need to use commands to resize a partition on Windows 10 without losing data, then you can use the diskpart tool with Command Prompt.
Shrink partition size with diskpart
To shrink a partition with Command Prompt, use these steps:
- Open Start.
- Search for Command Prompt, right-click the top result, and select the Run as administrator option.
- Type the following command to start diskpart and press Enter:
diskpart
- Type the following command to list the volumes and press Enter:
list volume
- Type the following command to select the volume you want to shrink the partition and press Enter:
select volume 4
In the command, make sure to change 4 for the number that represents the partition you want to modify.
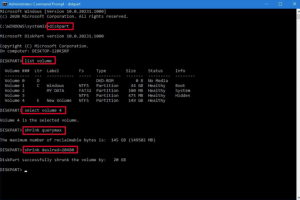
- Type the following command to determine the space you can decrease the partition and press Enter:
shrink querymax
- Type the following command to shrink the drive partition by a specific amount (in megabytes) and press Enter:
shrink desired=20480
In the command, make sure to change 20480 for the amount (in megabytes) you want to shrink the partition.
- (Optional) Type the following command to shrink the partition by its maximum space reclaimable and press Enter:
shrink

Increase partition size with diskpart
To increase the drive partition size with diskpart, use these steps:
-
- Open Start.
- Search for Command Prompt, right-click the top result, and select the Run as administrator option.
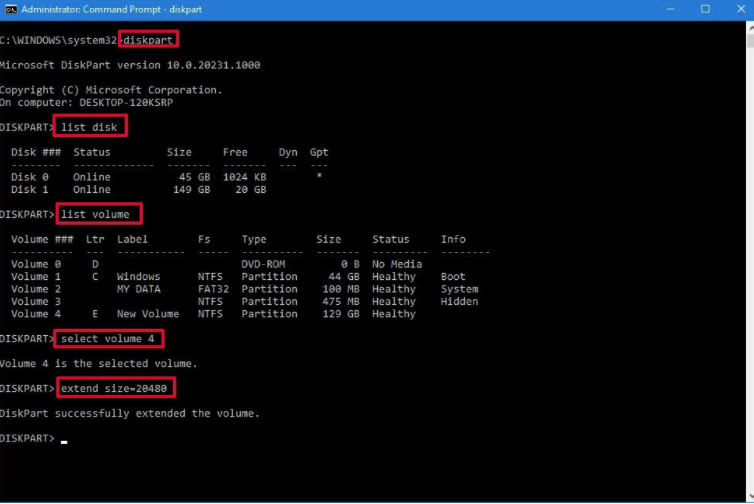
- Type the following command to start diskpart and press Enter:
diskpart
- Type the following command to list the available disks and their capacity, and press Enter:
list disk
Quick note: Identify the total size of the drive with the partition you want to increase.
- Type the following command to list the volumes and press Enter:
list volume
- Type the following command to select the volume you want to shrink the partition and press Enter:
select volume 4
In the command, make sure to change 4 for the number that represents the partition you want to modify.
- Type the following command to increase the size of the partition and press Enter:
extend size=20480
In the command, make sure to change 20480 for the amount (in megabyte) you want to increase the partition.
8. (Optional) Type the following command to increase the size of the partition using all contiguous free space that is available on the drive and press Enter: extend
extend
Resize partition using PowerShell on Windows 10
It’s also possible to resize partitions using PowerShell commands. To make a partition smaller with PowerShell, use these steps:
- Open Start.
- Search for PowerShell, right-click the top result, and select the Run as administrator option.
- Type the following command to list all the drives and their total size, and press Enter:
Get-Disk
- Type the following command to list the available partitions on the drive and Enter:
Get-Partition -DiskNumber 1
In the command, make sure to change 1 for the number of the drive with the partition you want to shrink.
- (Optional) Type the following command to understand the minimum and maximum space you can resize the partition and press Enter:
Get-PartitionSupportedSize -DiskNumber 1 -PartitionNumber 1
In the command, make sure to change the number of disk and partition that corresponds to your situation. Also, the SizeMin and SizeMax are specified in bytes, which means that you may need to use an online converter to understand the information in gigabytes or any other size.
- Type the following command to resize the partition to 20GB and press Enter:
Resize-Partition -DiskNumber 1 -PartitionNumber 1 -Size (20GB)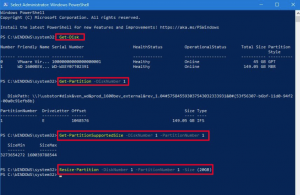
Increase partition size with PowerShell
To extend the partition size with PowerShell, use these steps:
- Open Start.
- Search for PowerShell, right-click the top result, and select the Run as administrator option.
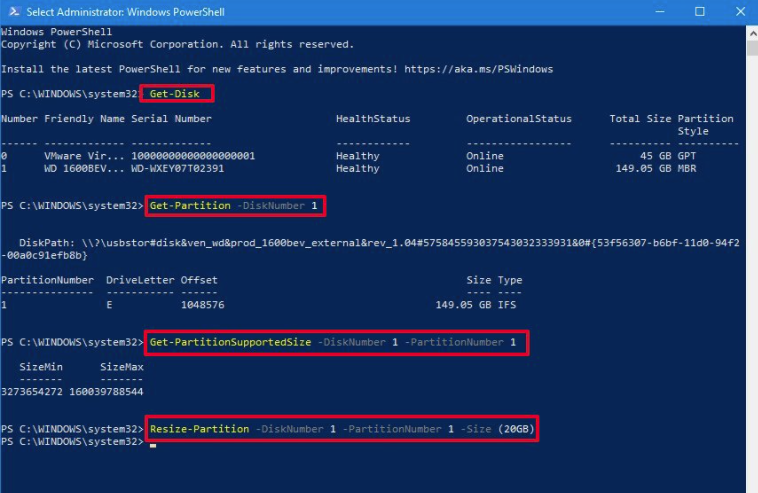
- Type the following command to list all the drives and their total size, and press Enter:
Get-Disk
- Type the following command to list the available partitions in the drive and press Enter:
Get-Partition -DiskNumber 1
In the command, make sure to change 1 for the number of the drive with the partition you want to extend.
- (Optional) Type the following command to understand the minimum and maximum space you can resize the partition and press Enter:
Get-PartitionSupportedSize -DiskNumber 1 -PartitionNumber 1
In the command, make sure to change the number of disk and partition that corresponds to your situation.
- Type the following command to increase the partition to 40GB and press Enter:
Resize-Partition -DiskNumber 1 -PartitionNumber 1 -Size (40GB)
In the command, make sure to replace the disk and partition number and size for the information corresponding to your drive and size you want to increase the partition.

- (Optional) Type the following command to extend the partition to its maximum size and press Enter:
Resize-Partition -DiskNumber 1 -PartitionNumber 2 -Size 64407715328
In the command, make sure to replace the disk and partition number for the information that corresponds to your situation. Also, to specify the new size of the partition, use the SizeMax number available on step No. 4.

Leave A Comment?