Situatie
If you are frustrated with the slow and laggy Photos app on Windows 11, worry not. You can still get the trusty Windows Photo Viewer right from Windows 7 to Windows 11. I am sure it will quickly become the best photo viewer on Windows 11 for you. So go ahead and try this registry hack on your Windows 11 PC.
Solutie
Pasi de urmat
First, open Notepad on your PC and copy + paste the below commands into the new document:
Windows Registry Editor Version 5.00

[HKEY_CURRENT_USER\SOFTWARE\Classes\.bmp]
@="PhotoViewer.FileAssoc.Tiff"

[HKEY_CURRENT_USER\SOFTWARE\Classes\.gif]
@="PhotoViewer.FileAssoc.Tiff"

[HKEY_CURRENT_USER\SOFTWARE\Classes\.ico]
@="PhotoViewer.FileAssoc.Tiff"

[HKEY_CURRENT_USER\SOFTWARE\Classes\.jpeg]
@="PhotoViewer.FileAssoc.Tiff"

[HKEY_CURRENT_USER\SOFTWARE\Classes\.jpg]
@="PhotoViewer.FileAssoc.Tiff"

[HKEY_CURRENT_USER\SOFTWARE\Classes\.png]
@="PhotoViewer.FileAssoc.Tiff"

[HKEY_CURRENT_USER\SOFTWARE\Microsoft\Windows\CurrentVersion\Explorer\FileExts\.gif\OpenWithProgids]
"PhotoViewer.FileAssoc.Tiff"=hex(0):

[HKEY_CURRENT_USER\SOFTWARE\Microsoft\Windows\CurrentVersion\Explorer\FileExts\.ico\OpenWithProgids]
"PhotoViewer.FileAssoc.Tiff"=hex(0):

[HKEY_CURRENT_USER\SOFTWARE\Microsoft\Windows\CurrentVersion\Explorer\FileExts\.jpeg\OpenWithProgids]
"PhotoViewer.FileAssoc.Tiff"=hex(0):

[HKEY_CURRENT_USER\SOFTWARE\Microsoft\Windows\CurrentVersion\Explorer\FileExts\.bmp\OpenWithProgids]
"PhotoViewer.FileAssoc.Tiff"=hex(0):

[HKEY_CURRENT_USER\SOFTWARE\Microsoft\Windows\CurrentVersion\Explorer\FileExts\.jpg\OpenWithProgids]
"PhotoViewer.FileAssoc.Tiff"=hex(0):

[HKEY_CURRENT_USER\SOFTWARE\Microsoft\Windows\CurrentVersion\Explorer\FileExts\.png\OpenWithProgids]
"PhotoViewer.FileAssoc.Tiff"=hex(0):


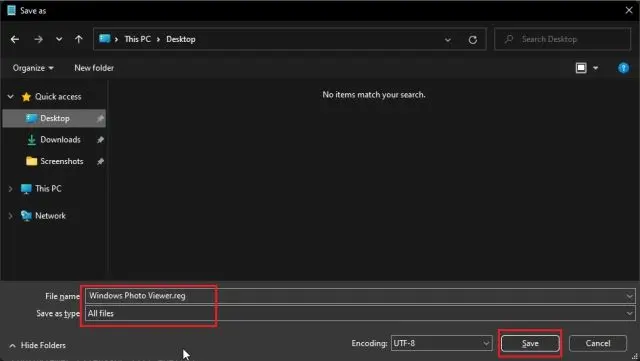
Now, click on “File” in the top menu and select “Save as“.

Here, choose “All files” from the “Save as type” drop-down menu and give the file name. For example, I used the file name – “Windows Photo Viewer”. Next, add .reg at the end of the file name to create a Registry file. Finally, click on “Save”.
Now, move to the location where you have saved the .reg file. Then, double-click on the file to run the registry command and click on “Yes“. This will merge the entries with your Registry.

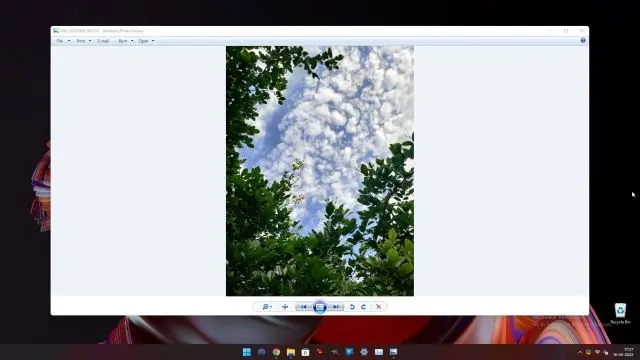
Now, right-click on any image and open it with Windows Photo Viewer. You will find that the Windows Photo Viewer opens images in a jiffy without any lag whatsoever.
Leave A Comment?