Soluții

How to Use the Google Slides Presenter Toolbar

Redesigned Presenter Toolbar in Google Slides

When you’re presenting a slideshow, the last thing you should worry about is how to control it. With the Google Slides presenter toolbar, you can concentrate on your presentation, not the navigation.

  • Start the Slideshow

As a refresher, you can start your Google Slides presentation in a couple of different ways. After opening your slideshow, click View > Present from the menu, or use the Present drop-down in the upper-right corner and choose “Present From Beginning.”

Click Present, Present From Beginning

With your slideshow ready to go, move your cursor to the bottom-left corner of the screen, and you’ll see the presenter toolbar display.

Google Slides Presenter Toolbar Features

The presenter toolbar is transparent but brightens up when you place your cursor over it. This offers a nice, subtle appearance throughout your presentation.

Google Slides Presenter Toolbar

The two arrows let you advance forward or move back one slide at a time. If you click the slide number in the center, you can jump to a particular slide in the presentation. This puts you in complete control of the show. On the right side of the toolbar, you have the overflow menu (three dots). The features in this area allow you to do even more with your presentation.

  • Open Your Speaker Notes

If you like to use the speaker note feature for talking points during your presentation, you can open them by selecting “Open Speaker Notes” in the menu. You’ll get a separate window that you can control and close when you finish with it.

Speaker Notes window

  • Turn on the Laser Pointer

With the built-in red laser pointer, highlighting parts of a slide is a breeze. Click “Turn on the Laser Pointer” in the menu. You can click it again to turn off the laser pointer or use the “L” key on your keyboard for a quick shortcut.

Click Turn On Laser Pointer

  • Enable Auto-Play

If you prefer your slideshow to play on its own, select “Auto-Play” in the overflow menu. You’ll see a pop-out list of time intervals for each slide. Choose one and watch the show play automatically.

Choose AutoPlay in Google Slides

You can also hit “Loop” for the continuous playing of your slideshow. When the presentation reaches the last slide, it will restart from the beginning.

[mai mult...]

How to Create a Table of Contents in Google Slides

You might not think much about including a table of contents in a slideshow. But this can be a handy tool, especially for lengthy presentations. The nice thing about making a linked table of contents in Google Slides is that the application gives you a super simple way to do it.

  • Add and Set Up the Table of Contents Slide

Visit Google Slides, sign in, and open the presentation. You’ll start by adding a new slide and moving it to the start of the slideshow so that it’s at the beginning, just like the table of contents in a book or document.

You can select a slide that has the layout for the table of contents slide you want to add, or you can change the layout afterward. Just keep in mind that you’ll need a text box to add the text and links.

  • Go to the menu and choose either Insert or Slide and pick “New Slide.” Your slide is inserted below the active slide.

Select New Slide from the menu

If you choose to use a blank slide, you can then select Text Box in the toolbar, and click on your slide to insert the box.

Text box inserted on a slide

Once you have your slide and text box, you’ll move it to the beginning of the slideshow. Go to View in the menu and pick either “Show Filmstrip” to display slide thumbnails on the left or “Grid View” to display a grid of your slides.

Grid View and Show Filmstrip in the menu

Drag the table of contents slide to the start of the presentation so it becomes slide number 1. You can then return to your slide view by selecting the slide.

Drag the slide to move it

Create a Table of Contents in Google Slides

With your new slide ready to go, creating the table of contents in Google Slides is a breeze. You can use the slide titles or enter your own text and link it. Let’s look at both options for the one you prefer.

Option 1: Insert the Linked Slide Titles

Place your cursor inside the text box. Select either the Insert Link button in the toolbar or Insert > Link from the menu.

Use the Link button in the toolbar

When the link box appears, click “Slides in This Presentation” at the bottom. Select the first item in your table of contents.

Select the slide from the list

You’ll then see the slide number and title pop into the text box with a link to that slide. You can then adjust the text if you like. For instance, you may want to remove the slide number or edit the title.

Linked slide title

Continue the same process to add the remaining linked slide titles to your table of contents.

Option 2: Insert Text and Link It to the Slides

If you have slides without titles that you don’t plan to add or simply prefer to use different text in your table of contents, you can do this as well. Then, you’ll simply link the text to the corresponding slide.

Enter the text you want to use for the first table of contents item, then select it by dragging your cursor through it. Remember, you can select any text you like for the link; a sentence, phrase, or word.

Then click either the Insert Link button in the toolbar or Insert > Link from the menu.

With the text selected, use the Link button

When the link box appears, click “Slides in This Presentation” at the bottom or find a particular slide using the Search box.

Once you see the slide you want, select it. The link will apply to the text. To check it, click the linked text and you’ll see the pop-up window display the slide and link to it which you can click.

Linked text when clicked

  • Test Your Table of Contents

After you complete your table of contents, you can practice your presentation using the Slideshow button at the top of Google Slides. When you place your cursor over a link in the table, it transforms into a hand symbol. Click the link to go to the slide.

Table of contents in Google Slides

[mai mult...]

Resetare permisiuni NTFS în Windows 10

În mod implicit, aproape toate fișierele de sistem, folderele de sistem și, de asemenea, chiar și cheile de registry din Windows 10 sunt proprii unui cont de utilizator special încorporat, numit TrustedInstaller. Alte conturi de utilizator sunt setate să citească doar fișierele.

Pe măsură ce un utilizator accesează fiecare fișier, folder, cheie de registry, imprimantă sau, de asemenea, un obiect Active Directory, sistemul își verifică permisiunile. În principiu, acceptă moștenirea unui obiect, de exemplu, asta înseamnă că fișierele pot moșteni permisiuni din folderul părinte. De asemenea, fiecare obiect are un Proprietar, care este contul de utilizator care poate seta proprietatea și, de asemenea, poate modifica permisiunile.

Deci, atunci când nu aveți suficiente permisiuni pentru a controla resursele de pe sistemul dvs., resetarea permisiunilor NTFS poate fi singura soluție pe care o aveți. De asemenea, puteți reseta permisiunile NTFS ale fișierelor și folderelor direct din linia de comandă. Cele două tipuri de permisiuni: permisiuni explicite și permisiuni moștenite.

  • Permisiunile explicite sunt cele care sunt setate în mod implicit pentru obiectele non-copil atunci când obiectul este creat, sau din acțiunea utilizatorului asupra obiectelor non-copil, părinte sau copil, de asemenea.
  • Permisiunile moștenite sunt practic cele care sunt propagate către un obiect de la un obiect părinte. Permisiunile moștenite ușurează sarcina de a gestiona permisiunile și asigură coerența permisiunilor între toate obiectele dintr-un anumit container.

În mod implicit, obiectele dintr-un container moștenesc permisiunile de la acel container ori de câte ori sunt create obiectele. De exemplu, atunci când creați un folder numit MyFolder, atunci toate subfolderele și fișierele create în MyFolder moștenesc automat permisiunile din acel folder. Prin urmare, MyFolder are permisiuni explicite, atunci când toate subfolderele și fișierele din el au permisiuni moștenite.

Prin resetarea permisiunilor efective, veți restaura permisiunile NTFS ale fișierelor și folderelor înapoi la permisiunile implicite moștenite. Pentru a reseta permisiunile NTFS în Windows 10, procedați în felul următor.

  • Mai întâi, deschideți un command prompt cu drepturi de administrator.
  • Rulați următoarea comandă pentru a reseta permisiunile pentru un fișier: icacls full path to your file /reset
  • Dacă doriți să resetați permisiunile pentru un folder: icacls full path to the folder /reset
  • Pentru a reseta permisiunile pentru un folder, fișierele și subfolderele acestuia, executați comanda icacls full path to the folder /reset /t /c /l

Înlocuiți căile exemplu împreună cu valorile reale care se potrivesc cu sistemul dvs.

[mai mult...]

Cum instalam CloudPanel pe Debian 10

CloudPanel este un panou de control pentru server gratuit si open-source , utilizat pentru gestionarea mai multor componente web. Cu CloudPanel, puteti gestiona MySQL, NGINX, PHP-FPM, Redis, Domain, FTP, User management si multe altele din interfata web. Acesta accepta toti furnizorii importanti de cloud, inclusiv AWS, Google, Digital Ocean si este special conceput pentru performanta ridicata, cu o utilizare minima a resurselor. De asemenea, CloudPanel ofera un instrument CLI care va ajuta sa efectuati mai multe operatiuni, inclusiv backup bazei de date, resetarea parolei, permisiuni si multe altele.

[mai mult...]

Prompt for password on resume from hibernate/suspend

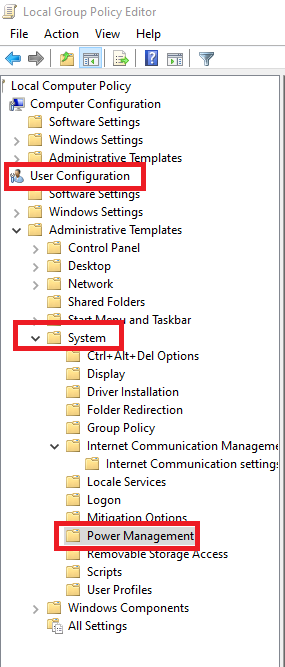
Pentru a activa functia “Prompt for password on resume from hibernate/suspend” este necesar sa se urmeze pasii de mai jos:

  1. Utilizand comanda Windows+R, se va deschide programul “Run” unde se va scrie comanda gpedit.msc

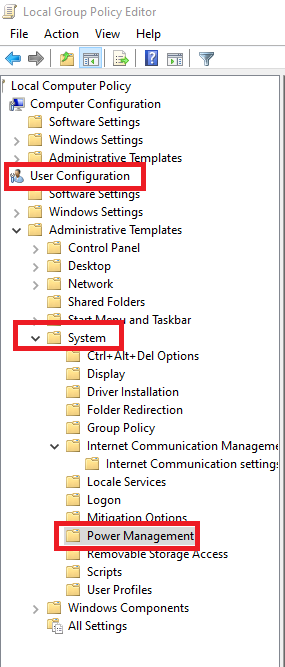
2. User configuration – System

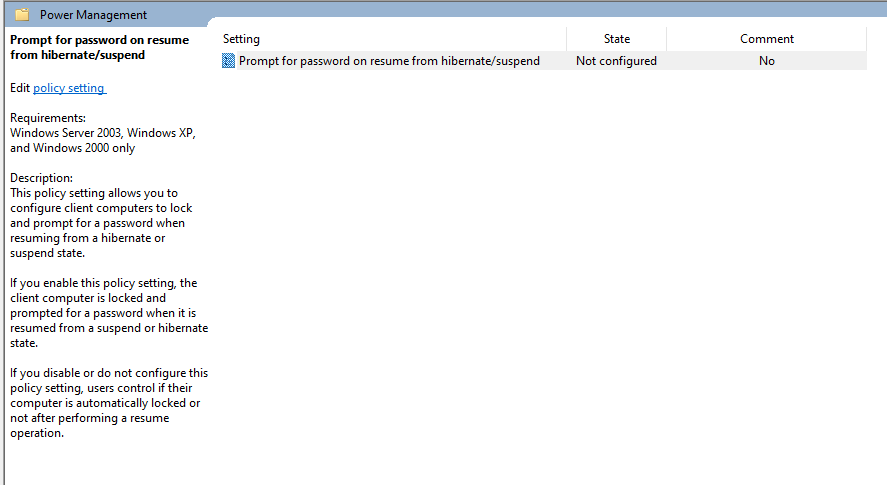
3. Power Management

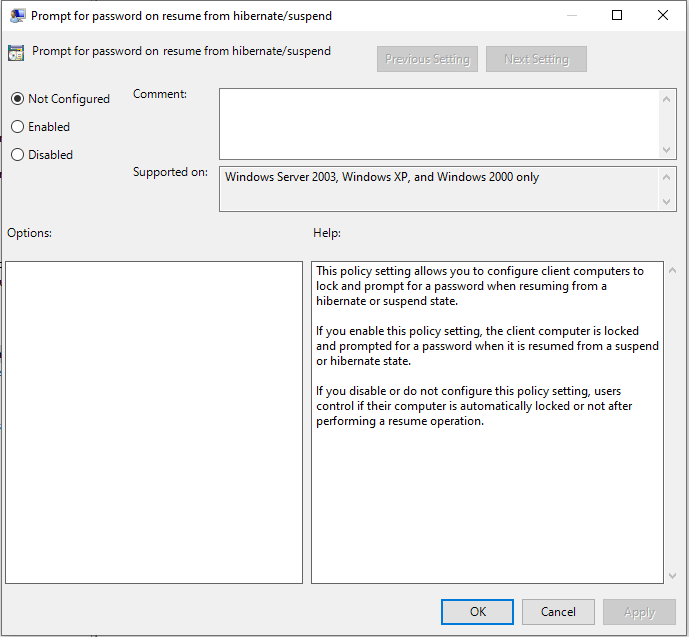
4. Dublu click pe “Prompt for password on resume from hibernate/suspend

5. Se va bifa Enable si se va apasa Apply.

[mai mult...]

Remove Deceptive Site Ahead in Chrome & Firefox

Deceptive Site Ahead is a warning message from web browsers that informs that the website the user requested might contain malicious or phishing content, or be insecure in general. This measure allows saving the user from visiting potentially dangerous websites online. The detection of unsafe websites is turned on by default by popular browsers – Chrome, Firefox and others. Typically, such sites can contain infamous spyware/malware programs, deceptive software bundles, impersonate other well-known websites or promote a software that’s flagged as potentially unwanted by many security programs.

[mai mult...]