Soluții

Cum să conectați un controler wireless Xbox la un PC prin Bluetooth

Dacă preferi să eviți cablurile și vrei sa folosesti Xbox Wireless in jocuri îl poți conecta la PC-ul tău cu Windows 10 prin Bluetooth. Pentru a face acest lucru, mai întâi deschideți meniul Start de pe computer și faceți click pe pictograma cu unelte pentru a deschide Settings (Setări).

În Settings, faceți click pe “Devices”.

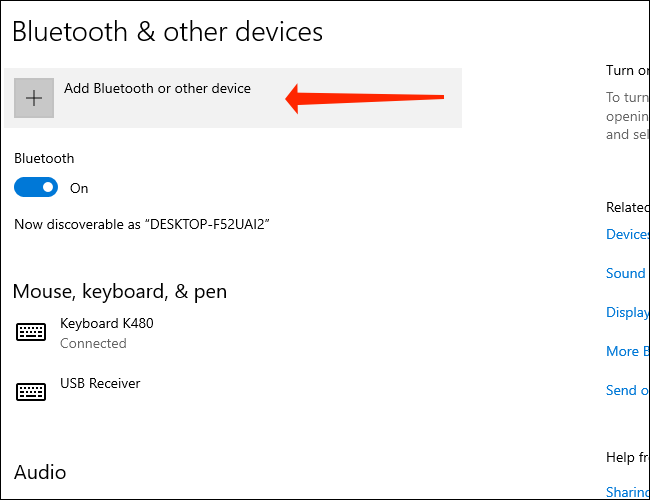
În Devices (Dispozitive), asigurați-vă că vă aflați pe pagina “Bluetooth & Other Devices” (Bluetooth și alte dispozitive), apoi faceți click pe “Add Bluetooth or other device” (Adăugați un dispozitiv Bluetooth sau un alt dispozitiv).

În fereastra “Add a Device” (Adăugați un dispozitiv) care apare, selectați “Bluetooth”.

Apoi, puneți controlerul wireless Xbox în modul de asociere. Mai întâi, porniți controlerul apăsând și ținând apăsat butonul Xbox.

Pe computer, faceți click pe “Xbox Wireless Controller” atunci când acesta apare în lista “Add a Device”.

Controlerul wireless Xbox este acum conectat la PC. Selectați “Done” (Terminat) pentru a finaliza procesul.

[mai mult...]

How to Enable Secure Boot and TPM 2.0 to install Windows 11

We cannot list all BIOS/UEFI versions in the article. Vendors equip their motherboards with different BIOS versions, UI, layouts, and capabilities. In this article, we provide you with general terminology and an idea of what to look for to enable Secure Boot and TMP 2.0 to install Windows 11. Also, we assume you know how to enter BIOS in Windows 10. If you do not know, do the following:

[mai mult...]

How to Beta Test iOS Apps with TestFlight

Have you ever wanted to try out beta versions of your favorite apps? Perhaps, you want to get early access to certain app features that the developers are working on? TestFlight makes it easy to beta test apps on iPhone and iPad, so let’s review how it all works.

For the unfamiliar, Apple offers an app called TestFlight that allows developers, beta testers, and even regular users to try out test versions of apps that haven’t been published on the App Store yet. This essentially gives you early access to new features weeks or sometimes even months ahead of the public release. Even though they tend to be buggy and prone to crashes, a lot of iOS and iPadOS users seem to be interested in installing beta versions of their favorite apps.

Before you get started, we’d like to point out you can’t access beta tests just like that. You’ll need either a private invite or a public Testflight link to gain access to the beta versions of the app. This depends completely on the app developer, though many developers have public betas to solicit feedback for their apps.

  1. First, download and install TestFlight from the App Store.
  2. TestFlight Icon
  3. Now, open the app and tap on “Continue” in the welcome page to access the main menu.
  4. Unlike the screenshot below, everything will be empty here. Now, if you have an invitation code which is usually sent via email, tap on “Redeem” located at the top-right corner.
  5. How to Beta Test iOS Apps with TestFlight
  6. Next, enter the code and tap on “Redeem”
  7. How to Beta Test iOS Apps with TestFlight
  8. If you’re a regular user, you’ll need to find a public TestFlight link. You can browse and find it with a simple Google search. When you have the link, just tap on it to open the invitation in TestFlight. You’ll see a similar page as indicated here. Tap on “Accept”.
  9. How to Beta Test iOS Apps with TestFlight
  10. Now, wait for a couple of seconds and the Accept option will change to Install. Just tap on “Install” to continue.
  11. How to Beta Test iOS Apps with TestFlight
  12. If you have the public version of the app installed on your device, you’ll get the following prompt to replace the current version with the test version. To confirm and proceed with the installation, simply choose “Install”.
  13. How to Beta Test iOS Apps with TestFlight

There you go. You’ve successfully installed the beta version of the iOS app on your iPhone.

[mai mult...]

How to Factory Reset M1 Mac to Wipe & Reinstall macOS

Do you have an M1 Mac that you’d like to factory reset as if it were brand new? The process of factory resetting the M1 Mac line to restore the Mac to factory defaults basically erasing all data and reinstalling a blank macOS.

Before you go ahead with the steps mentioned below, make sure you back up the Mac and all the important files and data you want to keep as they will be permanently erased during the factory restoration. Without a backup, you will not be able to get those files back.

  1. Entering recovery mode is different on Apple silicon Macs. You need to shut down your Mac and then hold down the Touch ID/power button until you see “Loading startup options”. Now, choosing “Options” will take you to macOS Utilities. Here, select “Disk Utility” and click on “Continue” to get started.
  2. How to Factory Reset M1 Mac
  3. Next, select the hard drive where macOS is currently installed from the left pane, typically “Macintosh HD”, and click on the “Erase” option located at the top of the window.How to Factory Reset M1 Mac
  4. Next, select the drive format as “APFS” and click on “Erase Volume Group” (or “Erase” if that is not available).
  5. How to Factory Reset M1 Mac
  6. This will initiate the drive wipe. It may take a few seconds to complete. Click “Done” to continue.How to Factory Reset M1 Mac
  7. Now, go back to the macOS Utilities screen, select “Install macOS” and click on “Continue”. You’ll be prompted to select the drive where you want to install macOS. Make the selection and click on “Install” to begin installing the factory version of macOS.How to Factory Reset M1 Mac

That’s all you need to do to perform a factory reset. At this point, you just need to patiently wait for the installation process to complete which could take a while. After the factory reset, you’ll need to go through the initial set-up screen like it’s a brand new Mac.

[mai mult...]