Cum rezolvi: DRIVER_CORRUPTED_MMPOOL în Windows (10 / 11)

1. Repornește în Safe Mode (Modul de siguranță)

Dacă nu mai poți intra normal în Windows:

  1. Repornește computerul de 2-3 ori forțat → vei ajunge în Recovery Mode

  2. Alege: Advanced OptionsStartup SettingsRestart

  3. Apasă F4 pentru Safe Mode (sau F5 pentru Safe Mode with Networking)

2. Actualizează sau reinstalează driverele

A. Prin Device Manager:

  1. Apasă Win + XDevice Manager

  2. Extinde secțiunile: Display Adapters, Network Adapters, Audio, etc.

  3. Clic dreapta pe fiecare → Update DriverSearch Automatically

B. Reinstalează driverele problematice:

  • Dacă știi ce driver a cauzat BSOD-ul (ex: rețea, grafică), fă:

    • Clic dreapta → Uninstall device

    • Repornește → Windows îl reinstalează automat

3. Verifică actualizările Windows

Uneori patch-urile Windows rezolvă aceste conflicte:

  1. StartSettingsWindows Update

  2. Apasă Check for updates și instalează tot

4. Rulează comenzi pentru verificare fișiere sistem

Deschide Command Prompt ca Administrator și rulează:

sfc /scannow
Verifică fișierele corupte și le repară automat.

Apoi rulează:

DISM /Online /Cleanup-Image /RestoreHealth
Repară imaginea Windows coruptă.

 5. Verifică RAM-ul (Memorie defectă poate cauza această eroare)

  1. Apasă Win + R → scrie mdsched.exe → Enter

  2. Alege: Restart now and check for problems

  3. Lasă testul să ruleze (durează câteva minute)

6. Verifică fișierul minidump pentru detalii (opțional)

Folosind aplicația BlueScreenView sau WinDbg, poți identifica driverul exact care a provocat BSOD-ul.

7. Dezinstalează software recent instalat

  • Dacă eroarea a apărut după instalarea unui nou software (antivirus, VPN, etc.), încearcă:

    • Win + Rappwiz.cpl → Dezinstalează acel software

    • Repornește

8. Resetează Windows dacă nimic nu funcționează

  • Mergi la: Settings → System → Recovery

  • Alege: Reset this PC → păstrează fișierele → Windows se reinstalează fără a-ți șterge datele.

[mai mult...]

Cum repari o cameră Lenovo care nu funcționează pe Windows 11

1. Verifică întrerupătorul fizic sau tasta de activare cameră

  • Unele laptopuri Lenovo au un buton fizic de protecție a camerei (lângă cameră – un slider mic). Asigură-te că este deschis (poziție ON).

  • Alte modele folosesc o tastă funcțională:

    • Caută o tastă cu o pictogramă de cameră (de obicei F8 sau F4)

    • Apasă Fn + F8 sau doar F8 pentru a activa camera

 2. Activează accesul la cameră în Windows

  1. Intră în SetăriConfidențialitate și securitateCameră

  2. Asigură-te că:

    • Accesul la cameră este activat

    • Permite aplicațiilor să folosească camera este activat

    • Verifică și aplicațiile individuale (ex: Zoom, Teams, Skype)

3. Verifică în Device Manager (Manager de dispozitive)

  1. Apasă Windows + XDevice Manager

  2. Extinde secțiunea Cameras sau Imaging Devices

  3. Clic dreapta pe cameră:

    • Selectează Enable device (Activează dispozitivul) dacă apare dezactivat

    • Selectează Update driver (Actualizează driverul)Search automatically (Caută automat)

4. Dezactivează „Camera Privacy Mode” din Lenovo Vantage

  1. Descarcă și deschide aplicația Lenovo Vantage (din Microsoft Store)

  2. Mergi la Device SettingsMy Device Settings

  3. Dezactivează opțiunea Camera Privacy Mode

5. Verifică setările antivirus / firewall

Unele soluții antivirus blochează camera. Verifică:

  • Setările antivirus (ex: Bitdefender, Avast, Norton)

  • Dezactivează temporar protecția pentru cameră

  • Adaugă aplicațiile de tip Zoom/Teams pe lista de excepții

6. Repornește serviciul de cameră (Windows Services)

  1. Apasă Windows + R, scrie services.msc → Enter

  2. Găsește serviciul: Windows Camera Frame Server

  3. Dă clic dreapta → Restart

7. Reinstalează driverul camerei

  1. Mergi în Device Manager

  2. Clic dreapta pe cameră → Uninstall device (Dezinstalează)

  3. Repornește laptopul → Windows va reinstala automat driverul

Dacă nu, mergi pe site-ul Lenovo, caută modelul tău și descarcă driverul pentru cameră manual.

8. Testează camera

  • Apasă Windows + S → scrie „Camera” → deschide aplicația de cameră

  • Dacă funcționează aici, dar nu în alte aplicații, problema e de permisiuni sau blocaj antivirus.

[mai mult...]

How to creating Bar Charts using the REPT Function in Excel

Another way to create in-cell bar charts is to use the REPT function, which repeats a specified character a given number of times.

In the cell next to the first value you want to visualize, type:

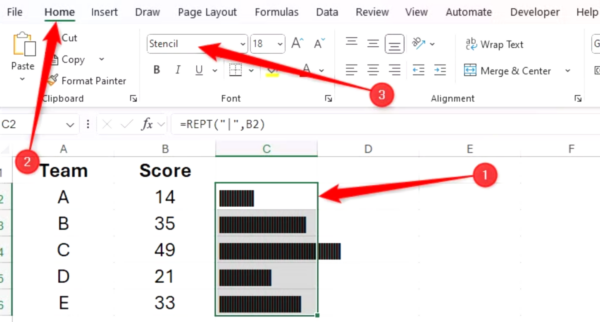
=REPT("|",x)

and press Ctrl+Enter.

In this formula, “|” is the vertical glyph character (enclosed in double quotes) often accessed by pressing Shift or Fn at the same time as the relevant key, and x is a reference to a cell containing a numerical value. Here, the formula references cell B2 and so returns 14 vertical glyphs.

Double-click the fill handle of that cell to repeat the formula down the column.

At the moment, the data is visualized as a tally graph, as the default fonts in Excel place small spaces between each character. To fix this, select the relevant cells, and in the Home tab on the ribbon, select a typeface that doesn’t separate characters with a space, like “Stencil” or “Playbill.”

Where data bars adjust to the column width, bar charts created using the REPT function expand or contract dynamically, regardless of the width of the cells they occupy.

[mai mult...]

How to creating Bar Charts using conditional formatting in Excel

To create in-cell bar charts using conditional formatting, select the cells containing the values, and in the Home tab on the ribbon, click “Conditional Formatting”

Then, hover over “Data Bars,” and select a fill type.

Now, the cells you selected are partially filled according to their relative values in the dataset. The largest value is represented by a fully filled cell, while only zeros will be completely empty.

What’s more, if the values change, so do the lengths of the data bars.

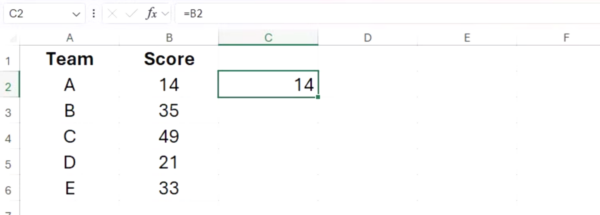
However, maybe you want the data bars to be next to the cells containing the values. In the screenshot above, that would mean that column B contains the values, and column C contains the data bars. To do this, first, select cell C2, type:

=B2

and press Ctrl+Enter to stay in the same cell.

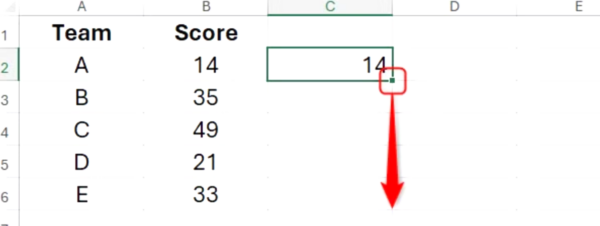
Now, double-click the fill handle to duplicate the formula down the column.

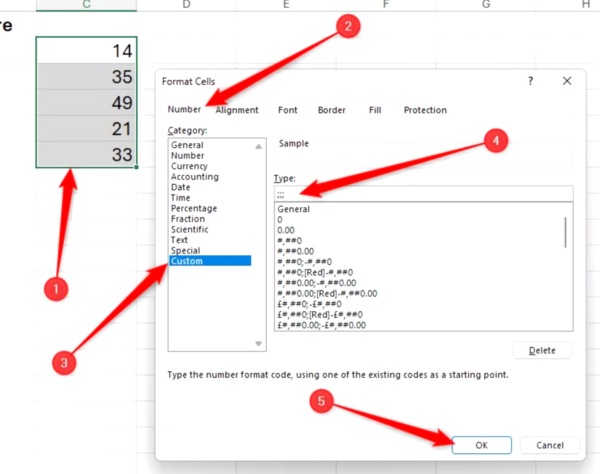
Next, select the duplicated values you just generated, and press Ctrl+1 to open the Format Cells dialog box. Then, in the Number tab, click “Custom,” type ;;; (three semicolons) into the text field, and click “OK.”

Even though the cells in column C appear empty, they still contain the values you duplicated from column B earlier—they’re just invisible.

Now, apply the conditional formatting data bars to the cells containing the invisible values.

[mai mult...]