Situatie
- When you install an Oracle ODBC driver in Windows 10, you can connect to an Oracle database with Access and other ODBC-compliant database applications.
- Users can download and install an ODBC driver for Oracle 19c, which is the current release with a high level of stability.
- You can establish an Oracle ODBC connection in Windows 10 by setting up an ODBC data source after installing the ODBC driver.
- You’ll also need to have installed certain Visual C++ packages for the Oracle setup.
Solutie
How can I install an Oracle ODBC driver in Windows 10?
1. Download and extract the Oracle packages
- First, open the Oracle Instant Client page in your browser
- Next, click the Instant Client for Microsoft Windows 32 or 64-bit link (or an alternative one that matches your PC’s platform).
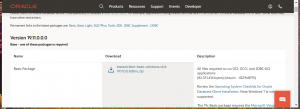
- Click the Basic package download link.
- Scroll down and click the SDK package hyperlink to download that archive.
- In addition, click the download link for the ODBC package.
- Open the File Explorer window by clicking the folder taskbar button for it.
- Click the C: root drive in File Explorer.
- Then right-click a space within the C: drive and select New > Folder.
- Enter Oracle as the new folder name. Then you should have a new folder with this path:
C:\Oracle - Move all three of the downloaded Oracle ZIP archives into the Oracle folder. You can do that by selecting the ZIP files, clicking the Move to button, and selecting Choose location within File Explorer.
- Next, extract all three of the ZIP archives into the Oracle folder. To extract a ZIP, select it and click the Extract all button on File Explorer’s Compressed Folder Tools tab.
- Then you can click the Browse button in the Extract Compressed window to select the Oracle folder. Click the Extract button.
- Open the extracted instantclient-basic-windows.x64-19.11.0.0.0dbru folder.
- Move the instantclient_19_11 subfolder from there into the Oracle folder.
- Then erase the now empty instantclient-basic-windows.x64-19.11.0.0.0dbru folder that previously included the instantclient_19_11 subfolder by right-clicking it and selecting Delete. Thereafter, you’ll have a single instantclient_19_11 folder within the Oracle directory.
- The ODBC and basic ZIP archives must be unzipped to exactly the same folder. Select to extract the ODBC ZIP to the path of your unzipped Basic package.
- Delete instantclient_19_11 at the end of the path in the Extract Compressed window so that an additional subfolder isn’t included.
- The SDK package is a non-essential optional one. However, it’s recommended you download that package too.
- The SDK ZIP archive should also be extracted to the same instantclient_19_11 folder that includes the Basic and ODBC package files.
2. Add an Oracle Client directory environment variable
- Press the Windows and S keys simultaneously to open a search box.
- Type the keyword system environment variables with the search text box.
- Click Edit the system environment variables to open the window in the screenshot directly below.
- Press the Environment Variables button.
- Click the New button for system variables.
- Next, input OCI_LIB32 within the Variable name box.
- Input your Oracle folder path in the Variable value box. If you followed the guidelines above, that folder path would be this:
C:\Oracle\instantclient_19_11.
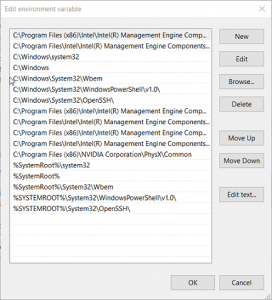
- Next, Double-click Path in system variables to open the window in the snapshot directly below.
- Click the New button, and enter the same folder path you input within the Variable value box.
- Press the OK button.
3. Install your ODBC Oracle client package
To install the ODBC client, open the instantclient_19_11 folder you extracted the ODBC package to in File Explorer. Then right-click odbc_install.exe and select the Run as administrator option. Note that there isn’t any kind of GUI installation wizard for that file. So, that’s all you need to do here.
4. Set up the DSN for Oracle driver
- Bring up the search tool within Windows.
- Enter ODBC Data Sources in the search box.
- Click ODBC Data Sources to open the window in the screenshot directly below.
- Next, click the Add button on the User DSN (or System) tab to open the Create New Data Source window.
- Select your Oracle ODBC driver, and press the Finish button.
- Fill out the required details on the ODBC configuration window.
- Click Test Connection to check your Oracle Database Server connection.
- Press the OK button to exit.
5. Install missing Visual C++ libraries
You can’t set up data sources for an Oracle driver with the ODBC Data Source Administration if a required Visual C++ package for it is not installed on your PC. If an error message pops up when your try to set up an Oracle driver data source, you might be missing a required Visual C++ package.
You’ll need to have Visual Studio 17 installed for the current Oracle 19 client. You can download Visual Studio 2017, and older redistributable packages, via the C++ downloads page. Then click the VC EXE file you downloaded to the install Visual Studio package. So, that’s how you can install the Oracle ODBC driver on Windows 10.
When you’ve installed the current Oracle ODBC driver, you’ll be able to connect to Oracle Database DBMS versions from 11.2 up to 19.1 with the 19c client.


Leave A Comment?