Situatie
A very essential skill in photo editing is using the Blur tool for making the image less sharp. It also smooths edges and removes noise from an image and creates a pleasant visual effect. Depending on what we need to do, Adobe Photoshop provides 14 important types of blur.
Solutie
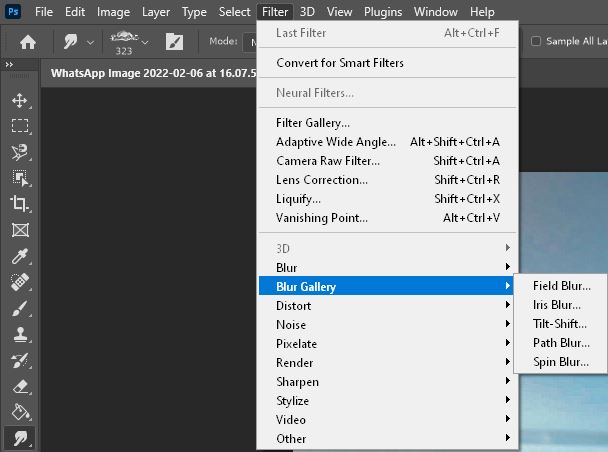
In Adobe Photoshop, you can find the Blur tools in the Filters Menu:
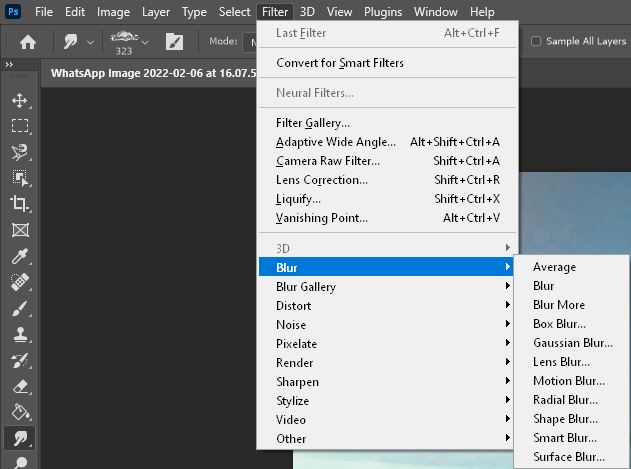
1. Blur
The Blur Filter looks for significant transitions or edges and then blurs them together to create a softer image.
2. Blur More
The Blur More filter creates an even more blurry image after you’ve already used the general Blur filter. Every time you select Blur More, it blurs the image three to four times more than it was originally blurred. You may find yourself clicking Blur More up to 10 times to get the look you want.
Use this filter when working with a high-resolution image to achieve a more hazy look. You can also use it on a lower-resolution image, but the effect will be much more pronounced.
3. Average Blur
The Average Blur filter gives a more correct color in your image by removing a color cast. It does this by creating a color that’s the average of all the colors in the neighboring pixels.
There are three ways to use this blur:
To color correct an entire image, simply select Average Blur. Your image will end up being one averaged color of the entire image.
To color correct a specific area on the image, select one spot before choosing Average Blur. The area’s color will become an average of the colors inside that selection. This allows you to smooth out one area of color.
To remove a color cast.
4. Box Blur
The Box Blur filter uses the average of nearby colors to blur an image. Because of this, it gives you more control than the Blur filter. The Box Blur looks for edges within an image (two contrasting colors right next to each other) to retain more definition in an image. A word of warning—this filter can create a weird distortion, so it’s often only used for special effects.
5. Gaussian Blur
The Gaussian Blur filter gives a hazy effect by blurring the image or selected area by an adjustable amount. This amount is based on a weighted average, also called The Gaussian Function.
You’re able to implement the Gaussian Blur using either Radius or Threshold. The smaller the area you select, the less blur you’ll get. This is a great way to bring focus to a specific part of an image. As good as it is, the Gaussian Blur can still give the image a hazy look.
6. Lens Blur
The Lens Blur is used to give the image the effect of having a narrower depth of field. This means some objects in an image stay in focus while others are blurred.
7. Motion Blur
The Motion Blur filter applies a specific blur in a specific direction with a specific intensity. This gives the illusion of movement to a subject in your image.
Select a part of the image to blur. When you select this filter, a dialog box will open. Rotate the wheel around to choose the direction of the blur, then choose the distance that you’d like the image to be blurred and by what amount.
8. Radial Blur
The Radial Blur filter will simulate either zooming in or rotating a camera.
When you select Radial Blur, a dialog box will appear. Change the center of the blur to the place you want and set the amount of grain by using the quality setting controls. A lower amount equals a lower blur.
Unfortunately, you’ll have to make your selections without seeing them previewed on your image, but you can guess how they will look by examining the white part of the dialog box. Once you hit Apply you’ll see the final result.
9. Shape Blur
The Shape Blur filter is best to use on a part of your image with a simple shape, like the circle shape at the bottom of a tulip.
10. Smart Blur
The Smart Blur filter smooths out grain and noise patterns between edges.
You have a lot of control of this blur in its dialog box. The Threshold setting determines how different the pixels need to be before they’re blurred. If you want a very minimal change, choose the lowest setting. The Quality setting will change the quality of the blur. The Mode setting shows where Photoshop is detecting edges.
11. Surface Blur
The Surface Blur filter blurs the entire image except for the edges. Using a high radius will cause you to lose a lot of detail in your image, but the Threshold will allow Photoshop to look at the pixels in the radius and figure out how they should be blurred.
This filter is a great way to smooth out skin. However, without taking some additional steps, the filter can smooth out too much detail and texture, making the image look fake. If you add a layer mask to your layer and use your brush tool with the mask selected, you can get back some of the detail you want. Or, you can brush over with black in the areas where you want more detail.
12. Field Blur
The Field Blur can help you blur part of a portrait while still being able to see the subject’s eyes or even their entire face.
Once you select Field Blur, you’ll see the Blur Gallery open. Also, your entire image will be blurred, and you’ll see a little circle in the middle. The circle is called a “pin” which can be moved or duplicated. Alternatively, you can drag the slider located in the top left corner of the Blur Gallery.
13. Iris Blur
The Iris Blur filter uses a lot of the same technology and techniques as the Field Blur, but it gives you more control over the blurring of a subject’s eyes.
The differences are that with Iris Blur, you:
-Can change the shape of the ellipse to be more circular or flat by manipulating any of the four points around the ellipse. You can even drag the ellipse outside of the image to blur just the corners.
-Control the transition or gradient of the blur in the transition area. The space between the center of the iris (where the pin would be) to the edge of the four transition points will have no blur. But, a gradual blur can be applied from the transition point to the 100% blur line.
-Control the line curve by manipulating the little diamond that’s on the 100% blur line. Dragging the diamond changes the shape of the ellipse to a rectangle with rounded corners.
-Change the transition of just one part of the ellipse by holding Option (Mac) or Alt (Windows).
-Change the focus in the transition area by adjusting the Focus slider in the Blur Gallery.
14. Tilt-Shift
The Tilt-Shift filter prevents perspective distortion by controlling the plane of focus. Sometimes it’s also used as a way to make an image look as though it was shot up close with a macro lens, rendering the subjects look like mini versions of themselves.
The different components of Tilt-Shift are similar to the Iris Blur, except the solid lines create a protected area without a blur (unless the Focus is adjusted). The dotted lines represent the 100% blur line. Between the solid and dotted lines is where the blur will transition or form a gradient.
Other things to note are:
-The Distortion setting makes it possible to add a slight motion blur effect.
-By default, the Distortion will sit at 0.
-Any changes will only apply to the bottom portion of the image. To get the same effect on the top as well, check the Symmetric Distortion box.
Leave A Comment?