
Soluții

How to Check Your Printed Document History in Windows 10

Checking the history of a printer to see what was printed can be somewhat difficult to monitor. As your toner level doesn’t convey how much the accessory has been used, you’ll need to enable logging within Windows 10. Here’s how.

Enable Logging for Recently Printed Documents

By default, your printed document history will be wiped after each document has finished printing. You can change this setting to enable you to see a list of your recently printed documents from the print queue for your printer.

You’ll need to change this setting for each printer you have installed.

Access Your Print Queue

To access your print queue, right-click the Windows Start menu button and select the “Settings” option. From here, click Devices > Printers & Scanners.
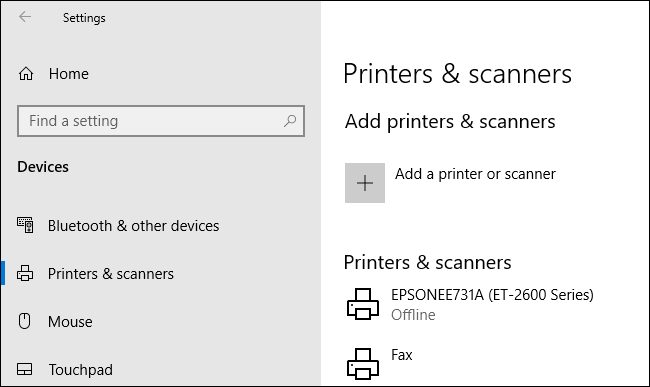
Find your printer in the “Printers & Scanners” list, click on it, and then click “Open Queue” to open the print queue.
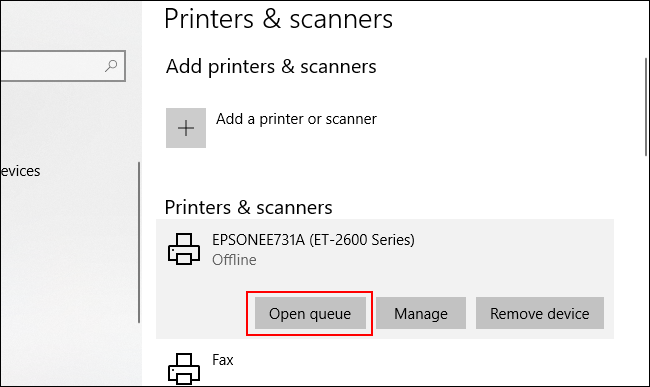
Your printer queue with current and queued printed items will be listed. Documents you’ve previously printed will not be shown, which is why you’ll need to enable logging.

Enable Printer History

In the print queue window for your printer, click Printer > Properties. Alternatively, select your printer and click “Manage” in the “Printers & Scanners” settings menu.

In your printer properties, click on the “Advanced” tab and then select the “Keep Printed Documents” checkbox.

Click “OK” to save your settings.
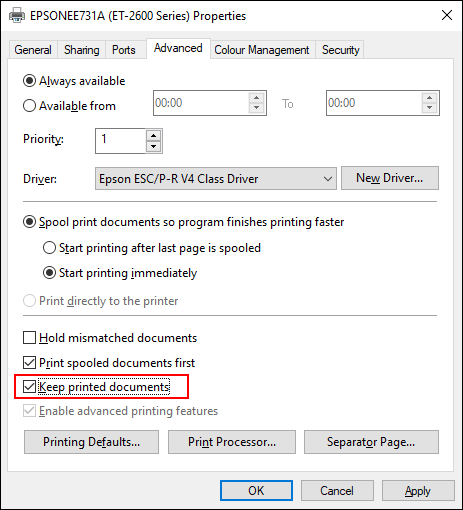
Once your document history is enabled, your documents will no longer disappear from your print queue after the printing process has completed.

[mai mult...]

How to Add or Remove Rows and Columns in Google Sheets

How to Add Rows or Columns

Fire up your browser and head to the Google Sheets home page. Open a spreadsheet in which you want to insert a few rows or columns.

Next, click on a cell where you want to insert a column or row next to. After, select “Insert” from the toolbar.

From the Insert menu, you’ll see a few options for inserting rows and columns into your spreadsheet. You can insert rows above or below and columns to the left or right of the selected cell.

If you want to insert more than one row or column at a time, highlight as many cells as you want to add. For example, highlight two vertical cells to insert two rows or highlight two horizontal cells to insert columns.

You can insert rows and columns from the right-click context menu as well. Highlight the cell you want to insert them next to, right-click the selection, and then choose “Insert Rows” or “Insert Columns.”

When removing rows and columns in Google Sheets, you can use these shortcuts if you’d prefer to keep your fingers on your keyboard the whole time. Highlight the cells from the row or column you want to remove, and then press the keyboard shortcut for the command you want to execute.

Again, because Google wants to be difficult, here are the browser-specific keyboard shortcuts for Windows, Linux, and Chrome OS:

  • Alt+E, then D (Chrome) or Alt+Shift+E, then D (Other browsers): Delete rows.
  • Alt+E, then E (Chrome) or Alt+Shift+E, then E (Other browsers): Delete columns.

If you use macOS, you can use the following keyboard shortcuts to remove rows or columns:

  • Ctrl+Option+E, then D: Delete rows.
  • Ctrl+Option+E, then E: Delete columns.
[mai mult...]

How to Downgrade Your Android Phone to a Previous Version

Nu toată lumea apreciază modificările atunci când versiunile noi de Android accesează dispozitivele. Dacă doriți să reveniți, este posibil, uneori, să downgradați dispozitivul Android la o versiune anterioară. Iată cum procedați. Înainte de a începe, este important să menționăm riscurile. Descărcarea telefonului Android nu este acceptată în general, nu este un proces ușor și aproape sigur va duce la pierderea datelor de pe dispozitiv. Asigurați-vă că faceți backup la telefon înainte de a începe. În plus, acest proces ar putea anula garanția dispozitivului sau ar putea-o proteja, ceea ce face ca telefonul să nu fie decât deșeuri electronice. Ca atare, NU vă recomandăm să continuați decât dacă aveți experiență modificând firmware-ul dispozitivului dvs. și să înțelegeți complet riscurile implicate.

[mai mult...]