Configurare program

How to Clear Safari Browsing Data with a Keyboard Shortcut

If you use Safari on Mac and would like to quickly clear your browser history without digging through menus, you can take care of it with a keyboard shortcut and a click by creating a custom shortcut in System Preferences. Here’s how.

First, we’ll need to visit “System Preferences” to create the custom keyboard shortcut. On your Mac, click the “Apple” icon in the upper-left corner and select “System Preferences.”

Click the Apple icon, and then select "System Preferences."

In “System Preferences,” select “Keyboard.” In “Keyboard” preferences, click the “Shortcuts” tab.

Click "Shortcuts" in the "Keyboard" menu.

In the sidebar menu, click “App Shortcuts.”

Click "App Shortcuts."

Click the plus sign (+) located near the bottom of the window to add a new shortcut.

Click the plus sign (+) to add a keyboard shortcut.

A pop-up window will appear. First, click the drop-down menu labeled “Application” and select “Safari.app.”

In the Application drop-down menu, select "Safari."

In the “Menu Title” text box, enter “Clear History...” exactly. It must include the three dots at the end, as it must match the existing menu command in Safari under the “History” menu. Next, select the “Keyboard Shortcut” box and type the shortcut you want to use to clear Safari’s browser history. We chose Shift+Command+H, but you can enter any unused keyboard combination.

In the Menu Title box, enter "Clear History..." then define a keyboard shortcut combination.

Then click the “Add” button, and the shortcut will be added to the list. You’re now clear to close System Preferences (unless you want to tweak the keyboard shortcut key combination after testing it out.)

Open “Safari” and press the keyboard shortcut you just defined. A small pop-over window will appear with a drop-down menu and two buttons. In the “Clear” menu, you can choose how much of your history is cleared. When you’re ready, click the “Clear History” button.

Click "Clear History."

Your Safari browsing history will be cleared to whatever level you selected. Safari will remember the setting you chose in the “Clear” menu, so next time you call up the window with your custom shortcut, you can just click the “Clear History” button.

If you find yourself frequently clearing your browser history, consider trying Safari’s Private Browsing mode, which is a special mode that doesn’t keep track of your browsing history. You can even configure Safari to start with a Private window every time you open the app.

[mai mult...]

Cum activezi functia ,,Folder Securizat’’ pe un telefon Samsung

Desi exista foarte multe aplicatii de acest gen in Magazin Play, majoritatea vin la pachet cu reclame sau alte functii inutile. In cazul in care nu stiati deja, Samsung ofera posibilitate din setari de a activa un Folder Securizat unde puteti pune orice aplicatie sau fisier doriti.

Pentru activare si configurare trebuie sa urmati pasii de mai jos:

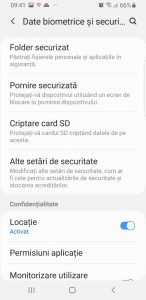
  • Intrati in Setari si aici selectati ,,Date biometrice si securitate’’

De aici alegeti ,,Folder securizat’’ (veti avea nevoie de o parola)

Dupa setarea parolei trebuie obligatoriu sa activati butonul cu ,,activare folder securizat’’, astfel incat acesta sa apara in meniul telefonului.

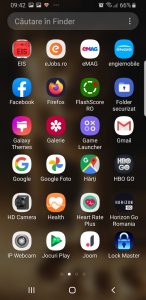
Dupa activare veti gasi ,,Folder securizat’’ in aplicatii si il puteti accesa introducand parola setata anterior.

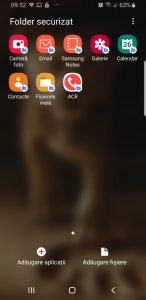
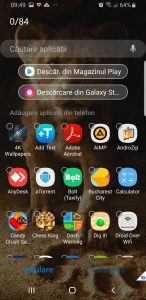
Se va deschide Folder securizat si acum puteti adauga ce aplicatie sau fisier doriti.

Gata, acum aplicatiile sau fisierele dumneavoastra sunt securizate.

[mai mult...]

Cum schimbi poza unui grup in Microsoft Teams

Crearea si alaturarea unui grup in Microsoft Teams este usoara. Pe de alta parte, identificarea unui grup dintr-o lista lunga poate fi dificila. Puteti sa puneti o poza pentru fiecare grup pentru o identificare mai usora.

Pentru acest lucru trebuie sa urmati pasii de mai jos:

Pasul 1:

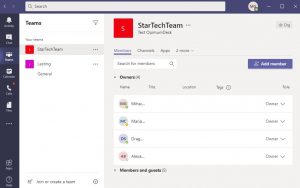
Dati click pe grupul pentru care doriti sa schimbati poza si apasati cele trei puncte orizontale.

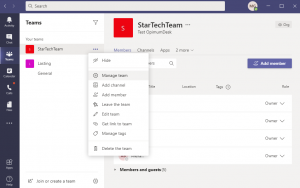
Pasul 2

Dupa ce ati dat click va aparea o lista cu optiuni de unde va trebui sa alegeti ,,Manage team’’:

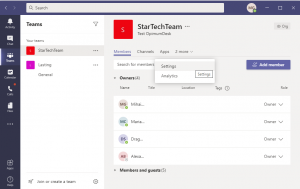
Pasul 3

Din lista de optiuni trebuie sa alegeti ,,Settings’’

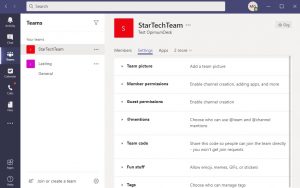
Pasul 4

Dupa ce ati selectat ,,Settings”, apare un meniu cu noi optiuni, de aici trebuie sa alegeti prima optiune ,,Add a team picture’’

Pasul 5

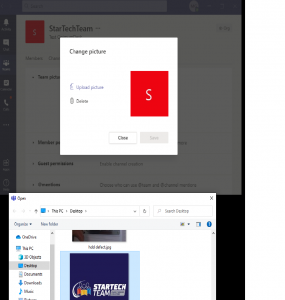
Dupa ca ati ales ,,add a team picture’’ apare un nou meniu cu ,,Change picture’’

Pasul 6

Acum prin optiunea ,,Upload picture’’ trebuie sa alegeti ce fotografie doriti din PC-ul dumneavoastra.

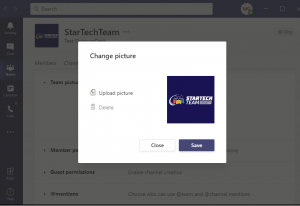
Pasul 7

Dupa ce ati ales poza dorita grupului, va trebui sa dati ,,Save’’:

Dupa ce ati salvat poza, aceasta se va modifica automat. Puteti repeta procedura pentru fiecare grup in parte astfel incat sa va fie mai usor sa le identificati.

[mai mult...]