Configurare program
How to fix Chrome not saving passwords via Chrome account settings
How to fix Chrome not saving passwords.
[mai mult...]How to Change the Time on Windows 10
Manually Change the Time on Windows 10
If you’d like to manually specify your PC’s time, use the built-in Settings option to do that.
- Start by launching Settings on your PC. Press the Windows+i keys and the app will open.
- On the Settings window, choose “Time & Language.”

On the “Date & Time” page that opens, make sure both “Set Time Automatically” and “Set Time Zone Automatically” options are disabled.

Beneath “Set the Date and Time Manually,” click “Change.”

You’ll see a “Change Date and Time” window. Here, click the current date and time options and set them to your choice. When that’s done, at the bottom, click “Change.”

Your PC now uses your newly-specified time, and you’re all set.
Set the Time to Update Automatically on Windows 10
If you don’t wish to use the manually-specified time on your PC, you can get Windows 10 to automatically adjust the clock. Your PC syncs with Microsoft’s time servers to fetch the current time for your region.
This feature should be enabled by default, but you or another user may have disabled it in the past. To enable it again, first, open Settings by pressing Windows+i. On the Settings window, click “Time & Language.”
On the “Date & Time” page, turn on both “Set Time Automatically” and “Set Time Zone Automatically” options.

How to Fix “Page Fault in Nonpaged Area” on Windows
Some Blue Screens of Death (BSODs) are difficult or impossible to diagnose and fix, whereas others are pretty straightforward. Luckily, a Page Fault BSOD is often fixable.
- What Causes PAGE_FAULT_IN_NONPAGED_AREA?
When your computer is performing tasks, it is constantly loading programs and files in and out of your computer’s Random Access Memory, more commonly called RAM. If your Windows PC runs out of RAM, or a program or file is inactive for a long time, Windows will start moving things from RAM to your hard drive or SSD instead. Those ‘things’ are stored in the Page File.
If something interferes with reading or writing to the page file (pagefile.sys)—or directly with your RAM itself—there is a good chance you’ll get a Blue Screen of Death (BSOD).
There are a handful of things that can cause the issue:
- A faulty driver or system service
- A corrupted hard drive or solid-state drive (SSD)
- Malfunctioning Antivirus Software
- Faulty Memory (RAM, Cache, or VRAM)
Diagnosing the Problem
Generally speaking, your first troubleshooting steps should always focus on anything that recently changed on your PC. Did you just update a driver, a program, or Windows? Did you install new hardware? If you did — start there. Roll back the driver you updated, remove the program, or try uninstalling the latest Windows update. If you installed new hardware, remove it and see if the issue persists.
If you aren’t sure what recently changed, you need to do a bit more digging.
When you get this BSOD, it often displays what was running at the time that things went wrong on the “What Failed” line.

If your BSOD displays something there, start by Googling it. It’ll probably be enough to point you in the right direction. For example, if the thing that failed returns results for NVIDIA, you should definitely start by reinstalling or rolling back your graphics drivers.
- General Troubleshooting
If the BSOD doesn’t give you any clue what the problem might be, and you aren’t sure what updated recently, the problem becomes more challenging to solve. Here are a few things you can try. Some of them might help you figure out what the problem is, while others might fix it.
- Remove New Hardware
If you recently installed new hardware and your computer suddenly started experiencing BSODs, you should definitely try removing the new hardware first. While you’re at it, make sure your other components are seated properly. It is possible that something got bumped during the installation.
- Check the Event Viewer
The Event Viewer is exactly what it sounds like — it lets you view important events that affect your PC. Events are sorted into a few different categories, like “Windows logs” and “Applications and Service Logs,” for example. They’re also sorted by severity: Information, Warning, and Error. There is a lot of information packed into Event Viewer, so it is probably worth reading a bit about what it is and how it works before you dive straight in.
In all likelihood, some error that causes a BSOD will be found under Windows Logs > System.

Check through the “Details” tab. Try to narrow your results to things that happened at the same time as the BSOD. Click the Start button, type “apps and features” into the search bar, and then hit Enter or click “Open.” (You an also head to Settings > Apps > Apps & Features to find this window.)
Note: The search result will be “Apps & Features,” not “Apps and Features,” but who wants to type an ampersand (the “and” sign) unless they need to?

By default, the list of programs is sorted alphabetically, but we need to change it so that they’re sorted by install date. Click the label “Name” next to “Sort By” and change it to “Install Date.”

If you spot any drivers that have been updated since you noticed the BSODs started, try installing an older version, or reinstalling the current one.
- Disable Your Antivirus
Even the best antivirus software sometimes makes mistakes. It isn’t likely, but it is possible that your antivirus is somehow interfering with reading from or writing to the paging file somehow, thereby causing the BSOD.
The simplest way to check if your antivirus is the problem is to disable it temporarily. If the crashes stop, you’ve found the culprit.
Fixing the issue is a bit harder. If your antivirus is at fault, it is probably a result of access protection or real-time threat detection. You’ll need to add exceptions to both for the Windows paging file. How exactly you do that depends on what antivirus software you’re using. You’ll need to consult the documentation for your specific software to find out the details.
Alternatively, you could remove your third-party antivirus completely and let Microsoft Defender take over. Microsoft Defender struggled for a while, but it has been as good as any third-party option for a few years now.
- Run a Memory (RAM) Test
Modern computer components are phenomenally complex, and like all things, they do sometimes break. Your RAM is no exception. Luckily, there are some tests you can run to determine if your RAM is faulty.
If your RAM is faulty, it is almost definitely the cause of the BSOD. There isn’t much you can do to fix faulty RAM. You can try cleaning the contacts and re-seating it, but it probably won’t help. You’ll have to replace it. The good news is that RAM isn’t particularly expensive, and it is widely available.
Swapping out RAM on a desktop PC is pretty easy and doesn’t take more than a few minutes. Laptops are a different story — they’re much more difficult to open up and work on, and in some cases the RAM is permanently attached to the motherboard. If your laptop does have RAM that is permanently attached, you’ll need to get it serviced by the manufacturer or a professional.
- Run Chkdsk
Your RAM isn’t the only physical component that could be at fault — it could also be your hard drive or SSD. Sometimes corruption occurs because of a software fault, other times it occurs because of a hardware problem. Windows comes packaged with a tool designed specifically to diagnose and repair issues with hard drives or SSDs: the Check Disk Utility.
Check Disk, usually referred to ask Chkdsk, can repair some basic problems, and help mitigate more severe ones. If there is a problem with the file system, or there is a corrupted sector due to a software fault, it can probably fix it completely. If your hard drive has a corrupted sector due to physical damage, the most it can do is prevent it from being used in the future.
Corrupted sectors or problems with the file system can cause BSODs; running Chkdsk may fix the problem completely. Like with most computer parts, there is basically nothing you can do to repair a failing hard drive or SSD, you just have to replace it. If you find that your drive is failing, be sure to back up any important information that you might have saved on it. A hard drive can completely fail at any time and leave you unable to recover important files.
[mai mult...]How to Set Up Voice Access on Windows 11
Voice controls are everywhere now. They’re ubiquitous in TVs, smartphones, and cars, and they’re increasingly common in household appliances. Windows 11 also includes the ability to control your computer with your voice. All you need is a microphone and some practice. Here’s how to set up Windows Speech Recognition.
- How to Set Up Voice Access
Windows 11, like Windows 10, includes voice control as an accessibility feature. Windows Speech Recognition isn’t enabled by default, so that’s where we’ll start.
Click the Start button and type “Settings” into the search bar, and then click “Open” or hit Enter. Alternatively, you can click the small gear icon in the new Start Menu.

Look at the left-hand side of the Settings window, and click “Accessibility.” It will be near the bottom of the list.

Scroll down until you reach a section titled “Interaction,” and then click “Speech.”

Click the switch next to “Windows Speech Recognition.”

You’ll get a popup that will walk you through some configuration options. There are a few things to keep in mind:
- Use the best microphone you can reasonably afford. Voice recognition and natural language processing are not perfect, and trying to get it working well with distorted, muddy audio will be difficult.
- If you need speech recognition to work as well as possible, especially in situations where it is the primary means of controlling your Windows 11 PC, you should provide it with documents to review.
- How to Improve Your Results
You can provide the voice recognition software with more samples of your voice if you’re not getting the results you want. That option has not been moved into the new Settings app yet — it is still buried in the Control Panel. Click the Start button, type “speech recognition” into the search bar, look for the search result with “Control Panel” displayed under it, and then click “Open.”
Note: The application “Windows Speech Recognition” might be your top result when you search “speech recognition,” so make sure you click the right option.

Click “Train Your Computer to Better Understand You” and follow all of the instructions. Remember to speak clearly, but in a way that is comfortable for you.

The process will probably take a few minutes. The more data you provide to the speech recognition model, the more accurate it will be when interpreting your instructions. You can train the model multiple times, and each time you do, it should improve the accuracy.
It is also important to learn the correct syntax when issuing commands your computer. While computers are much more proficient at interpreting instructions than they used to be, it still helps to be as precise as possible. Microsoft’s website has extensive documentation that details exactly what commands Windows Speech Recognition is programmed to recognize and how to utilize them.
If you’re wondering exactly how precise Windows Speech Recognition can be, it might interest you do know that the vast majority of this article was written using voice-to-text after only a single training session. The only significant difficulty dictating this article with Windows Speech Recognition was capitalization, hyperlinks, and formatting.
[mai mult...]Cum intrati in Task Manager ca administrator pe Windows 11
Dacă rulați adesea Task Manager ca administrator, adăugați o comandă rapidă pe desktop care să deschidă întotdeauna acest utilitar cu drepturi de administrator.
- Pentru a face acest lucru, mai întâi, lansați meniul “Start” și căutați “Task Manager”.
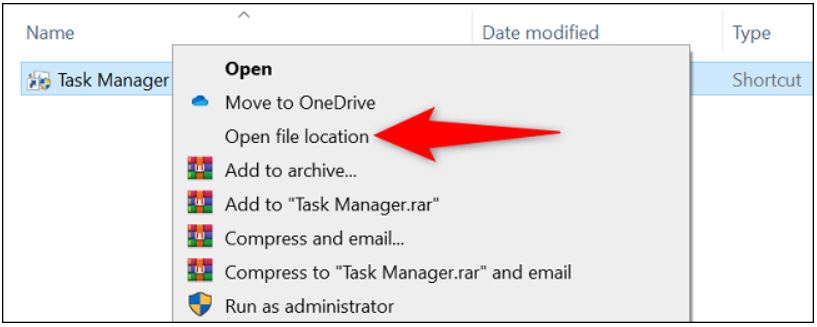
- Faceți click dreapta pe utilitar și alegeți “Open File Location”.

- În fereastra File Explorer, faceți click dreapta pe comanda rapidă “Task Manager” și alegeți “Open File Location”.
Veți vedea un fișier “Taskmgr.exe”. Faceți click dreapta pe acest fișier și alegeți Send To > Desktop (Create Shortcut).

Aveți acum o comandă rapidă Task Manager pe desktop. Pentru ca această scurtătură să deschidă întotdeauna utilitarul cu drepturi de administrator, faceți click dreapta pe ea și alegeți “Properties”.
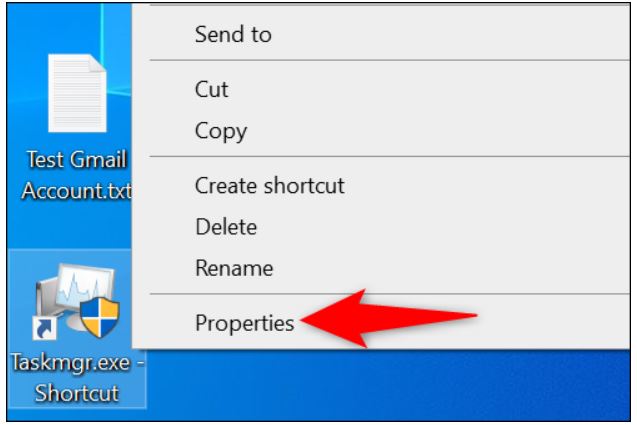
În fereastra “Properties”, în fila “Shortcut”, selectați “Advanced”.

Activați opțiunea “Run as Administrator”, apoi faceți click pe “OK”.

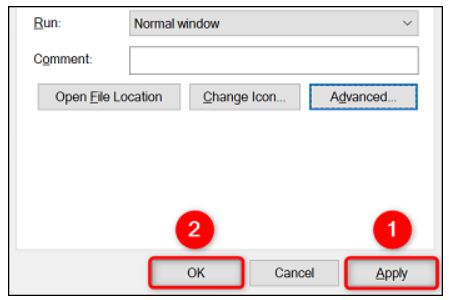
Înapoi în fereastra “Properties””, faceți click pe “Apply”,urmat de “OK”.