Stații de lucru

OS - Windows 8671 Solutii

Reguli si plangeri 8 Solutii

OS - OS X 407 Solutii

Reguli de configurare 11 Solutii

Licentiere 18 Solutii

Securitate 179 Solutii

Copie de rezerva (Backup) 68 Solutii

Antivirus 71 Solutii

Aplicatii specifice 4891 Solutii

Hardware 288 Solutii

How to use Quick actions on a Mac

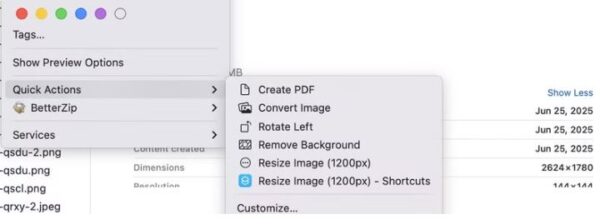
As soon as you create a Quick Action—using either method—it’s automatically added to the Quick Actions menu on your Mac, ready to use.

Head over to Finder or the desktop—wherever you have the files you want to work with stored. Select the file on which you want to use a Quick Action; you can choose multiple files, too. Now, right-click (Control-click) on your selection, select “Quick Actions,” and click the Quick Action you want to use.

Alternatively, you can click on the Quick Action you want to use in the Preview pane. You need to enable the Preview pane for this to work. Open Finder and go to View > Show Preview, or press the Command+Shift+P shortcut.

Similarly, if your Mac has a Touch Bar, you can execute Quick Actions from it as well. However, you’ll need to configure it first from the Touch Bar settings.

Depending on what Quick Action you just used, it may work in the background, apply changes to the selected files, and save them automatically. Or it may ask for your input. The Convert Image Quick Action is a great example of this. When you run it, you’ll see prompts on your screen asking you to select the desired output format, among other things. Make the appropriate selections, and the Quick Action will complete the operation and save the file.

Unless you’ve opted to preserve the original file while creating a workflow (in Automator or Shortcuts), the Quick Action will overwrite the original file and save it in the same location.

[mai mult...]

How to create custom Quick Actions on a Mac

Creating a Custom Quick Action in the Automator App

Automator is a built-in macOS app that lets you create workflows to automate repetitive tasks on your Mac. While creating workflows often requires a good understanding of programming languages, Automator employs a simple approach, wherein you drag and drop actions to stitch them together and create workflows.

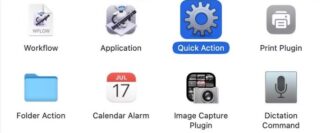
To create a Quick Action, launch the Automator app under Applicatons > Utilities. Click “New Document,” and when prompted to set the document type, select “Quick Action” and hit “Choose.”

In the workflow area, set the Workflow Receives Current action to “Image Files” in “Finder”

Now, in the Actions sidebar, select “Files and Folders” and drag and drop the “Get Selected Finder Items” action to the workflow area on the right.

Next, select “Photos” in the Actions sidebar and drag and drop the “Scale Images” action into the workflow area. Automator will prompt you to add the “Copy Finder Items” action to your workflow to preserve the original files. Click on “Add” to allow this and specify a destination folder for the files, or hit “Don’t Add” to overwrite the original files.

Once done, in the Scale Images action, enter the size (in pixels) you want your images resized to in the text field next to the “To Size” dropdown. Note that this value is essentially the maximum size of the longest side of the image, meaning it could be the width (for a landscape image) and length (for a portrait) image.

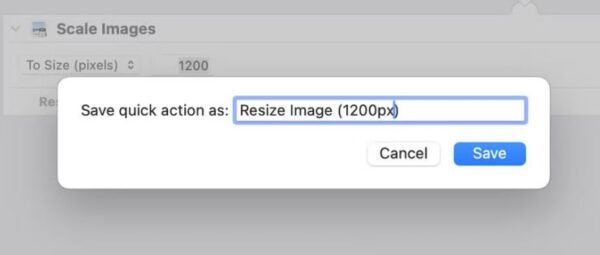
Finally, with all the actions added, save the Quick Action. Go to File > Save, or press the Command+S keyboard shortcut. Give a name to this service and click “Save”

If you ever want to edit the Quick Action in the future, open the Finder app and press the Command+Shift+G shortcut to access the Go to Folder window. Type in ~/Library/Services, and you’ll see all your Automator Quick Actions.

Control-click on the Quick Action you want to edit and select Open With > Automator.app. This will open the Quick Action in an Automator window. Make the changes, and don’t forget to save them.

[mai mult...]

Cum instalați și integrați Google Gemini CLI în Windows

Există o nouă agitație în jurul platformei Google Gemini, deoarece Google a făcut un pas important pentru dezvoltatori, administratori de sistem și utilizatori de CLI puternici.Aceasta este o interfață de linie de comandă care aduce caracteristicile AI ale Gemini direct în terminalul dvs. Dacă lucrați în VS Code, Git Bash sau Windows Terminal, Gemini CLI va aduce un nou nivel de productivitate pentru devs și alții.

Gemini CLI este un instrument de linie de comandă open-source dezvoltat de Google care vă permite să interacționați cu modelele AI Gemini utilizând limbajul natural, direct din terminal.

Modelele Gemini(cunoscute anterior ca Bard) reprezintă familia Google de modele generative de inteligență artificială. Acestea sunt similare cu GPT de la OpenAI sau cu Claude de la Anthropic. Cu ajutorul CLI, puteți:

  • Să puneți întrebări și să primiți răspunsuri în linie în terminal.
  • Să generați și să explicați fragmente de cod.
  • Să traduceți comenzi între Bash, PowerShell și alte shell-uri.
  • Să refacționați scripturi sau fișiere de infrastructură ca cod.
  • Să generați mesaje de confirmare pe baza diferențelor git(utilizând funcția gemini commit).
  • Să primiți ajutor în linie atunci când lucrați cu instrumente complexe(de exemplu, kubectl, terraform, docker).

În loc să comutați înainte și înapoi între un tab de browser și terminal, Gemini CLI acționează ca asistentul dvs. AI. Acesta este încorporat în instrumentul din care lucrați în mod nativ.

[mai mult...]

Cum utilizezi AI Chatbot în Windows Terminal

Windows Terminal are o nouă caracteristică experimentală care vă permite să integrați un chatbot AI direct în linia de comandă.

Cu integrarea serviciilor GitHub Copilot, Azure OpenAI și OpenAI, puteți solicita asistență AI din mediul de linie de comandă Windows Terminal. Acest asistent AI vă ajută să generați comenzi PowerShell și scripturi complete, să înțelegeți sintaxa, să depanați erorile și să primiți sugestii inteligente. Funcția experimentală de chat AI este disponibilă numai în versiunea Canary a Windows Terminal.

[mai mult...]

Cum utilizezi AI Shell pentru PowerShell

AI Shell pentru PowerShell este un shell de comandă interactiv care integrează o funcție de chat AI în linia de comandă Windows. Această caracteristică oferă utilizatorilor, asistență AI pentru crearea comenzilor și scripturilor PowerShell, interpretarea erorilor și accesarea explicațiilor detaliate ale codului. Cu AI Shell, puteți utiliza OpenAI Agent și Azure Copilot preinstalate, precum și modele AI terțe.

[mai mult...]