
How to Install GlassFish JAVA Application Server on Ubuntu 22.04
Glassfish is a free and open-source server used for deploying Java-based applications. It allows developers to develop enterprise applications that are convenient and scalable. The glassfish project is started by Sun Microsystem and is now sponsored by Oracle Corporation. It comes under two free software licenses Common Development and Distribution License and GNU General Public License.
Prerequisites
- A server running Ubuntu 22.04.
- A valid domain name pointed with your server IP.
- A root password is configured on the server.
Install Java JDK
Glassfish is a Java-based application. So you will need to install Java JDK on your server. You can install it by running the following command:
apt-get install default-jdk unzip -y
Once the Java is installed, verify the Java version using the following command:
java --version
You will get the Java version in the following output:
openjdk 11.0.15 2022-04-19
OpenJDK Runtime Environment (build 11.0.15+10-Ubuntu-0ubuntu0.22.04.1)
OpenJDK 64-Bit Server VM (build 11.0.15+10-Ubuntu-0ubuntu0.22.04.1, mixed mode, sharing)
- Download Glassfish Server
First, you will need to download the Glassfish from their official download page. You can download it with the following command:
wget https://download.eclipse.org/ee4j/glassfish/glassfish-6.1.0.zip
Once the download is completed, unzip the downloaded file to the /opt directory:
unzip glassfish-6.1.0.zip -d /opt/
- Create a Systemd Service File for Glassfish
Next, you will need to create a systemd service file to manage the Glassfish service. You can create it with the following command:
nano /usr/lib/systemd/system/glassfish.service
Add the following lines:
[Unit]
Description = GlassFish Server v6.1.0
After = syslog.target network.target

[Service]
User = root
ExecStart = /usr/bin/java -jar /opt/glassfish6/glassfish/lib/client/appserver-cli.jar start-domain
ExecStop = /usr/bin/java -jar /opt/glassfish6/glassfish/lib/client/appserver-cli.jar stop-domain
ExecReload = /usr/bin/java -jar /opt/glassfish6/glassfish/lib/client/appserver-cli.jar restart-domain
Type = forking

[Install]
WantedBy = multi-user.target
Save and close the file then reload the systemd daemon to apply the changes.
systemctl daemon-reload
Next, start the Glassfish service and enable it to start at system reboot:
systemctl start glassfish
systemctl enable glassfish
You can also check the status of the Glassfish service with the following command:
systemctl status glassfish
You should see the following output:
? glassfish.service - GlassFish Server v6.1.0
     Loaded: loaded (/lib/systemd/system/glassfish.service; disabled; vendor preset: enabled)
     Active: active (running) since Thu 2022-05-12 15:39:16 UTC; 4s ago
    Process: 5313 ExecStart=/usr/bin/java -jar /opt/glassfish6/glassfish/lib/client/appserver-cli.jar start-domain (code=exited, status=0/SUC>
   Main PID: 5326 (java)
      Tasks: 92 (limit: 2292)
     Memory: 289.3M
        CPU: 12.563s
     CGroup: /system.slice/glassfish.service
             ??5326 /usr/lib/jvm/java-11-openjdk-amd64/bin/java -cp /opt/glassfish6/glassfish/modules/glassfish.jar -XX:+UnlockDiagnosticVMOp>

May 12 15:39:04 ubuntu systemd[1]: Starting GlassFish Server v6.1.0...
May 12 15:39:16 ubuntu java[5313]: Waiting for domain1 to start ..........
May 12 15:39:16 ubuntu java[5313]: Successfully started the domain : domain1
May 12 15:39:16 ubuntu java[5313]: domain  Location: /opt/glassfish6/glassfish/domains/domain1
May 12 15:39:16 ubuntu java[5313]: Log File: /opt/glassfish6/glassfish/domains/domain1/logs/server.log
May 12 15:39:16 ubuntu java[5313]: Admin Port: 4848
May 12 15:39:16 ubuntu java[5313]: Command start-domain executed successfully.
May 12 15:39:16 ubuntu systemd[1]: Started GlassFish Server v6.1.0.
- Set password for Glassfish and Enable Secure Login
By default, Glassfish administrative user has no password. So you will need to set it first. You can set it using the following command:
/opt/glassfish6/bin/asadmin --port 4848 change-admin-password
You will be asked to provide the username:
Enter admin user name [default: admin]>admin
Provide admin as a username and press the Enter key. You will be asked to provide a password:
Enter the admin password>
Just press the Enter key without typing anything. You will be asked to set a new password:
Enter the new admin password>
Enter the new admin password again>
Provide your new password and press the Enter key to set the password.
Command change-admin-password executed successfully.
Next, you will also need to enable a secure login. You can enable it with the following command:
/opt/glassfish6/bin/asadmin --port 4848 enable-secure-admin
You will be asked to provide an admin user and password to enable the secure login.
Enter admin user name>  admin
Enter admin password for user "admin">
You must restart all running servers for the change in secure admin to take effect.
Command enable-secure-admin executed successfully.
Next, restart the Glassfish service to apply the changes:
systemctl restart glassfish
- Configure Nginx as a Reverse Proxy for Glassfish
Next, you will need to install and configure the Nginx as a reverse proxy for Glassfish. First, install the Nginx server with the following command:
apt-get install nginx -y
Once Nginx is installed, create an Nginx virtual host configuration file:
nano /etc/nginx/conf.d/glassfish.conf
Add the following configuration:
upstream glassfish {
  server 127.0.0.1:8080 weight=100 max_fails=5 fail_timeout=5;
}

server {
  listen          80;
  server_name     glassfish.example.com;

  location / {
        proxy_set_header X-Forwarded-Host $host;
        proxy_set_header X-Forwarded-Server $host;
        proxy_set_header X-Forwarded-For $proxy_add_x_forwarded_for;
        proxy_pass http://glassfish/hello/;
  }
}
Save and close the file when you are finished then verify the Nginx for any syntax configuration error with the following command:
nginx -t
If everything is fine, you will get the following output:
nginx: the configuration file /etc/nginx/nginx.conf syntax is ok
nginx: configuration file /etc/nginx/nginx.conf test is successful
Next, restart the Nginx service to apply the changes:
systemctl restart nginx
You can also check the status of the Nginx with the following command:
systemctl status nginx
You should see the following output:
? nginx.service - A high performance web server and a reverse proxy server
     Loaded: loaded (/lib/systemd/system/nginx.service; enabled; vendor preset: enabled)
     Active: active (running) since Thu 2022-05-12 16:09:38 UTC; 6s ago
       Docs: man:nginx(8)
    Process: 5687 ExecStartPre=/usr/sbin/nginx -t -q -g daemon on; master_process on; (code=exited, status=0/SUCCESS)
    Process: 5689 ExecStart=/usr/sbin/nginx -g daemon on; master_process on; (code=exited, status=0/SUCCESS)
   Main PID: 5690 (nginx)
      Tasks: 2 (limit: 2292)
     Memory: 2.6M
        CPU: 39ms
     CGroup: /system.slice/nginx.service
             ??5690 "nginx: master process /usr/sbin/nginx -g daemon on; master_process on;"
             ??5691 "nginx: worker process" "" "" "" "" "" "" "" "" "" "" "" "" "" "" "" "" "" "" "" "" "" "" "" "" "" "" ""

May 12 16:09:38 ubuntu systemd[1]: Starting A high performance web server and a reverse proxy server...
May 12 16:09:38 ubuntu systemd[1]: Started A high performance web server and a reverse proxy server.
- Configure UFW Firewall
For security reasons, it is recommended to install and configure the UFW firewall in your system. First, install the UFW firewall with the following command:
apt install ufw -y
Once the UFW firewall is installed, allow all required ports and services using the following command:
ufw allow 'Nginx Full'
ufw allow OpenSSH
ufw allow 4848/tcp
ufw allow 8080/tcp
Next, enable to UFW firewall to start after the system reboot:
ufw enable
You can now check the status of the UFW firewall with the following command:
ufw status
You will get the following output:
Status: active

To                         Action      From
--                         ------      ----
OpenSSH                    ALLOW       Anywhere
Nginx Full                 ALLOW       Anywhere
8080/tcp                   ALLOW       Anywhere
4848/tcp                   ALLOW       Anywhere
OpenSSH (v6)               ALLOW       Anywhere (v6)
Nginx Full (v6)            ALLOW       Anywhere (v6)
8080/tcp (v6)              ALLOW       Anywhere (v6)
4848/tcp (v6)              ALLOW       Anywhere (v6)
- Access Glassfish Web Interface
You can now access Glassfish using the URL http://glassfish.example.com. You should see the following page:

To access the Glassfish admin interface type the URL https://your-server-ip:4848. You will be redirected to the Glassfish login page:

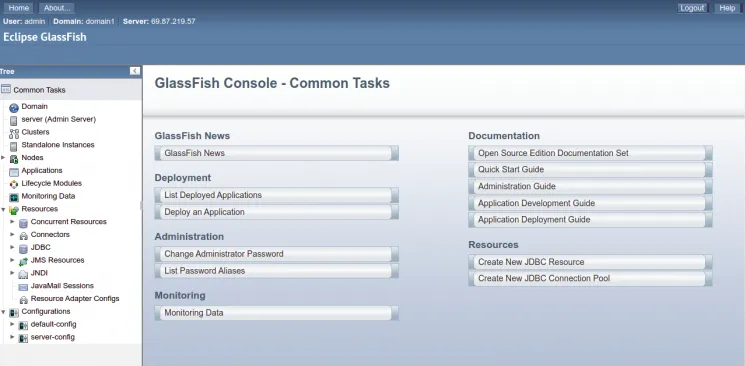
Provide your admin username, password, and click on the Login button. You should see the Glassfish dashboard on the following page:
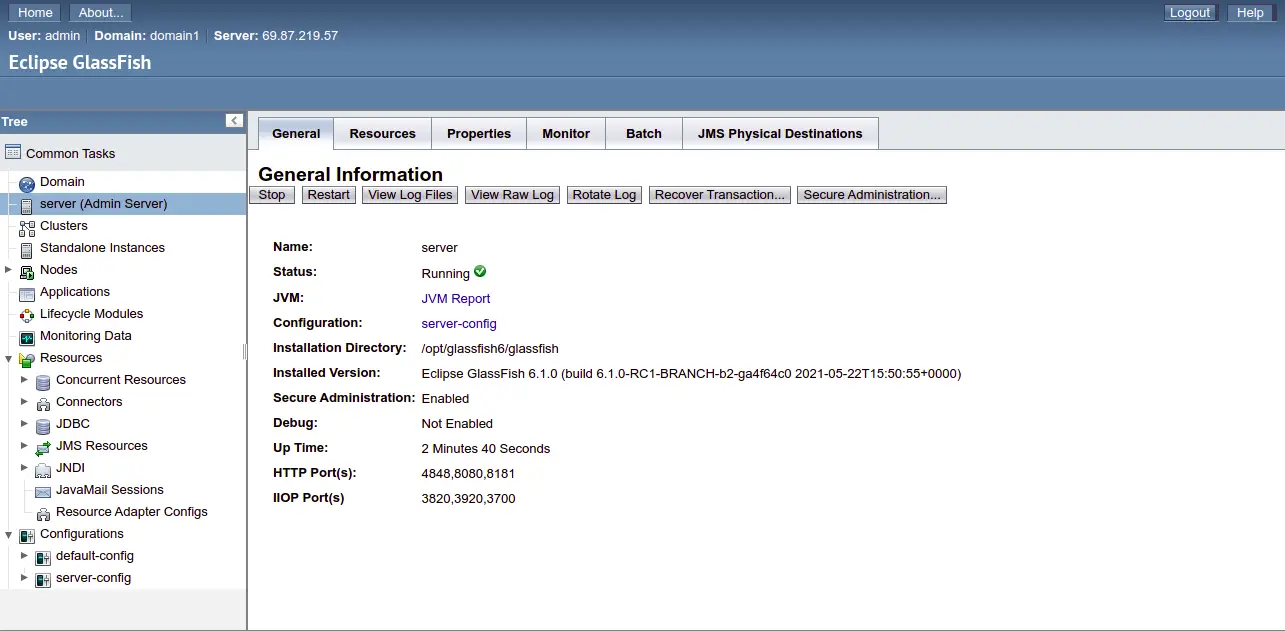
Click on the server in the left pane. You should see the general information page.
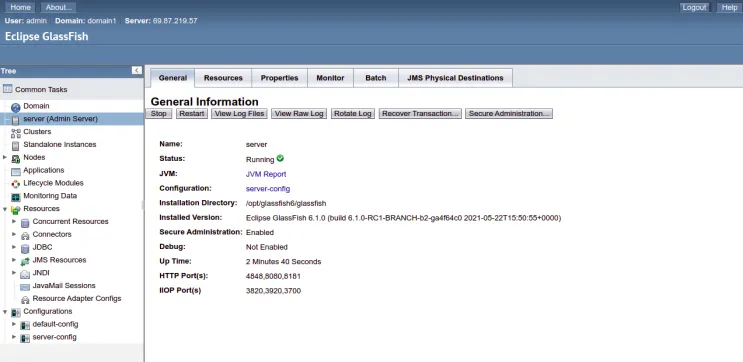
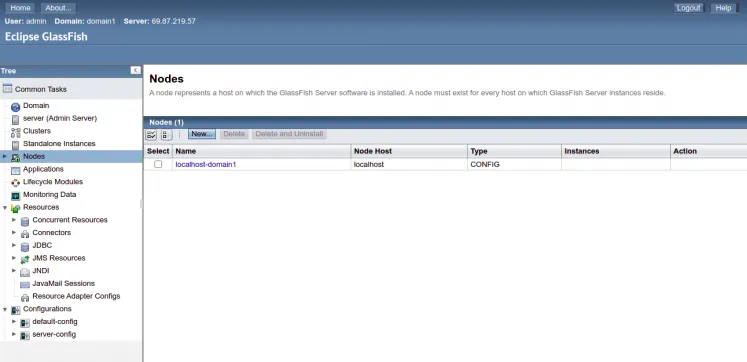
Here, you can start, stop and monitor the Glassfish server. Click on the Nodes in the left pane. You should see the Glassfish node on the following page.
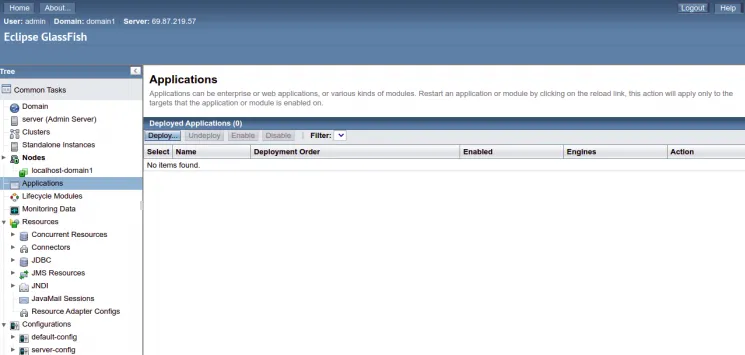
Click on the Applications in the left pane. You should see all your deployed applications on the following page.

