Stații de lucru

OS - Windows 8664 Solutii

Reguli si plangeri 8 Solutii

OS - OS X 407 Solutii

Reguli de configurare 11 Solutii

Licentiere 18 Solutii

Securitate 179 Solutii

Copie de rezerva (Backup) 68 Solutii

Antivirus 71 Solutii

Aplicatii specifice 4888 Solutii

Hardware 288 Solutii

Cum folosești Microsoft Copilot pentru aplicațiile de social media și pentru a te ajuta cu postările

Cum te ajută Copilot pentru rețelele sociale?

 Ce poate face Copilot pentru tine:

Funcționalitate Exemplu concret
 Scriere automată de postări Creează descrieri pentru Instagram, texte pentru LinkedIn etc.
 Generare de idei de conținut Îți dă idei pentru postări zilnice sau campanii tematice
 Optimizare text Sugerează cuvinte cheie, hashtaguri și stiluri de exprimare
 Planificare de conținut Te ajută să organizezi postările într-un calendar editorial
 Traducere automată Scrii în română și îl convertește în engleză, spaniolă etc.

 Cum să folosești Copilot pentru social media – Pași simpli:

 1. Deschide Word, Outlook sau aplicația web Copilot

Poți folosi Copilot în:

  • Microsoft Word / Word online

  • Microsoft Loop (pentru brainstorming)

  • Copilot în Bing sau Edge (varianta web)

  • Copilot mobile (dacă ai aplicația instalată)

2. Dă-i o cerere clară (prompt)

Exemple de cereri în română:

  • Creează o descriere profesională pentru LinkedIn legată de un nou loc de muncă în IT.

  • Sugerează 5 idei de postări pentru o pagină de Facebook care promovează turismul în România.

Poți spune:

  • „Fă-l mai scurt”

  • „Adaugă emoji”

  • „Scrie într-un stil mai informal”

  • „Folosește hashtaguri populare”

Copilot va modifica textul după preferințele tale.

 4. Copiază și postează

După ce ești mulțumit de text:

  • Copiază-l și publică-l în aplicația ta preferată: Instagram, Facebook, LinkedIn, X (Twitter), TikTok etc. Sau salvează-l într-un document Word/Excel cu toate postările planificate.

[mai mult...]

5 metode de a opri/dezactiva si elimina Copilot in Word

1. Dezactivarea Copilot direct din setările Word (dacă este disponibilă)

 Windows & Mac:

Unele versiuni de Word permit dezactivarea Copilot direct din aplicație.

Pași:

  1. Deschide Microsoft Word

  2. Mergi la Fișier (File) > Opțiuni (Options)
    (pe Mac: Word > Preferințe)

  3. Caută o secțiune numită Copilot, Inteligență Artificială, sau Servicii Inteligente (Intelligent Services)

  4. Dezactivează Copilot sau funcțiile AI

  5. Repornește Word.

Notă: Nu toate versiunile de Word oferă această opțiune, mai ales conturile personale Microsoft 365.

2. Dezactivare Copilot prin Group Policy (doar Windows Pro/Enterprise)

Această metodă dezactivează Copilot în aplicațiile Office, inclusiv Word, prin Editorul de Politici de Grup.

Pași:

  1. Apasă Windows + R, tastează gpedit.msc, apasă Enter.

  2. Navighează la:

    Configurare utilizator > Șabloane administrative > Microsoft Word > Opțiuni Word > General
  3. Caută opțiunea „Turn off Copilot in Word” sau „Disable Microsoft 365 Copilot”

  4. Seteaza Enabled (Activat)

  5. Aplică modificarea și închide editorul

 Dacă nu găsești opțiunea, poate fi necesar să descarci cele mai recente șabloane administrative (ADMX) de la Microsoft.

3. Dezactivare din Microsoft 365 Admin Center (pentru conturi business/edu)

Dacă ești administrator IT, poți dezactiva Copilot pentru întreaga organizație sau anumite conturi.

Pași:

  1. Mergi la: admin.microsoft.com

  2. Navighează la:
    Setări > Setări organizație > Microsoft 365 Copilot

  3. Dezactivează Copilot pentru utilizatorii doriți sau pentru toți.

Ideal pentru companii, școli sau instituții.

 4. Dezactivare buton Copilot prin Editorul de Registri (Windows)

Această metodă elimină sau dezactivează butonul Copilot din Word prin modificarea registrului Windows.

Pași:

  1. Apasă Windows + R, tastează regedit, apasă Enter.

  2. Mergi la:

    HKEY_CURRENT_USER\Software\Policies\Microsoft\Office\16.0\Common\AssistiveTechnology

    („16.0” poate varia în funcție de versiunea ta de Office – de exemplu, 16.0 = Office 2016/2019/365)

  3. Click dreapta în panoul din dreapta > New > DWORD (32-bit) Value

  4. Numește-l:

    disablecopilot
  5. Setează valoarea pe 1.

  6. Repornește computerul și deschide din nou Word.

Salvează registrul înainte de modificare, ca măsură de siguranță.

5. Dezinstalare Office 365 și instalare Office 2021 (fără AI)

Dacă nu dorești deloc funcții AI sau Copilot:

  1. Dezinstalează Microsoft 365 complet.

  2. Instalează o versiune fără Copilot, cum ar fi:

    • Microsoft Office 2021 (nu are Copilot)

    • Office 2019 sau o versiune mai veche

Aceste versiuni nu includ AI și sunt potrivite pentru utilizatorii care vor o experiență clasică, fără integrare cloud sau Copilot.

[mai mult...]

Cum remediem eroarea: Fix Missing Runtime Libraries in Windows 11

Bibliotecile Runtime, în special cele de la Microsoft (cum ar fi Visual C++ Redistributable), sunt esențiale pentru rularea multor aplicații. Dacă primești erori de genul:

  • MSVCP140.dll is missing

  • VCRUNTIME140.dll missing

  • Runtime Error!

  • Program can't start because .dll is missing from your computer

… urmează pașii de mai jos:

Pasul 1: Actualizează Windows-ul

  1. Mergi la Setări (Settings) > Windows Update

  2. Apasă Check for updates și instalează toate actualizările disponibile

  3. Repornește PC-ul.

Pasul 2: Instalează toate versiunile Visual C++ Redistributable

Aplicațiile folosesc versiuni diferite ale Visual C++. Recomand instalarea tuturor versiunilor de la 2005 până la 2022.

Descarcă pachetul complet:

  • Vizitează site-ul oficial Microsoft sau folosește un pachet complet:

Instalează ambele versiuni:

  • x86 pentru aplicații 32-bit

  • x64 pentru aplicații 64-bit

Pasul 3: Repară instalările existente

  1. Accesează Control Panel > Programs and Features

  2. Caută toate intrările cu numele Microsoft Visual C++ Redistributable

  3. Selectează fiecare, apoi apasă Change > Repair

Pasul 4: Instalează .NET Framework (dacă e necesar)

Unele aplicații cer o versiune specifică de .NET Framework.

Verifică și instalează:

  • Accesează: Control Panel > Turn Windows features on or off

  • Asigură-te că .NET Framework 3.5 și .NET Framework 4.x sunt activate

Pasul 5: Verificare fișiere de sistem (SFC și DISM)

  1. Deschide Command Prompt ca Administrator (apasă Win + X > Command Prompt (Admin) sau Terminal).

  2. Rulează următoarele comenzi:

sfc /scannow

Apoi:

DISM /Online /Cleanup-Image /RestoreHealth

Așteaptă să se finalizeze, apoi repornește computerul.

Pasul 6: Reinstalează aplicația cu eroare

Dacă eroarea apare la o anumită aplicație:

  • Dezinstaleaz-o complet

  • Șterge fișierele rămase (opțional, cu Revo Uninstaller)

  • Instaleaz-o din nou de pe sursă oficială.

[mai mult...]

How to manage Quick Actions on a Mac

Over time, as you keep creating new custom Quick Actions, your Mac’s Quick Actions can become cluttered due to too many Quick Actions. You can prevent this by disabling the Quick Actions you don’t use regularly.

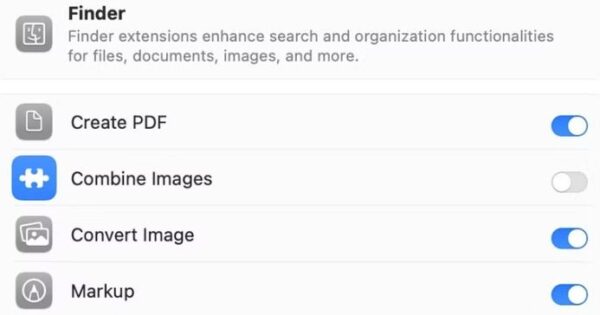
To manage Quick Actions on your Mac, launch the “System Settings” app. Go to “General,” scroll down, and select “Login Items & Extensions”.

Scroll down to the “Extensions” section and click the “i” button next to “Finder.” You should see a list of all the built-in and custom Quick Actions you currently have on your Mac. Flip the toggle next to a Quick Action off to disable it and hit “Done”.

In the future, if you need to use this Quick Action again, you can enable it. Head back to the same page and toggle on the switch next to it.

[mai mult...]

How to use Quick actions on a Mac

As soon as you create a Quick Action—using either method—it’s automatically added to the Quick Actions menu on your Mac, ready to use.

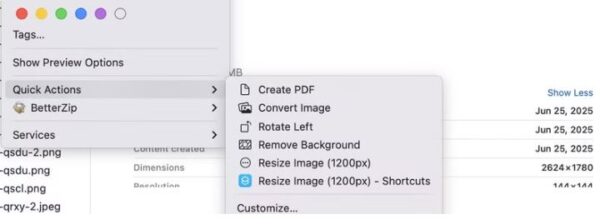
Head over to Finder or the desktop—wherever you have the files you want to work with stored. Select the file on which you want to use a Quick Action; you can choose multiple files, too. Now, right-click (Control-click) on your selection, select “Quick Actions,” and click the Quick Action you want to use.

Alternatively, you can click on the Quick Action you want to use in the Preview pane. You need to enable the Preview pane for this to work. Open Finder and go to View > Show Preview, or press the Command+Shift+P shortcut.

Similarly, if your Mac has a Touch Bar, you can execute Quick Actions from it as well. However, you’ll need to configure it first from the Touch Bar settings.

Depending on what Quick Action you just used, it may work in the background, apply changes to the selected files, and save them automatically. Or it may ask for your input. The Convert Image Quick Action is a great example of this. When you run it, you’ll see prompts on your screen asking you to select the desired output format, among other things. Make the appropriate selections, and the Quick Action will complete the operation and save the file.

Unless you’ve opted to preserve the original file while creating a workflow (in Automator or Shortcuts), the Quick Action will overwrite the original file and save it in the same location.

[mai mult...]

How to create custom Quick Actions on a Mac

Creating a Custom Quick Action in the Automator App

Automator is a built-in macOS app that lets you create workflows to automate repetitive tasks on your Mac. While creating workflows often requires a good understanding of programming languages, Automator employs a simple approach, wherein you drag and drop actions to stitch them together and create workflows.

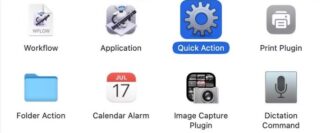
To create a Quick Action, launch the Automator app under Applicatons > Utilities. Click “New Document,” and when prompted to set the document type, select “Quick Action” and hit “Choose.”

In the workflow area, set the Workflow Receives Current action to “Image Files” in “Finder”

Now, in the Actions sidebar, select “Files and Folders” and drag and drop the “Get Selected Finder Items” action to the workflow area on the right.

Next, select “Photos” in the Actions sidebar and drag and drop the “Scale Images” action into the workflow area. Automator will prompt you to add the “Copy Finder Items” action to your workflow to preserve the original files. Click on “Add” to allow this and specify a destination folder for the files, or hit “Don’t Add” to overwrite the original files.

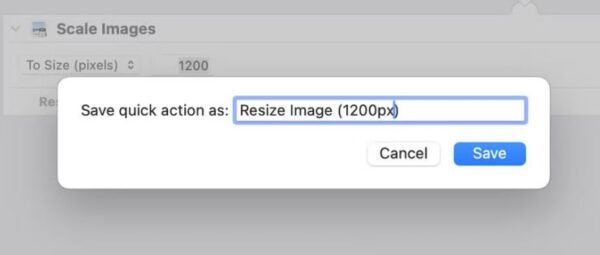
Once done, in the Scale Images action, enter the size (in pixels) you want your images resized to in the text field next to the “To Size” dropdown. Note that this value is essentially the maximum size of the longest side of the image, meaning it could be the width (for a landscape image) and length (for a portrait) image.

Finally, with all the actions added, save the Quick Action. Go to File > Save, or press the Command+S keyboard shortcut. Give a name to this service and click “Save”

If you ever want to edit the Quick Action in the future, open the Finder app and press the Command+Shift+G shortcut to access the Go to Folder window. Type in ~/Library/Services, and you’ll see all your Automator Quick Actions.

Control-click on the Quick Action you want to edit and select Open With > Automator.app. This will open the Quick Action in an Automator window. Make the changes, and don’t forget to save them.

[mai mult...]