Situatie
Are you experiencing issues while connecting to websites and apps on Windows 11? The underlying cause of the problem can be the erroneous network configuration. You should start by wiping off the temporary files of Windows and delete the app cache.
Solutie
Pasi de urmat
- Flush DNS Cache using Command Prompt
First of all, you need to launch the Command Prompt Window in Administrator Mode. To do this, type ‘cmd’ in the search bar of Windows 11. Right-click the Command Prompt from suggestions and select ‘Run as Administrator’.
Now you need to enter this command: ipconfig /flushdns. You can also copy-paste the command for ease.
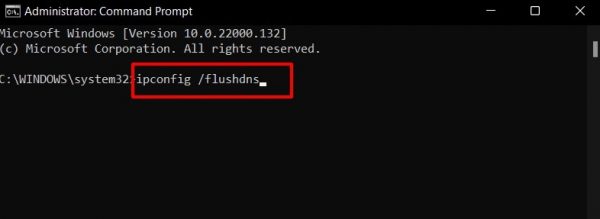
Finally, press the Enter key. After a few seconds, you’ll get a pop-up saying the operation was successful.
- Flush DNS Cache in Windows 11 using Windows Powershell
Open the Windows Powershell in Admin Mode on your Windows 11 PC. If you don’t know how to do it, simply type ‘Powershell’ in the Search bar and right-click the ‘Windows Powershell’ from the suggestions, and choose ‘Run as Administrator Mode’.
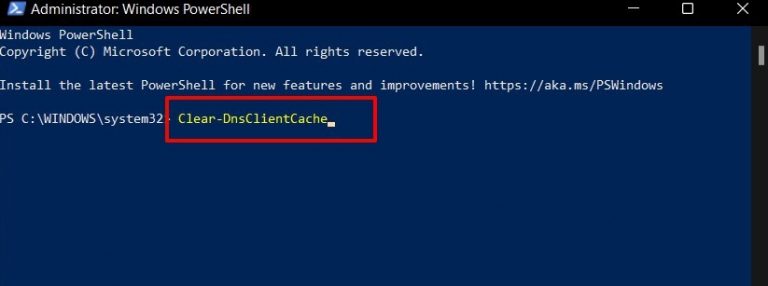
Now type the ‘Clear-DnsClientCache’ in the PowerShell window. You can also copy-paste the command from here. Now hit the enter key. This process will clear the DNS cache on your PC running on Windows 11.
- Using a Run Command to flush DNS cache in Windows 11
Launch the Run dialog box on Windows 11 PC using the shortcut key – Windows + R key. After the dialog box appears, type the ‘ipconfig /flushdns’ command in the command box and press the enter key.
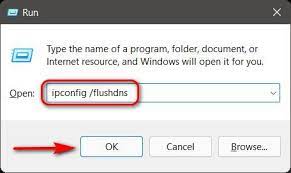
Now the ‘Run’ command will flush the DNS cache on your PC.
Leave A Comment?