Situatie
This capability is useful in situations in which a VM has lost network connectivity or is on an isolated network segment that is inaccessible to the host.
Solutie
Pasi de urmat
Before you can perform a direct file copy from the Hyper-V host to a guest operating system running within a VM, you will have to enable the VM’s Guest Services. The Guest Services are one of the Hyper-V integration services. When you create a new VM in Hyper-V, most of the integration services are enabled by default. However, the Guest Services are not enabled automatically.
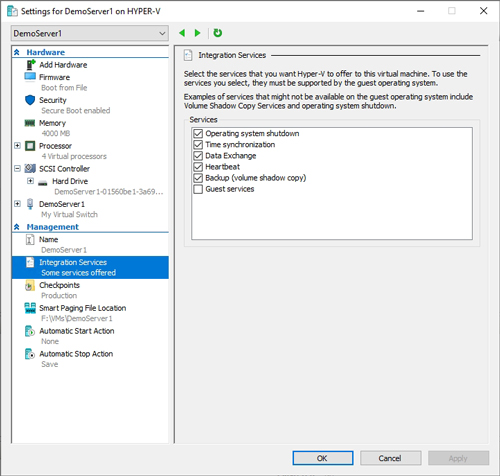
To enable the Guest Services, open the Hyper-V Manager, right-click on the VM and choose the Settings command from the shortcut menu. This will cause the VM’s Settings screen to be displayed.
Now click on the console tree’s Integration Services option, and the Hyper-V Manager will show you which of the VM’s integration services are currently enabled. You can see what this looks like in Figure 1. Select the Guest Services checkbox and click OK.
With the Guest Services enabled, you will be able to copy files from the Hyper-V host to the VM. To do so, you will have to use a special PowerShell cmdlet called Copy-VMFile.
The Copy-VMFile cmdlet accepts a number of different parameters but only a few are really necessary. One such parameter is the name of the VM that you want to copy the file to. Keep in mind that this is the VM name as defined by Hyper-V, not the VM’s Windows name. After all, this process totally bypasses the network stack so there is no reason to use the VM’s computer name.
The next bit of information you will have to provide is the source path. This is the physical path to the file that you want to copy. For example, if you wanted to copy a file named D:\scripts\Script.ps1, then your source path would be D:\Scripts\Script.ps1.
Not surprisingly, the third parameter that you will have to provide is the destination path. In other words, you will have to tell Hyper-V where to put the file on the VM. If you wanted to copy Scripts.ps1 to the VM’s C:\PowerShell folder, for example, then the destination path would be C:\PowerShell\Script.ps1.
The next item that I want to mention is optional, but it’s usually a good idea to use it. This item is a command-line switch named CreateFullPath. When specified, this switch tells PowerShell to create any folders it needs to in order to allow the file copy operation to complete successfully. Suppose that I were to copy D:\Scripts\Script.ps1 to a VM’s C:\PowerShell folder, but C:\PowerShell didn’t exist. Normally, the nonexistence of the folder would cause the copy operation to fail. By using the CreateFullPath switch, however, you can avert a failure by letting PowerShell create the C:\PowerShell folder on your behalf.
The last parameter that I want to mention is FileSource. This parameter tells PowerShell where the file being copied is coming from. This parameter is usually given a value of Host.
Now that I have laid out all of the various parameters, let’s put them all together. Suppose that I wanted to copy the C:\Scripts\Script.ps1 file from the Hyper-V host to a folder named C:\PowerShell on a VM named DemoServer1. The command used for doing so would be:
Copy-VMFile "DemoServer1" -SourcePath "C:\Scripts\Script.ps1" -DestinationPath
"C:\PowerShell\Script.ps1" -CreateFullPath -FileSource Host

As you can see in Figure 2, this command does not produce any visible output.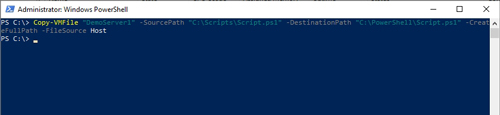
If you look at Figure 3, however, you can see that the C:\PowerShell folder was created on the VM, and the folder also contains a copy of the Scripts.ps1 file.

Leave A Comment?