How to Turn On Dark Mode in Outlook on Mobile
Outlook’s app for iPhone, iPad, and Android also offers dark mode. To enable it, first, open the Outlook app on your phone.
[mai mult...]Soluții pentru problemele tale IT

Outlook’s app for iPhone, iPad, and Android also offers dark mode. To enable it, first, open the Outlook app on your phone.
[mai mult...]Apps you install on Android often collect data about you and your activity for the app developers and their affiliates. With a tool developed at the University of Oxford, you can see those trackers and even stop them in their tracks.
At the very least, most Android apps are collecting data on crashes and bugs for the app developers to review. Apps may also use trackers in order to function, especially if the app has a social aspect, like to fetch content from external domains. The developers may also want to understand how people use their app so they can fine-tune the user experience. Trackers that report directly to the app’s owner are usually referred to as “first-party” trackers and are, in theory, the safer kind.
“Third-party” trackers, however, send data to external services the company uses, or to the company’s business partners. These are often advertisers wanting to sell stuff to you. They’re likely using your data to do things like learning what your interests are, or judging what time of day you’re likely to tap on ads. You can limit trackers’ knowledge of you by opting out of personalized ads, but that doesn’t stop them from learning what they can.
If all of this has you concerned, then meet TrackerControl, a free and open-source app capable of identifying those trackers and blocking them as well. It works by piping your network data through an on-device VPN server and checking the traffic against a database of known trackers. If you’re worried by the privacy concerns associated with VPNs, don’t be; it’s not a true VPN and is located on your device, not a remote server. Unfortunately, this does mean you can’t use a regular VPN while TrackerControl is working.
With the traffic analyzed, you can then see the websites that your data is bound for, and, with the full version, even the country where they’re located. The app relies on IP addresses to do this, however, which aren’t necessarily accurate.

TrackerControl is also capable of blocking these trackers, but that feature comes with two caveats. First, the only version available in the Play Store is the “Slim” version that abides by Google’s rules by stripping out the blocking feature. To get real power over trackers, you’ll need to sideload the full app after downloading the APK from the TrackerControl website. Alternatively, you can install it using the third-party app store F-Droid (which itself you’ll have to sideload).
The second caveat is that blocking trackers can and often does prevent apps from working properly. Typically, this looks like loading screens that never complete. In our testing, web browsers and social media apps almost always have this issue, since they’re often fetching media to serve you from outside domains. You can solve the problem by allowing trackers necessary for function while still blocking others, although this involves some trial and error.
The first time you launch TrackerControl, tap the toggle switch in the top-left corner of the app to begin monitoring.
Warning: Enabling TrackerControl, especially the full version, will almost certainly lead to apps not working. Proceed with caution if you rely on your apps for important things like work or finances, and be prepared to tune the settings. Balancing privacy and functionality is often possible, but not necessarily easy.
![]()
You’ll be prompted to allow the app permission to set up its VPN server. Tap “Ok.”
![]()
You should see a small key icon appear in the status bar signifying the VPN is operational, and TrackerControl’s rocket icon should also appear in your notifications.
With TrackerControl activated, launch any app you want to monitor. Then go back to TrackerControl and look for the app in the main menu. Tap it, and under “Tracker Libraries” you’ll see a summary of the companies and services collecting data through the app. Scroll down, and you’ll see individual trackers divided by category, like Essential, Analytics, Fingerprinting, and Social. You’ll also see how long ago your data was sent.
![]()
Feel free to search for information on the different trackers by looking up their names on the internet. Note that this list will likely grow as you continue to use the app.
If you’re using the Slim edition and are uncomfortable with the trackers, you can stop them by flipping the “Internet Access” switch to the off position. However, the app will not work as long as TrackerControl is operational, or at least won’t be able to do anything that involves the internet.
![]()
It’s a rather blunt tool, and you’re probably better off simply uninstalling the offending app to protect your privacy.
If you installed the full version of TrackerControl, you have more granular control; you can block and allow trackers by category. By default, all non-essential categories will be blocked. You can choose to block trackers in the Essential category as well, but we don’t recommend this because it will almost certainly lead to problems.
![]()
If you’re having issues using an app while TrackerControl is working, try toggling blockers off. Start by making sure the Essential trackers for the app are unblocked, then consider allowing Social and Analytics trackers. If you’re still not able to do what you want, you might want to simply allow all of the app’s trackers by toggling off the “Monitoring” option.
![]()
Alternatively, you can unblock individual trackers by tapping them inside their categories. We don’t recommend this, though, because ensuring you unblocked the correct ones can require a lot of testing. And even if you succeed, other trackers may later become active, which TrackerControl will automatically block, forcing you to go through the process again.
If lack of functionality has you frustrated, TrackerControl also shows a persistent notification with the option to “Pause for 10 Mins.” Pull down on the status bar to access it. This button switches off all monitoring and blocking for 10 minutes while you do what you’re trying to accomplish. Note that this will allow all running apps to do their tracking business.
![]()
If you need more than 10 minutes, you can disable TrackerControl entirely by again hitting the toggle button in the top-left corner of the main menu.
[mai mult...]Almost all Xiaomi phones that launched in 2021 and beyond come with Dolby Atmos for sound. We can adjust this EQ for a better and rich sound.
[mai mult...]Thanks to light sensors, your iPhone can automatically adjust the display brightness to match the ambient lighting. If you prefer manual controls, it’s possible to turn off Auto-Brightness, but Apple put the option in an unusual place.
Strangely, the iPhone and iPad’s automatic brightness option is not in the “Display & Brightness” settings like you’d expect. You’ll find the “True Tone” toggle, but nothing for Auto-Brightness. The good news is it’s not hard to find, you just need to look somewhere else.
[mai mult...]Samsung este unul dintre producătorii Android care include o metodă de verificare a stării de sănătate a bateriei. Este nevoie de o aplicație, dar este o aplicație care, cel mai probabil, se află deja pe telefonul dvs. Dacă nu aveți aplicația Samsung Members, o puteți descărca din Play Store.
În primul rând, să tragem cu degetul în jos din partea de sus a ecranului pentru a dezvălui dalele Quick Settings (Setări rapide). Atingeți pictograma de angrenaj pentru a deschide Setări.
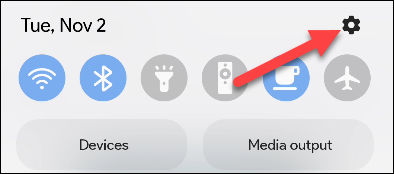
Apoi, derulați în jos și selectați “Battery and Device Care”.

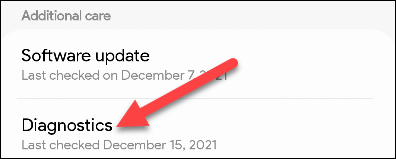
În secțiunea “Additional Care” selectati “Diagnostics.”
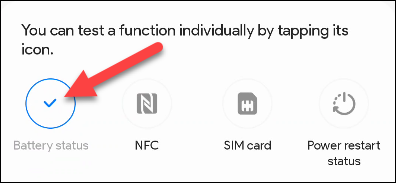
Se va deschide aplicația Samsung Members cu o mulțime de pictograme pentru lucruri pe care le puteți verifica. Atingeți pictograma “Battery Status” (Starea bateriei) pentru a continua – nu veți vedea o bifă dacă nu ați făcut deja acest lucru.
Acum veți vedea câteva informații despre baterie. Citirea “Life” se referă la starea de sănătate a bateriei. Va fi fie “Bun”, “Normal” sau “Slab”.

În mod implicit, conversațiile WhatsApp sunt criptate de la un capăt la altul, dar copiile de rezervă nu sunt criptate pentru utilizatorii de iPhone. Pentru a fi în siguranță, puteți activa criptarea end-to-end pentru aceste copii de rezervă WhatsApp.


Introduceți o nouă parolă cu cel puțin 6 caractere și o literă. Apoi, atingeți “Next” (Următorul) în colțul din dreapta sus. Repetați aceeași parolă pe ecranul următor și atingeți din nou “Next” (Următorul) în colțul din dreapta sus.
Atenție: Asigurați-vă că notați această parolă într-un loc sigur. Dacă o pierdeți, veți pierde accesul la copiile de rezervă ale mesajelor dumneavoastră.

Atingeți butonul “Create” (Creare) din partea de jos pentru a confirma că doriți să creați o nouă copie de rezervă criptată End-to-End. WhatsApp vă va pregăti copia de rezervă cu criptare și o va stoca în iCloud .Când doriți să restaurați copia de rezervă a mesajelor WhatsApp, va trebui să introduceți aceeași parolă pe care ați setat-o pentru copiile de rezervă criptate.
[mai mult...]