Stații de lucru

OS - Windows 8421 Solutii

Reguli si plangeri 8 Solutii

OS - OS X 407 Solutii

Reguli de configurare 11 Solutii

Licentiere 18 Solutii

Securitate 176 Solutii

Copie de rezerva (Backup) 68 Solutii

Antivirus 71 Solutii

Aplicatii specifice 4739 Solutii

Hardware 288 Solutii

Drop CSTM80 -review

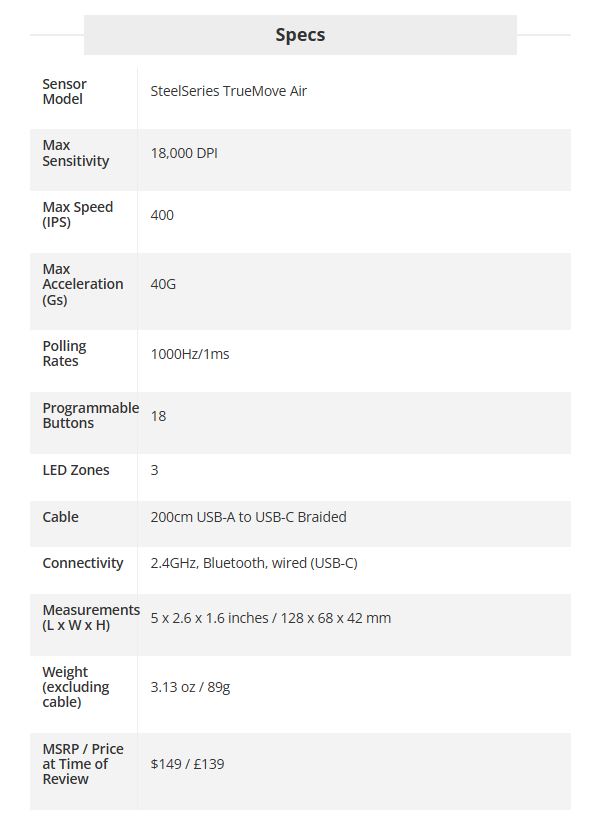
The CSTM80 is — as you might expect from the name — a mechanical keyboard that’s designed to be customized. Just about everything, from the top plate to the case weight, can be swapped out, and Drop sells additional case plates, switch plates, keycaps, and case weights on its site. The keyboard comes with Gateron Brown Pro 3.0 or Milky Yellow KS3 switches and a polycarbonate top plate, as well as ABS keycaps with shine-through side legends. It’s not designed to be a gaming keyboard, necessarily, but it does boast a 1,000 Hz polling rate and N-key rollover. And its TKL layout is the perfect size for most gamers.

The CSTM80 is a wired mechanical gasket-mount keyboard with a tenkeyless (TKL) layout, which means it has a full function row, arrow keys, and a 3 by 2 navigation cluster. It also has an extra F13 function key, but no rotary knob.

The CSTM80 has a polycarbonate case with a decorative magnetic top case. The base keyboard comes with a black ABS top case and matching black ABS keycaps with shine-through side legends. Drop sells additional top cases in various colors, patterns, and materials, which you can find on their CSTM80 collection page.

The black case that the keyboard comes with is nicely made, if a bit boring, with a half-inch bezel that surrounds the keyboard and a chamfered edge. The keyboard measures 14.7 inches (374mm) wide by 5.8 inches (148mm) deep, and is 1.3 inches (34mm) thick at its thickest point. It weighs about 2.8 pounds (1,272g) with the included ABS top case and keycaps installed, but you can change the weight by adding a heavier top case or replacing the keyboard’s standard aluminum case weight with one of Drop’s custom options (replacing the case weight is slightly trickier than replacing the top case, as you’ll need to unscrew it from inside).

The keyboard measures about 0.74 inches (18.7mm) at the front, so it’s high enough that some people might want a wrist rest, though I didn’t feel the need to use one. The board has a typing angle of 6 degrees.

The back of the keyboard has four anti-slip rubber feet and a standard silver brushed aluminum keyboard weight, which is replaceable. In the box, the CSTM80 comes with a braided USB-C to USB-A cable, a keycap puller, a switch puller, optional Mac keycaps, and extra gaskets.

[mai mult...]

SteelSeries Aerox 9 Wireless -review

The Aerox 9 is a medium-large mouse measuring 5 inches (128mm) long, 2.6 (68mm) inches wide, and 1.6 inches (42mm) high. It weighs just 3.13 ounces (89g), which is fairly light for a mouse with so many buttons. It’s a good mouse for gamers with larger hands, but if your hands are on the smaller size it could be uncomfortable. The mouse wheel is sunk into the chassis and has a low profile, which improves access for scrolling but makes using the tilt function difficult.

Now for the most important part: the Aerox 9 has 18 programmable buttons, most of which are on the elongated 12-button side panel. The other buttons are the left/right primary buttons, the tilt wheel (left, right, middle click), and the DPI switch button behind the mouse wheel.

On the bottom of the mouse, you’ll find two large 100% PTFE mouse feet, plus a small PTFE circle around the sensor. This allows the mouse to freely glide around your mouse mat with minimal drag. The mouse is also touted as having an “Aqua Barrier” with an IP54 rating to protect its inner workings from dust, debris, and accidental drink spills (which we know all too well have dispatched a few peripherals to the bin).

In the box, you get the Aerox 9 mouse, a 6.5-foot (2m) braided USB-C to USB-A cable, a USB-C to USB-C wireless extension adapter, and the 2.4GHz wireless USB-C dongle.

[mai mult...]

Diagnostic policy services not running/program compatibility issues

1.Press “Windows key + R” and open “services.msc” as shown below

Go ahead and find “Diagnostic Policy Service”

Right click on it and press “restart”

And after this, also restart your computer.

2.If you’re having trouble opening different versions of programs this might help you out.

Press “windows key + R” and open up “control” as shown below

Find “troubleshooting”

Right below the “Programs” tab click on “Run programs made for previous versions of Windows”

Choose the app that doesn’t run from the drop down menu (we’ll use Excel as an example)

Click on the “Try recommended settings”:

And on the next tab go ahead and click on “Test the program…”

Your chosen app should run smoothly now.

[mai mult...]

Cum rezolvam eroarea: ScanPST is not fixing PST File

Dacă ScanPST.exe nu reușește să repare fișierul .PST (Outlook Data File), încearcă următoarele soluții:

🔹 Metoda 1: Rulează ScanPST de mai multe ori

  1. Închide Outlook complet.
  2. Rulează ScanPST.exe (se află în C:\Program Files\Microsoft Office\root\OfficeXX\ unde XX este versiunea Office).
  3. Selectează fișierul .PST și apasă Start.
  4. Dacă erorile nu se repară complet, rulează ScanPST din nou de 2-3 ori. Dacă tot nu funcționează, încearcă metodele de mai jos.

🔹 Metoda 2: Crează un fișier nou .PST și importă datele

Dacă ScanPST nu poate repara fișierul, încearcă să creezi un nou fișier și să imporți datele din cel corupt:
  1. Deschide Outlook și mergi la File → Account Settings → Data Files
  2. Click pe Add… și creează un nou fișier .PST
  3. Mergi la File → Open & Export → Import/Export
  4. Alege Import from another program or file → Outlook Data File (.PST)
  5. Selectează fișierul corupt și încearcă să imporți datele.

🔹 Metoda 3: Reparare manuală a fișierului .PST

Dacă ScanPST nu funcționează, încearcă următoarele:

  1. Mută fișierul .PST într-o altă locație (ex: pe Desktop)
  2. Redenumește-l (ex: Outlook_old.pst)
  3. Deschide Outlook și lasă-l să creeze un fișier nou
  4. Încearcă să imporți fișierul vechi în noul .PST.

🔹 Metoda 4: Verifică și repară coruperea HDD/SSD

Dacă fișierul .PST este corupt din cauza problemelor de disc:

Deschide Command Prompt (Admin) – Win + X → Command Prompt (Admin).
Rulează această comandă:
bash
Copy
Edit
chkdsk /f /r
Așteaptă ca Windows să scaneze și să repare eventualele erori de disc.
După repornire, rulează ScanPST din nou.

🔹 Metoda 5: Restaurare din Backup

Dacă ai un backup recent al fișierului .PST, poți să-l restaurezi:
  1. Mergi la File → Open & Export → Open Outlook Data File
  2. Selectează fișierul .PST de backup.
[mai mult...]

Cum stergi New Outlook din windows 10

Dacă vrei să elimini New Outlook din Windows 10 și să revii la versiunea clasică, urmează aceste metode:

Metoda 1: Dezactivare din Outlook (Dacă încă ai acces la vechea versiune)

  1. Deschide Outlook
  2. În colțul din dreapta sus, caută comutatorul “New Outlook”
  3. Dezactivează-l (toggle OFF)
  4. Outlook îți va cere să repornești – confirmă și vei reveni la versiunea clasică.

Dacă butonul nu apare, încearcă metodele de mai jos.

Metoda 2: Dezinstalare din Setări

  1. Apasă Win + I pentru a deschide Settings
  2. Mergi la Apps → Installed Apps (sau “Apps & Features” în versiuni mai vechi)
  3. Caută New Outlook sau Microsoft Outlook (New) în listă
  4. Click pe el și selectează Uninstall
  5. Urmează pașii de dezinstalare și repornește PC-ul.

Metoda 3: Folosind PowerShell (Dacă nu apare în Setări)

Dacă New Outlook nu apare în lista de aplicații, îl poți elimina manual astfel:

  1. Deschide PowerShell (Win + X → Windows Terminal (Admin))

  2. Rulează următoarea comandă pentru a dezinstala aplicația:

    powershell
    Get-AppxPackage "Microsoft.OutlookForWindows" | Remove-AppxPackage
  3. Așteaptă finalizarea procesului, apoi repornește calculatorul.

Metoda 4: Reinstalează versiunea clasică a Outlook

Dacă ai dezinstalat Outlook complet și vrei să revii la vechea versiune:

  1. Descarcă Microsoft Office de pe site-ul oficial
  2. Instalează pachetul complet Office, care include versiunea standard de Outlook.

Metoda 5: Dezactivare prin Registry (pentru utilizatori avansați)

Dacă New Outlook revine automat, îl poți bloca din Registry:

  1. Apasă Win + R, tastează regedit și apasă Enter

  2. Navighează la:

    HKEY_LOCAL_MACHINE\SOFTWARE\Microsoft\Office\Outlook
  3. Caută o cheie numită “EnableNewOutlook” și setează valoarea la 0

  4. Închide Registry Editor și repornește PC-ul.

[mai mult...]