

Stații de lucru
OS - Windows 9179 Solutii
Reguli si plangeri 11 Solutii
OS - OS X 410 Solutii
Reguli de configurare 12 Solutii
Licentiere 18 Solutii
Securitate 182 Solutii
Copie de rezerva (Backup) 68 Solutii
Antivirus 72 Solutii
Aplicatii specifice 5303 Solutii
Hardware 291 Solutii
If your iPhone or iPad won’t connect to a Wi-Fi network
[mai mult...]Cum ridicam volumul peste maxim pe Windows 10/11
Cand avem probleme ca acele situatii in care redarea audio sau video la un volum inregistrat sub un nivel normal, ne ingreuneaza activitatea si volumul este prea scazut pentru o ascultare confortabila si simtiti ca difuzoarele laptop-ului nostru nu pot produce un sunet mai puternic.
Letasoft Sound Booster poate ridica volumul peste maxim, astfel incat sa puteti auzi cu adevarat ce se reda. Functioneaza cu fiecare program care reda sunetul pe computer si creste sunetul in timp real. Nu este un plug-in, functioneaza singur. Puteti utiliza Sound Booster pentru a creste volumul pentru orice program care ruleaza pe computer.
Acesta poate fi folosit ca un amplificator suplimentar atunci cand volumul programului pe care il ascultati este prea scazut.

How to remove a partition in Windows 11
Want to get rid of a partition from your Windows 11 PC so you can reallocate the space to an existing partition or create a new partition? We’ll walk you through multiple ways you can remove Windows 11 partitions.
To remove a partition on Windows 11:
- Open Settings by pressing Windows+i.
- Navigate to System > Storage > Advanced Storage Settings > Disks & Volumes.
- Click “Properties” next to your partition.
Choose Delete > Delete Volume.
When you delete a partition, Windows erases the contents of that partition and removes the partition from appearing anywhere on your PC. You lose all the content saved on that partition.
In case you don’t already know, a partition basically lets you split your hard disk drive or SSD drive into multiple, independent virtual drives. In this mechanism, each virtual drive is treated as if it’s an actual physical drive. Since deleting the partition removes the partition’s contents, ensure you’ve backed up your important files from it before beginning to remove it.
Inland TN446 SSD
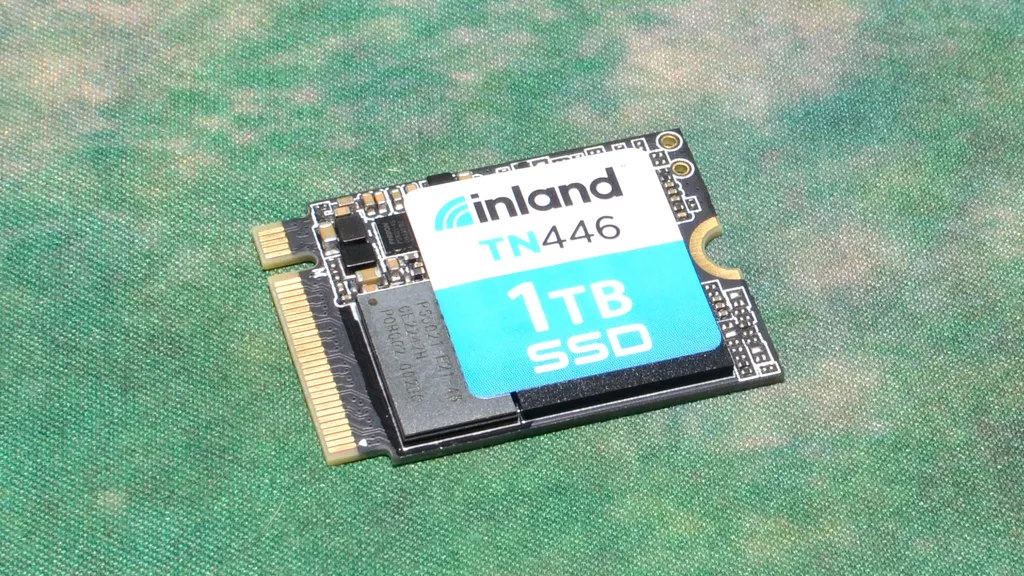
Inland, Micro Center’s house or generic SSD brand, has made a name for itself with solid SSDs like the Gaming Performance Plus. It has even had some firsts with the PCIe 5.0 TD510 and the M.2 2230 TN436, and the latter was a popular pick to upgrade launch Steam Decks. Inland is now back with the newer TN446 to improve the formula with a drive you can easily pick up and install into your favorite portable system.
That’s never been easier to do with the growing list of 2230 SSDs on the market, but for those with access to a Micro Center, the TN446 may be especially worthy of interest. It uses TLC flash instead of the QLC on the Sabrent Rocket Q4 2230 and Addlink S91. And while the Rocket 2230 has a 256GB option, the TN436 does not.
The Inland TN436 is a welcome addition to the roster of retail M.2 2230 NVMe SSDs, perfect for upgrading the internal storage of your Steam Deck or ASUS ROG Ally. It joins a growing list of options with enough competition to drive prices down to reasonable levels. It has Inland’s typical six-year warranty, which is nice, but it lacks a software management suite. Luckily, there are free applications available. The drive performs well enough and efficiently enough to be a good choice if it’s priced right, and it’s particularly attractive at the 512GB capacity point.

Cum oprești serviciul Windows Update din Windows
Dezactivarea pe termen lung a serviciului Windows Update poate expune sistemul tău la vulnerabilități de securitate și poate compromite stabilitatea generală a sistemului de operare. Este recomandat să dezactivezi temporar serviciul doar în situații strict necesare și să-l reactivezi ulterior.
Pașii pentru dezactivarea temporară a serviciului Windows Update:
- Deschide Services:
- Apasă simultan tastele
Win + Rpentru a deschide fereastra “Run”. - Tastează
services.mscși apasăEntersau clic pe “OK”. Aceasta va deschide fereastra “Services”.
- Apasă simultan tastele
- Găsește Windows Update:
- În fereastra “Services”, caută în listă serviciul denumit “Windows Update”.
- Dezactivează serviciul:
- Dă dublu clic pe “Windows Update” pentru a deschide fereastra de proprietăți.
- În secțiunea “General”, vei vedea opțiunea “Startup type”. Din meniul derulant al acestei opțiuni, selectează “Disabled”.
- Apasă butonul “Stop” pentru a opri imediat serviciul Windows Update, dacă este activ în acest moment.
- Clic pe “Apply” pentru a salva modificările și apoi pe “OK” pentru a închide fereastra de proprietăți.
- Reactivează serviciul (opțional):
- Dacă dorești să reactivezi serviciul Windows Update, urmează aceiași pași și setează “Startup type” la “Automatic” în fereastra de proprietăți a serviciului.