
Stații de lucru
OS - Windows 8940 Solutii
Reguli si plangeri 9 Solutii
OS - OS X 410 Solutii
Reguli de configurare 12 Solutii
Licentiere 18 Solutii
Securitate 182 Solutii
Copie de rezerva (Backup) 68 Solutii
Antivirus 72 Solutii
Aplicatii specifice 5123 Solutii
Hardware 291 Solutii
How to install Peppermint OS
Peppermint OS is a lightweight Linux distro based on Debian or Devuan, designed for speed, efficiency, and minimal resource usage. It features the XFCE desktop environment with a clean, familiar layout, ideal for both beginners and advanced users.
-
Go to the official site: https://peppermintos.com/
-
Choose the latest Debian or Devuan flavor ISO
-
Download the 64-bit
.isofile.
Create Bootable Installation Media
Use any of the following tools to write the ISO to a USB drive:
-
Windows: Rufus
-
Linux/macOS: balenaEtcher
Instructions (Rufus example):
-
Insert USB (minimum 4 GB)
-
Open Rufus, select your USB device
-
Choose the downloaded Peppermint
.iso -
Click Start and wait until complete.
Step 3: Install Peppermint OS
-
Insert USB and boot your computer
-
Enter BIOS/UEFI and set USB as the first boot device
-
Save and reboot.
At the Boot Menu:
-
Select “Start Peppermint OS” to boot into the live environment
-
On the desktop, double-click “Install Peppermint OS”.
Installation Steps:
-
Choose your language and keyboard layout
-
Connect to Wi-Fi if needed
-
Choose installation type:
-
Erase disk (for clean install)
-
Manual partitioning (advanced users).
-
-
Set your time zone
-
Create your user account and password
-
Click Install.
✅ After installation completes, remove the USB and reboot.
Step 4: Post-Install Configuration
1. 🔁 Update your System
Open a terminal and run:
Or use the GUI Update Manager.
Install Web Browser
Peppermint is minimalist; if your preferred browser isn’t pre-installed:
Install Common Apps
Customize Appearance
-
Go to Menu > Settings > Appearance
-
Change theme, icons, and fonts
-
Use “Peppermint Welcome” for useful tweaks and guides.
Set Up Cloud Storage (Optional)
-
Install cloud clients like:
Or use web apps via the included ICE tool to create “site-specific browsers”.
System Tools & Performance Tips
1. Use ICE (Site-specific Browser Tool)
-
Launch ICE from the menu.
-
Turn a website (like Gmail or YouTube) into a standalone app.
2. Install Driver Manager
If not present:
Then go to Menu > Administration > Driver Manager to install proprietary drivers.
3. Enable Firewall
4.Install Flatpak Support
Then add Flatpak repo:
[mai mult...]Cum rezolvi problema:microfonul nu funcționează în aplicații precum Zoom, Teams sau Skype
Microfonul este conectat corect, dar nu este detectat sau nu funcționează în aplicații de videoconferință. Ceilalți participanți nu te aud deloc sau sunetul este întrerupt.
[mai mult...]How to install and configure TrueNAS
TrueNAS is an open-source NAS (Network Attached Storage) operating system based on FreeBSD (TrueNAS CORE) or Linux (TrueNAS SCALE). It provides file sharing, data protection, and virtualization features for home or enterprise storage.
-
TrueNAS CORE: Best for traditional NAS (FreeBSD based)
-
TrueNAS SCALE: Supports Docker, Kubernetes, virtualization (Linux based).
Step 1: Download and Prepare Installation Media
-
Choose TrueNAS CORE or TrueNAS SCALE
-
Download the
.isofile -
Use a tool like Rufus or balenaEtcher to create a bootable USB stick from the ISO.
Step 2: Install TrueNAS
Boot from USB:
-
Plug in the bootable USB to the target machine
-
Boot and enter the BIOS/UEFI to set the USB as the first boot device
-
Reboot to launch the installer.
Installation Steps:
-
Select Install/Upgrade
-
Choose the boot device (e.g., USB or SSD – note: it will be wiped)
-
Set a root password
-
After installation, remove the USB installer
-
Reboot into TrueNAS.
Step 3: Access the Web UI
Once TrueNAS boots:
-
The console will show an IP address (e.g.,
http://192.168.1.100) -
Open a browser on a device on the same network
-
Visit the displayed IP
-
Log in with root and the password you created.
Step 4: Initial Configuration
1. Set Timezone and Hostname
-
Go to System > General
-
Set your hostname and timezone.
2. Create Storage Pool (ZFS)
-
Go to Storage > Pools > Add
-
Choose Create new pool
-
Add disks and configure RAID level (e.g., RAIDZ1, mirror)
-
Name the pool and click Create.
3. Create a Dataset (Optional)
-
Inside the pool, create datasets for different shares (e.g., media, backups).
Step 5: Set Up Network Shares
Option A: SMB (Windows/macOS)
-
Go to Sharing > Windows (SMB) Shares > Add
-
Select the dataset path
-
Name your share
-
Enable the share and save
-
Go to Services > SMB, enable and start it.
Option B: NFS (Linux)
-
Go to Sharing > Unix (NFS) Shares > Add
-
Choose the dataset path and set permissions
-
Enable NFS service.
Step 6: User and Permissions
-
Go to Accounts > Users > Add.
-
Create users with their home directories and shell (if needed).
-
Assign users to datasets with proper permissions under Storage > Pools > Permissions.
Optional: Enable Additional Features
-
Apps (TrueNAS SCALE only):
-
Go to Apps > Launch Docker containers like Plex, Nextcloud, etc.
-
-
Snapshots:
-
Enable ZFS snapshots for versioned backups
-
-
Replication:
-
Set up data replication to another system
-
-
Alerts:
-
Configure email alerts under System > Alert Settings.
-
Windows Tips and Tricks
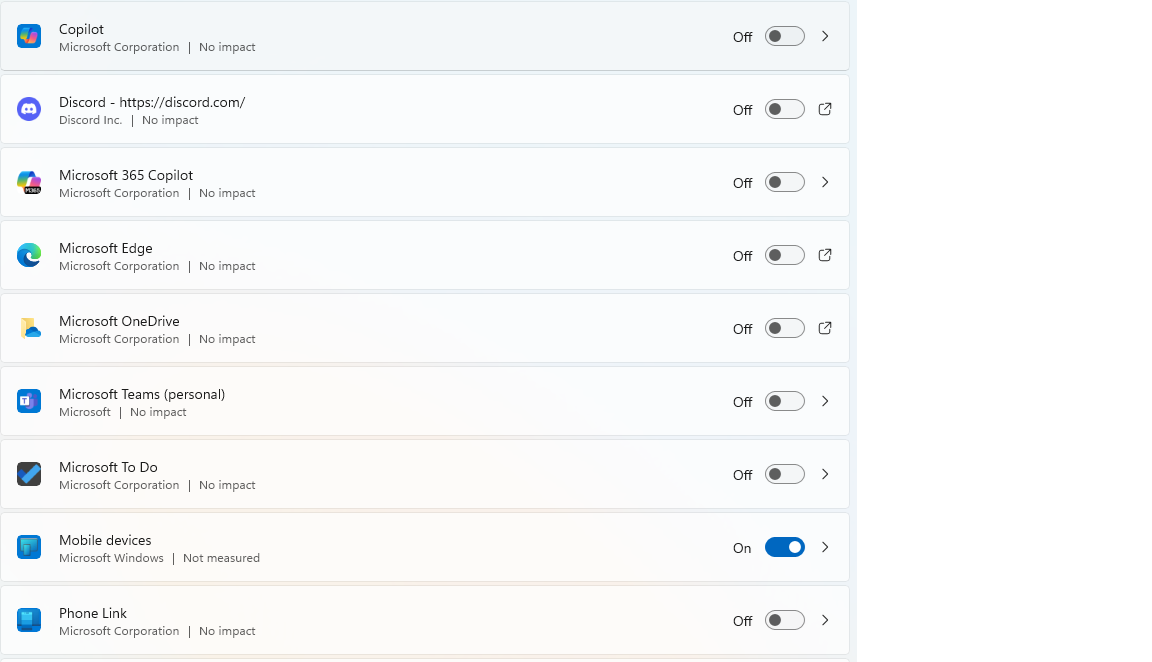
1.Turn off background running apps.
Go to Start-Settings as shown below
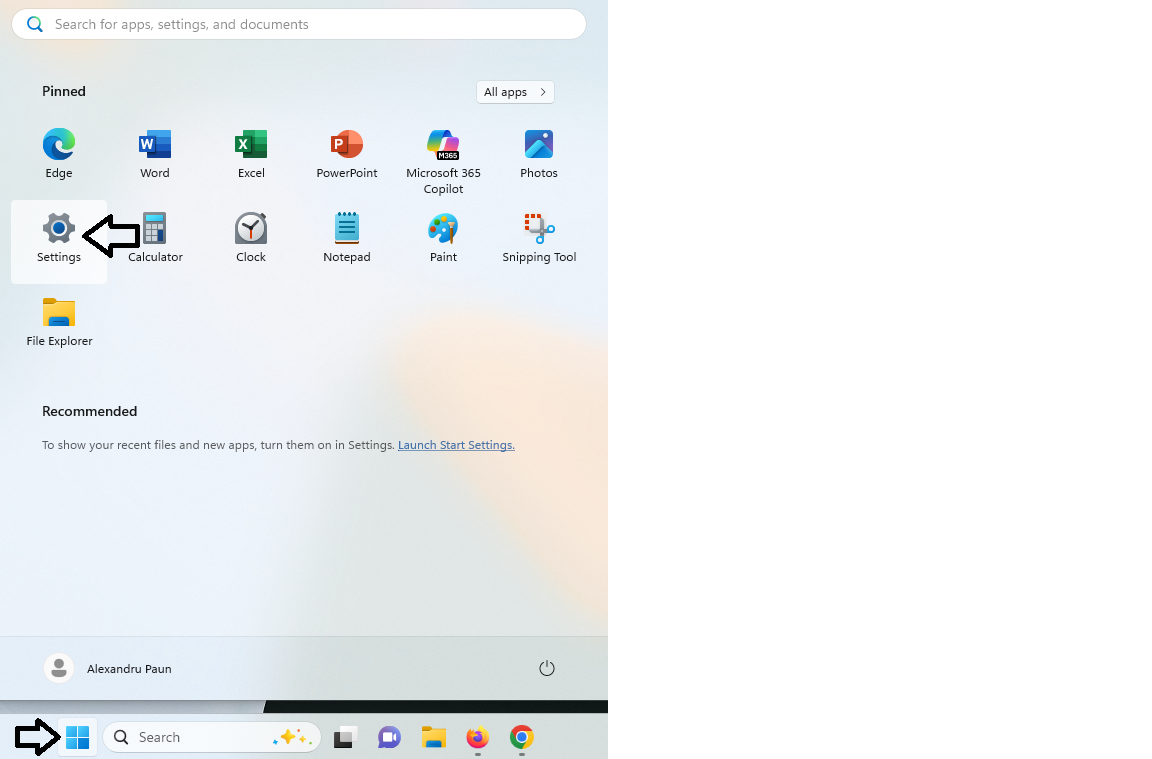
Then, into Apps – Startup
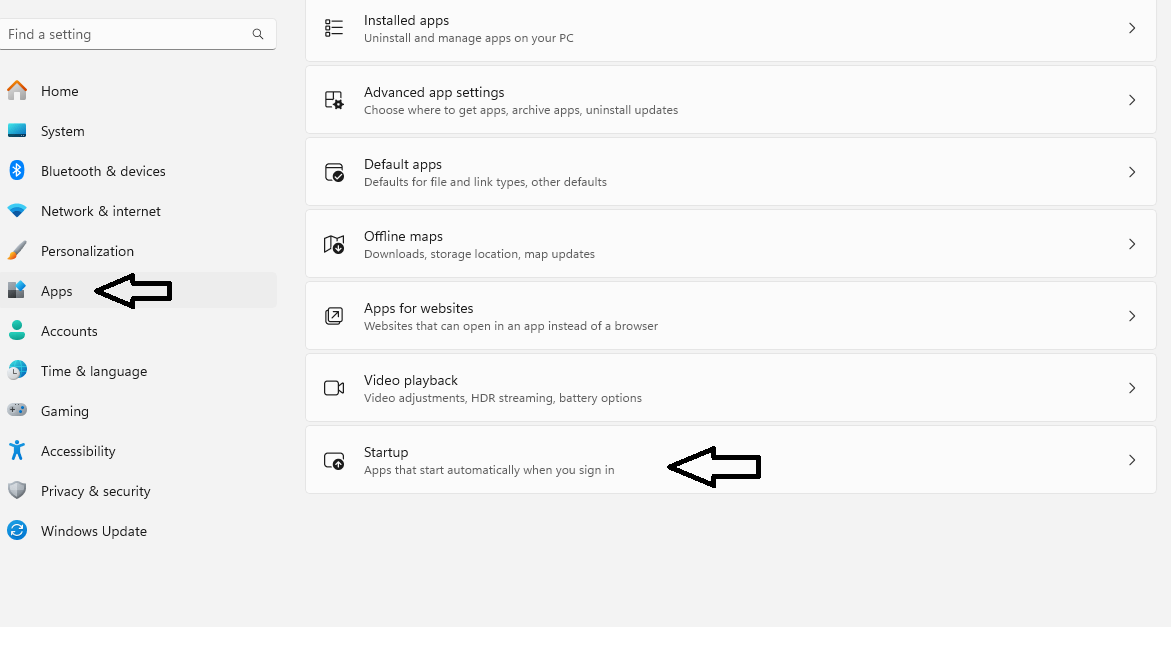
Simply unticks the ones that you are not using
2.How to relocate the Start button onto the left side of the screen.
Right click on an empty space on the taskbar and select Taskbar Settings
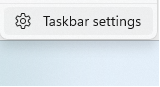
Scroll down and select taskbar behaviour
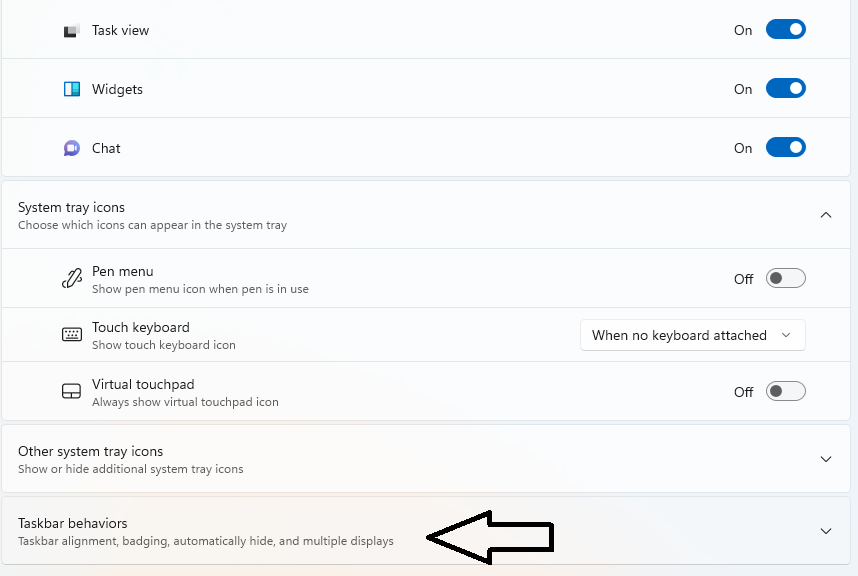
Then you will see taskbar allignment,click on “Center” frrom the dropdown menu and select left.
![]()
This will move it on the left side where it historically was on previous versions of Windows.
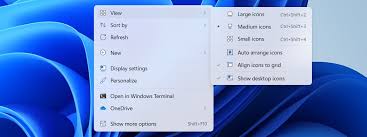
3.How to quickly hide desktop icons
Simply right click on desktop – View – and untick the show desktop icons marker.
Cum se remediaza: iTunesMobileDevice.dll is Missing from your Computer
Eroarea “iTunesMobileDevice.dll is missing from your computer” apare de obicei când:
-
iTunes sau Apple Mobile Device Support este corupt, instalat greșit sau lipsesc fișiere
-
Ai dezinstalat parțial software Apple (iTunes, iCloud, etc)
-
Sistemul tău Windows 11 are fișiere afectate sau lipsă în regiștri.
Soluții pentru remedierea erorii „iTunesMobileDevice.dll is missing”:
1. Reinstalează complet iTunes (în ordinea corectă)
Apple recomandă dezinstalarea completă a tuturor componentelor Apple în această ordine, apoi reinstalarea iTunes.
Pasul A – Dezinstalare completă:
-
Mergi la:
Setări > Aplicații > Aplicații și funcții. -
Dezinstalează următoarele, în exact această ordine (dacă există):
-
iTunes
-
Apple Software Update
-
Apple Mobile Device Support
-
Bonjour
-
Apple Application Support (32-bit & 64-bit)
-
-
Repornește PC-ul.
Pasul B – Reinstalare iTunes:
-
Descarcă cea mai nouă versiune de iTunes de aici:
https://support.apple.com/itunes/download
⚠️ Dacă folosești Windows 11, instalează versiunea desktop (nu cea din Microsoft Store), pentru o compatibilitate mai bună cu driverele.
2. Înlocuiește manual iTunesMobileDevice.dll (avansat)
Dacă ai un alt PC unde iTunes funcționează corect:
-
Caută fișierul
iTunesMobileDevice.dll(de obicei înC:\Program Files\Common Files\Apple\Mobile Device Support). -
Copiază-l pe un stick USB.
-
Mergi la același folder pe PC-ul cu eroare și înlocuiește fișierul lipsă.
Nu descărca DLL-uri de pe site-uri nesigure – pot conține malware.
3. Repară instalarea Apple Mobile Device Support
-
Mergi la:
Panou de control > Programe și caracteristici -
Găsește Apple Mobile Device Support
-
Click dreapta → Repair (dacă e disponibil)
-
Repornește sistemul.
4. Asigură-te că serviciul Apple Mobile Device Rulează
-
Apasă
Win + R, scrieservices.msc -
Caută serviciul Apple Mobile Device Service
-
Click dreapta > Start (sau Restart)
-
Setează-l pe Startup type: Automatic.
5. Verifică și repară fișierele de sistem
-
Deschide Command Prompt ca administrator
-
Rulează:
-
Așteaptă finalizarea și repornește.
Dacă nimic nu funcționează:
-
Creează un cont nou de utilizator Windows și instalează iTunes acolo. Uneori, setările de profil corupte cauzează eroarea.
-
Sau folosește iTunes for Windows (standalone installer) (nu versiunea din Store).