OS - Windows
Depanare VPN 4 Solutii
instalare printer 50 Solutii
Optimizare pc 50 Solutii
Optimizare PC 103 Solutii
Scanare cu malwarebyte 4 Solutii
shareuire si mapare 15 Solutii
adaugare la domeniu 5 Solutii
Migrare profil 9 Solutii
Instalare/reinnoire certificate 2 Solutii
Personalizare sistem operare 274 Solutii
Configureaza si verifica setarile de boot 11 Solutii
Transfer de date 21 Solutii
Configurare OS 109 Solutii
Reparare OS 47 Solutii
Punct de restaurare OS 8 Solutii
Windows Event Viewer 6 Solutii
Reinstalare/reconfigurare VPN 8 Solutii
Optimizare client e-mail 12 Solutii
Optimizare PC 30 Solutii
Optimizare PC 20 Solutii
Reinstalare / Reconfigurare VPN 6 Solutii
Reinstalare OS 32 Solutii
Reparare sistem de operare 45 Solutii
Programare sistem operare 12 Solutii
Puncte de restaurare sistem de operare 14 Solutii
Instalare imprimanta 44 Solutii
Mapare si partajare 13 Solutii
Modificari firewall 12 Solutii
Migrare profil 8 Solutii
Transferuri de date 33 Solutii
Upgrade sistem operare 12 Solutii
Windows Event Viewer 7 Solutii
Verificare HDD 32 Solutii
Spatiu partitie 31 Solutii
Scanare cu MalwareBytes 5 Solutii
Setari servicii sistem operare 42 Solutii
Setari retea sistem operare 25 Solutii
Setari partitii 19 Solutii
Actualizare sistem operare 15 Solutii
Clonare HDD 11 Solutii
Compatibilitate program 13 Solutii
Instalare / Reinnoire Certificate 6 Solutii
Configurare si verificare setari de BOOT 15 Solutii
Configurare Sistem de operare 1430 Solutii
Identificare DLL-uri lipsa 2 Solutii
Depanare 1024 Solutii
Editarea politicilor de grup ale sistemului de operare 13 Solutii
Drivere 50 Solutii
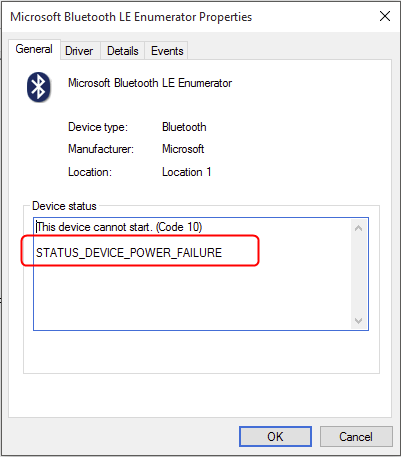
How to Fix STATUS_DEVICE_POWER_FAILURE Error in Windows 10 / 11 via Windows Power Settings
[mai mult...]How to Fix STATUS_DEVICE_POWER_FAILURE Error in Windows 10 / 11 via Device Manager
How to fully close discord
Restarting Discord isn’t as straightforward as restarting any other app. This is because Discord continues to run in the background even if you’ve closed it.
[mai mult...]How to Use Google Password Manager on Android
A password manager is a great thing to use if you want to keep your passwords secure and easy to remember. Google’s Password Manager built-in to Chrome is a popular option and it works on Android too. While we don’t necessarily recommend everyone use their browser’s password manager, it’s better than nothing. Plus, Google’s password manager has gotten a lot better over the years. If you use it in Google Chrome on your computer, you should use it on Android, too.
Before we get started, we’ll need to make sure you have Google’s password manager set as your “Autofill” service on your Android device. This will ensure that the passwords you save will automatically generate when you need to log in to an app or website.
Swipe down once or twice (depending on your phone) from the top of the screen and tap the gear icon to open the Settings.

Scroll down to the “Passwords & Accounts” section. On a Samsung Galaxy device, you’ll need to go to General Management > Passwords and Autofill.

Now select whichever service is listed under “Autofill Service.” It may already be “Google.”

Choose “Google” from the list if it’s not already selected.

Next, go back to the previous “Passwords & Accounts” screen. You’ll see “Google” listed under “Passwords.” Tap it.

This is the Google Password Manager. You can search through your saved passwords to edit the details or delete outdated ones. You’ll need to enter your security method to access any of the passwords.

At the top of the screen, you’ll see the “Password Checkup” tool. You can run this to see if any of your passwords should be improved for security.

Lastly, we’ll take a peek at the settings. Tap the gear icon in the top right corner.

Here’s where you can decide if you want Google to offer to save passwords when you enter them in apps and websites in Chrome. You can choose to automatically sign in to websites and get alerts when your passwords have been compromised.

And if you want to use the Password Manager a lot, you can add a shortcut to the home screen.

That’s all there is to the Google Password Manager. It’s not the best or most secure password manager out there, but it’s probably the easiest to use if you’re a Chrome and Android user.
[mai mult...]How to Set Up Shadowsocks With Outline
Shadowsocks is a tool that uses the SOCKS5 proxy to reroute and disguise internet traffic and thus get past censorship blocks. It was developed initially by a Chinese programmer and is thus particularly useful in getting past the Great Firewall of China, though we’ve received reports you can use it for bypassing other regimes’ blocks, too.
- How to Set Up Shadowsocks the Easy Way
Assuming you want to give Outline a shot, though, let’s get started with downloading the program. For this. For this, go to the Outline website and click on “get Outline.” The next page will show you download links for both the Manager and the Client, for now just install the Manager.

Once downloaded, open the program (for Linux you need to open the .AppImage file) and you’ll be met with a screen where you can choose the cloud service or server you’re using to route your traffic through. We’re using DigitalOcean for ours, but there are plenty of other options. DigitalOcean is the easiest option by far, though; you don’t even need to have a server ready.

In most cases, you’d have to set up your server beforehand, but using DigitalOcean all you need to do is link Outline to your account and the hard work is done for you. Just follow the on-screen prompts to authorize Outline to access your hosting account, all you need to do is choose a server location.

If you’re in China, Singapore is probably your best bet, though Bengaluru in India is a good alternative; we went with Amsterdam. Whichever location you go with, just click “set up Outline” in the top right when you’re done and the program will get started. The setup process will take a few minutes.

Once it’s done setting up, you’ll be greeted by Outline’s connection center, where you can set up connections—both your own as well as those of whomever you want to share the connection with—and track data usage. In the top right, you can also go to the settings screen to find information about the server as well as tweak functions to your liking. In our case, though, we want to hook up a device to the server, so we need to click on the icon next to “my access key.”

You’ll get a pop-up, just click “connect this device” and then make sure to copy the secure key in the next screen. After that, you’ll go to a third screen where you need to install the Outline Client. Just click “install outline” and the download will automatically start.

Once it’s downloaded, go to your downloads folder and open up the installer for the client. If it’s on the same device as the Outline Manager, the key will be automatically detected. Otherwise, you can enter it manually (in the image below, we’ve blanked part of the secure key.) Then hit “Add Server.”

Then all you need to do to connect to your new Shadowsocks server is to hit “Connect.”

You should now be able to access the internet through your new server. If you want to connect any other devices—including mobile devices, as Outline will work on Android and iOS as well—you should install the Outline Client on that device and enter the secure key. You can also create new secure keys if you want to spread security credentials around among friends and family, it’s up to you. Either way, you should now be able to browse the free internet.
[mai mult...]