“File Sharing” Synology NAS
Dorim sa share-uim un fisier sau un folder gazduit pe NAS-ul Synology cu un utilizator din alta tara fara a oferi acces la alte documente stocate pe acesta si cu o perioada limitata de timp.
[mai mult...]Soluții pentru problemele tale IT
Dorim sa share-uim un fisier sau un folder gazduit pe NAS-ul Synology cu un utilizator din alta tara fara a oferi acces la alte documente stocate pe acesta si cu o perioada limitata de timp.
[mai mult...]Lumea poate fi concediata pentru ca navigheaza internetul in loc sa navigheze fisierele excel. Si eu ma fac vinovat de acest obicei de a naviga pe oriunde in alta parte decat unde trebuie in timpul orelor de serviciu. Dar, vin cu o serie de scurtaturi pe care vi le ofer ca sa scapati de ochii curiosilor sau a paraciosilor la sefi.
Cu ajutorul acestor scurtaturi va puteti salva locul de munca, trebuie numai sa le tineti minte si sa intelegeti ce face fiecare dintre ele. Sa incepem!
[mai mult...]
There’s no way to leave email conversations if someone accidentally hits the “Reply All” button. What you can do is mute the conversation on your end to disable notifications. Here’s how to mute threads on your iPhone, iPad, or Mac using the Mail app.
To mute a thread on an iPhone or iPad, you need to be running iOS 13 or iPadOS 13 and higher.
There are two ways to do this. The first works without even opening the email. You can also mute a message from the reply menu.
If you’re in the Inbox, swipe left on an email and select the “More” option.

From the popup, tap on the “Mute” button.

The email will now have a small “Bell” icon to tell you that the thread has been muted.

If the email is already open, tap on the “Reply” button from the bottom-right corner.

Then, scroll down a bit until you see the “Mute” option. Tap on the button to mute the thread.

If you want to unmute the thread later on, follow the same process, and tap on the “Unmute” option.

Open the Mail app on your Mac that’s running macOS Catalina. Next, select an email or multiple emails. From the top toolbar, locate the “Bell” icon and click on it.

The icon will change to a bell icon with a dash across it. This means that the conversation has been muted.
You can also mute a conversation by right-clicking on an email from the list view and selecting the “Mute” option.

To unmute a thread, click on the “mute” button from the toolbar again.

This is just one of the new features in iOS 13. Take a look at our best new features list for iOS 13, and once you update, make sure to try the new Dark mode.
[mai mult...]
When you’re setting up a new smarthome, one of the easiest gadgets you can add to your arsenal is a smart lock. It’s not much harder than changing a standard lock on your home. Here’s what to do.
The Basics
For this guide, we’re installing a Schlage Encode smart lock. Even if you have a different smart lock from another brand, most (if not all) the steps will be the same. You’ll generally find three main components in a smart lock: an exterior piece that may have a keypad, lock for a key, or both, an interior piece that holds the batteries and circuitry, and the bolt that secures your door. The tricky part is connecting them all.
As a quick tip: You may have seen advice to test your smart lock before installing it by inserting the batteries to turn it on. Then you can be sure the lock powers up before it’s in the door.
That seems like sound advice, but the first time a smart lock turns on, it tests if the door is left facing or right facing and adjusts the bolt mechanism to match. Without an actual door to test against, it may guess wrong, and your install will fail to work correctly. If you want to perform this test, you should check the instructions for a factory reset process. After running the test, factory-reset the lock.
Before you can install your new smart lock, you need to take the old one out. Standard locks are easy to remove, so long as you have access to the interior of your home anyway. Start with finding the two screws on the interior thumb turn piece. Then unscrew them.

Open the door (if you haven’t already) and go to the front side of the lock (where you insert your key). The key assembly should be loose, pull that off.

Now on the side of your door, look for the bolt that slides out when you lock it. Unscrew the two screws and pull the bolt assembly out.

Now find the bolt for your new lock, and look for the top mark:

Slide the bolt into your door frame, and make sure to keep the “top” face up. Look in the door hole to see if the bolt interior centers with your door well. You’ll notice three holes in the assembly—those should be as close to the center as possible. If they aren’t, you can either lengthen or shorten the bolt (depending on the current length) to center it. Usually, you do that by twisting the bolt mechanism, but you may also have to use a screwdriver instead. Then, install the two screws to lock the bolt in place.

Next, find the outdoor assembly piece to the lock. Pay attention to the long thing bar and the electronic wire.

Insert the assembly to your door. As you do so, thread the thing bar through the middle hole of the bolt assembly. It should be the only hole the bar fits through. Carefully side the wiring beneath the bolt hardware. You want to make sure hardware won’t pitch the wiring.

If your smart lock assembly seems prone to falling out of the door at this point, we’ll be securing it in later steps. This is particularly common with tall keypads. You might consider using double-sided sticky tape to hold it in place until you can fully secure the lock.
Some smart locks include a steel or plastic plate that goes against the interior of the door. Grab that, and run the wire from the front assembly through it. Then find the two long screws and run them through the two other holds the bolt assembly to the front assembly. This will lock everything in place.
With some locks, you’ll attach the interior assembly with the two long screws without the metal plate.

Connect the wire from the outdoor piece to the interior assembly. Usually, the interior piece contains channels to run the wiring through and prevent pinching.

Once you have the wire connected, place the interior lock on the door, and secure it with screws.

Now all that’s left to do is insert your batteries. The first time your lock turns on, it will test which way the door faces. It’s normal for it to lock and unlock several times as part of that process. Once it finishes, you can start pairing your app and setting up PINs if you have a keypad.
[mai mult...]Windows Spotlight este o opțiune pentru ecranul de blocare, disponibilă în Windows 10 (Home, Pro, Enterprise etc.), care afișează diferite imagini de fundal și oferă ocazional sugestii.
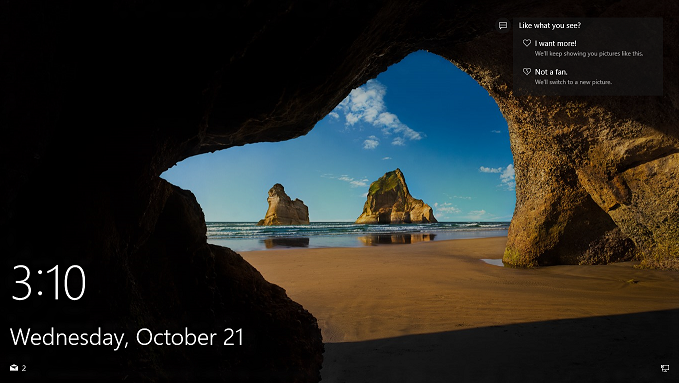
Putem dezactiva Windows Spotlight dacă urmăm pașii de mai jos.
[mai mult...]Deși Windows 10 este un sistem de operare excelent, acesta nu va fi pentru toată lumea și s-ar putea să constatați că nu vă place noul sistem de operare și doriți să reveniți la Windows 7 sau Windows 8.1 prin dezinstalarea Windows 10 și revenirea la versiunea dvs. anterioară a Windowsului.
Vestea bună este că acest proces de retrogradare este destul de simplu, mai ales dacă ai actualizat recent Windows 10 în ultimele 30 de zile.
Dacă a trecut mai mult de la actualizare sau ați efectuat o instalare curată a Windows 10 (sau ați cumpărat un computer cu Windows 10 preinstalat), atunci procesul este ceva mai complicat. În acest ghid, vom analiza toate modalitățile prin care puteți să faceți decalări de la Windows 10 și să reveniți la Windows 7 sau Windows 8.1.
[mai mult...]