OS - Windows

Depanare VPN 4 Solutii

instalare printer 50 Solutii

Optimizare pc 50 Solutii

Optimizare PC 103 Solutii

Scanare cu malwarebyte 4 Solutii

shareuire si mapare 15 Solutii

adaugare la domeniu 5 Solutii

Migrare profil 9 Solutii

Instalare/reinnoire certificate 2 Solutii

Personalizare sistem operare 274 Solutii

Configureaza si verifica setarile de boot 11 Solutii

Transfer de date 21 Solutii

Configurare OS 109 Solutii

Reparare OS 47 Solutii

Punct de restaurare OS 8 Solutii

Windows Event Viewer 6 Solutii

Reinstalare/reconfigurare VPN 8 Solutii

Optimizare client e-mail 12 Solutii

Optimizare PC 30 Solutii

Optimizare PC 20 Solutii

Reinstalare / Reconfigurare VPN 6 Solutii

Reinstalare OS 32 Solutii

Reparare sistem de operare 45 Solutii

Programare sistem operare 12 Solutii

Puncte de restaurare sistem de operare 14 Solutii

Instalare imprimanta 44 Solutii

Mapare si partajare 13 Solutii

Modificari firewall 12 Solutii

Migrare profil 8 Solutii

Transferuri de date 33 Solutii

Upgrade sistem operare 12 Solutii

Windows Event Viewer 7 Solutii

Verificare HDD 32 Solutii

Spatiu partitie 31 Solutii

Scanare cu MalwareBytes 5 Solutii

Setari servicii sistem operare 42 Solutii

Setari retea sistem operare 25 Solutii

Setari partitii 19 Solutii

Actualizare sistem operare 15 Solutii

Clonare HDD 11 Solutii

Compatibilitate program 13 Solutii

Instalare / Reinnoire Certificate 6 Solutii

Configurare si verificare setari de BOOT 15 Solutii

Configurare Sistem de operare 1429 Solutii

Identificare DLL-uri lipsa 2 Solutii

Depanare 1023 Solutii

Editarea politicilor de grup ale sistemului de operare 13 Solutii

Drivere 50 Solutii

Cum remediem eroarea: Fix Missing Runtime Libraries in Windows 11

Bibliotecile Runtime, în special cele de la Microsoft (cum ar fi Visual C++ Redistributable), sunt esențiale pentru rularea multor aplicații. Dacă primești erori de genul:

  • MSVCP140.dll is missing

  • VCRUNTIME140.dll missing

  • Runtime Error!

  • Program can't start because .dll is missing from your computer

… urmează pașii de mai jos:

Pasul 1: Actualizează Windows-ul

  1. Mergi la Setări (Settings) > Windows Update

  2. Apasă Check for updates și instalează toate actualizările disponibile

  3. Repornește PC-ul.

Pasul 2: Instalează toate versiunile Visual C++ Redistributable

Aplicațiile folosesc versiuni diferite ale Visual C++. Recomand instalarea tuturor versiunilor de la 2005 până la 2022.

Descarcă pachetul complet:

  • Vizitează site-ul oficial Microsoft sau folosește un pachet complet:

Instalează ambele versiuni:

  • x86 pentru aplicații 32-bit

  • x64 pentru aplicații 64-bit

Pasul 3: Repară instalările existente

  1. Accesează Control Panel > Programs and Features

  2. Caută toate intrările cu numele Microsoft Visual C++ Redistributable

  3. Selectează fiecare, apoi apasă Change > Repair

Pasul 4: Instalează .NET Framework (dacă e necesar)

Unele aplicații cer o versiune specifică de .NET Framework.

Verifică și instalează:

  • Accesează: Control Panel > Turn Windows features on or off

  • Asigură-te că .NET Framework 3.5 și .NET Framework 4.x sunt activate

Pasul 5: Verificare fișiere de sistem (SFC și DISM)

  1. Deschide Command Prompt ca Administrator (apasă Win + X > Command Prompt (Admin) sau Terminal).

  2. Rulează următoarele comenzi:

sfc /scannow

Apoi:

DISM /Online /Cleanup-Image /RestoreHealth

Așteaptă să se finalizeze, apoi repornește computerul.

Pasul 6: Reinstalează aplicația cu eroare

Dacă eroarea apare la o anumită aplicație:

  • Dezinstaleaz-o complet

  • Șterge fișierele rămase (opțional, cu Revo Uninstaller)

  • Instaleaz-o din nou de pe sursă oficială.

[mai mult...]

How to manage Quick Actions on a Mac

Over time, as you keep creating new custom Quick Actions, your Mac’s Quick Actions can become cluttered due to too many Quick Actions. You can prevent this by disabling the Quick Actions you don’t use regularly.

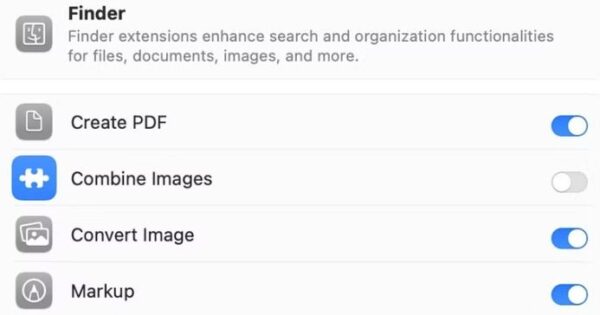
To manage Quick Actions on your Mac, launch the “System Settings” app. Go to “General,” scroll down, and select “Login Items & Extensions”.

Scroll down to the “Extensions” section and click the “i” button next to “Finder.” You should see a list of all the built-in and custom Quick Actions you currently have on your Mac. Flip the toggle next to a Quick Action off to disable it and hit “Done”.

In the future, if you need to use this Quick Action again, you can enable it. Head back to the same page and toggle on the switch next to it.

[mai mult...]

How to use Quick actions on a Mac

As soon as you create a Quick Action—using either method—it’s automatically added to the Quick Actions menu on your Mac, ready to use.

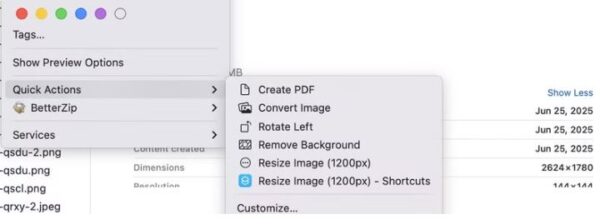
Head over to Finder or the desktop—wherever you have the files you want to work with stored. Select the file on which you want to use a Quick Action; you can choose multiple files, too. Now, right-click (Control-click) on your selection, select “Quick Actions,” and click the Quick Action you want to use.

Alternatively, you can click on the Quick Action you want to use in the Preview pane. You need to enable the Preview pane for this to work. Open Finder and go to View > Show Preview, or press the Command+Shift+P shortcut.

Similarly, if your Mac has a Touch Bar, you can execute Quick Actions from it as well. However, you’ll need to configure it first from the Touch Bar settings.

Depending on what Quick Action you just used, it may work in the background, apply changes to the selected files, and save them automatically. Or it may ask for your input. The Convert Image Quick Action is a great example of this. When you run it, you’ll see prompts on your screen asking you to select the desired output format, among other things. Make the appropriate selections, and the Quick Action will complete the operation and save the file.

Unless you’ve opted to preserve the original file while creating a workflow (in Automator or Shortcuts), the Quick Action will overwrite the original file and save it in the same location.

[mai mult...]

How to create custom Quick Actions on a Mac

Creating a Custom Quick Action in the Automator App

Automator is a built-in macOS app that lets you create workflows to automate repetitive tasks on your Mac. While creating workflows often requires a good understanding of programming languages, Automator employs a simple approach, wherein you drag and drop actions to stitch them together and create workflows.

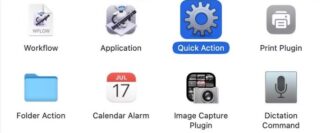
To create a Quick Action, launch the Automator app under Applicatons > Utilities. Click “New Document,” and when prompted to set the document type, select “Quick Action” and hit “Choose.”

In the workflow area, set the Workflow Receives Current action to “Image Files” in “Finder”

Now, in the Actions sidebar, select “Files and Folders” and drag and drop the “Get Selected Finder Items” action to the workflow area on the right.

Next, select “Photos” in the Actions sidebar and drag and drop the “Scale Images” action into the workflow area. Automator will prompt you to add the “Copy Finder Items” action to your workflow to preserve the original files. Click on “Add” to allow this and specify a destination folder for the files, or hit “Don’t Add” to overwrite the original files.

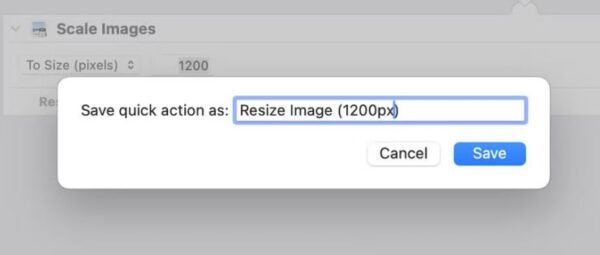
Once done, in the Scale Images action, enter the size (in pixels) you want your images resized to in the text field next to the “To Size” dropdown. Note that this value is essentially the maximum size of the longest side of the image, meaning it could be the width (for a landscape image) and length (for a portrait) image.

Finally, with all the actions added, save the Quick Action. Go to File > Save, or press the Command+S keyboard shortcut. Give a name to this service and click “Save”

If you ever want to edit the Quick Action in the future, open the Finder app and press the Command+Shift+G shortcut to access the Go to Folder window. Type in ~/Library/Services, and you’ll see all your Automator Quick Actions.

Control-click on the Quick Action you want to edit and select Open With > Automator.app. This will open the Quick Action in an Automator window. Make the changes, and don’t forget to save them.

[mai mult...]

Cum instalați și integrați Google Gemini CLI în Windows

Există o nouă agitație în jurul platformei Google Gemini, deoarece Google a făcut un pas important pentru dezvoltatori, administratori de sistem și utilizatori de CLI puternici.Aceasta este o interfață de linie de comandă care aduce caracteristicile AI ale Gemini direct în terminalul dvs. Dacă lucrați în VS Code, Git Bash sau Windows Terminal, Gemini CLI va aduce un nou nivel de productivitate pentru devs și alții.

Gemini CLI este un instrument de linie de comandă open-source dezvoltat de Google care vă permite să interacționați cu modelele AI Gemini utilizând limbajul natural, direct din terminal.

Modelele Gemini(cunoscute anterior ca Bard) reprezintă familia Google de modele generative de inteligență artificială. Acestea sunt similare cu GPT de la OpenAI sau cu Claude de la Anthropic. Cu ajutorul CLI, puteți:

  • Să puneți întrebări și să primiți răspunsuri în linie în terminal.
  • Să generați și să explicați fragmente de cod.
  • Să traduceți comenzi între Bash, PowerShell și alte shell-uri.
  • Să refacționați scripturi sau fișiere de infrastructură ca cod.
  • Să generați mesaje de confirmare pe baza diferențelor git(utilizând funcția gemini commit).
  • Să primiți ajutor în linie atunci când lucrați cu instrumente complexe(de exemplu, kubectl, terraform, docker).

În loc să comutați înainte și înapoi între un tab de browser și terminal, Gemini CLI acționează ca asistentul dvs. AI. Acesta este încorporat în instrumentul din care lucrați în mod nativ.

[mai mult...]